 Lenka's Way of Lace
Year of the Fire Horse
Posted on February 26, 2026
February 2026
First time I heard about the Year of the Fire Horse was twenty years ago. In one of the chance encounters that make artistic life so interesting, I met a writer and a film director Julia Kwan, who was then promoting her new feature film “Eve and the Fire Horse”. A sweet and gentle story about a gifted nine-year-old girl growing up in a Chinese immigrant family in Vancouver opened hearts of local audiences, because it allowed us to see the challenges of our mixed multicultural society through the eyes of an innocent child. Eve used her wild imagination to process influences coming from all sides and make sense of the world around her. She was born in the year of the Fire Horse, which happens only once in sixty years, and according to the old Chinese superstition brings misfortune and troubles to girls. Eve’s vivid dreams blend with reality as she creates her own world of wonder, acceptance and love.
This introduction prompted me to look at the Chinese Lunar Calendar and I was surprised by its long tradition. For millenia, before it got corrupted into a mere superficial fortune telling, the calendar offered a very complex guide based on a Taoist view of the world and the Universe. The system was devised to help people understand and balance their existence in harmony with the planetary cycles. Twelve archetypes symbolized by the animals interacting with five earthly elements explain a multitude of possible energy manifestation in material and spiritual realms. The calendar still holds the ancient wisdom for seekers of today. In comparison, our modern calendar seems rather soulless, as the time is now being kept by exceedingly precise machines that have absoulutely no interest in human life.
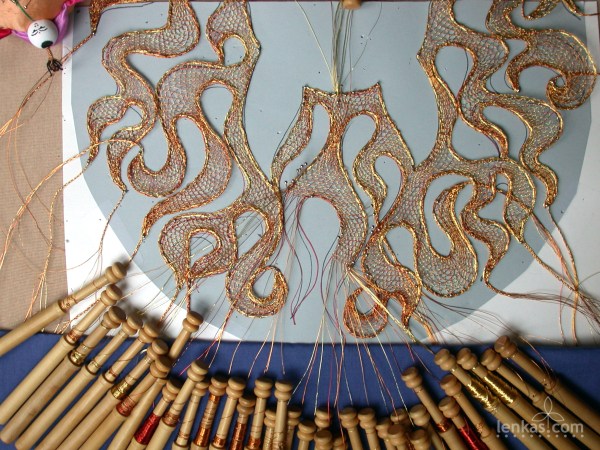
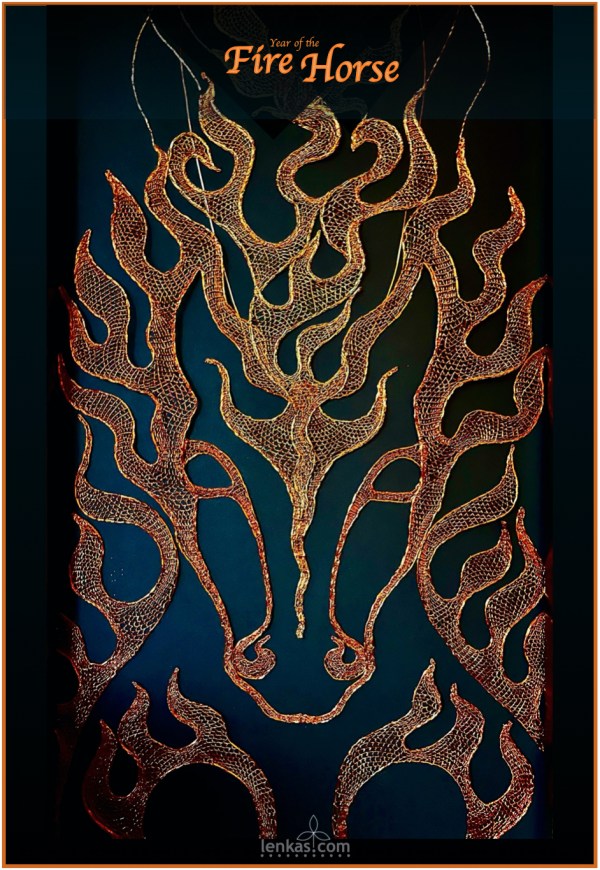
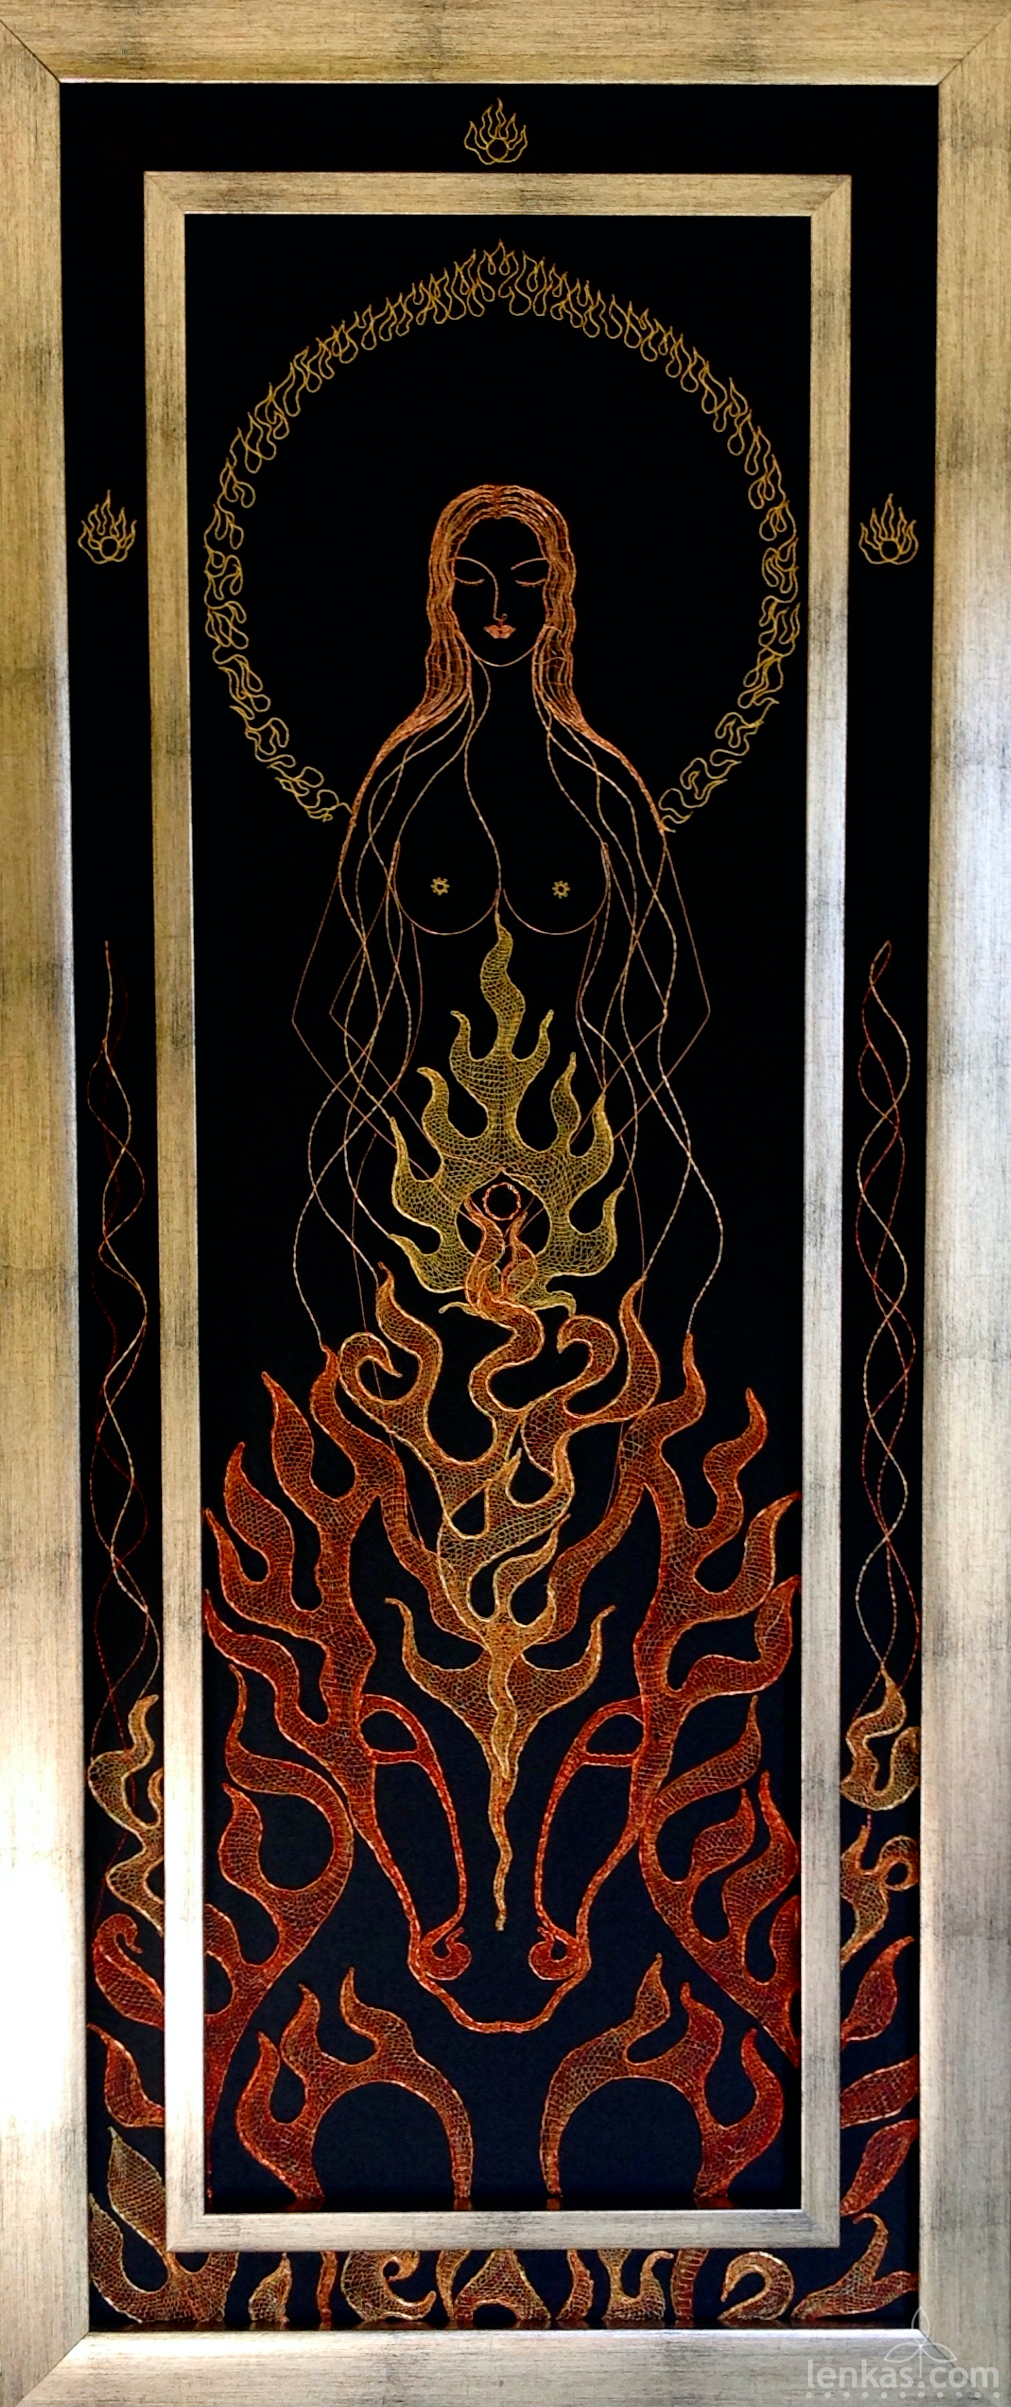
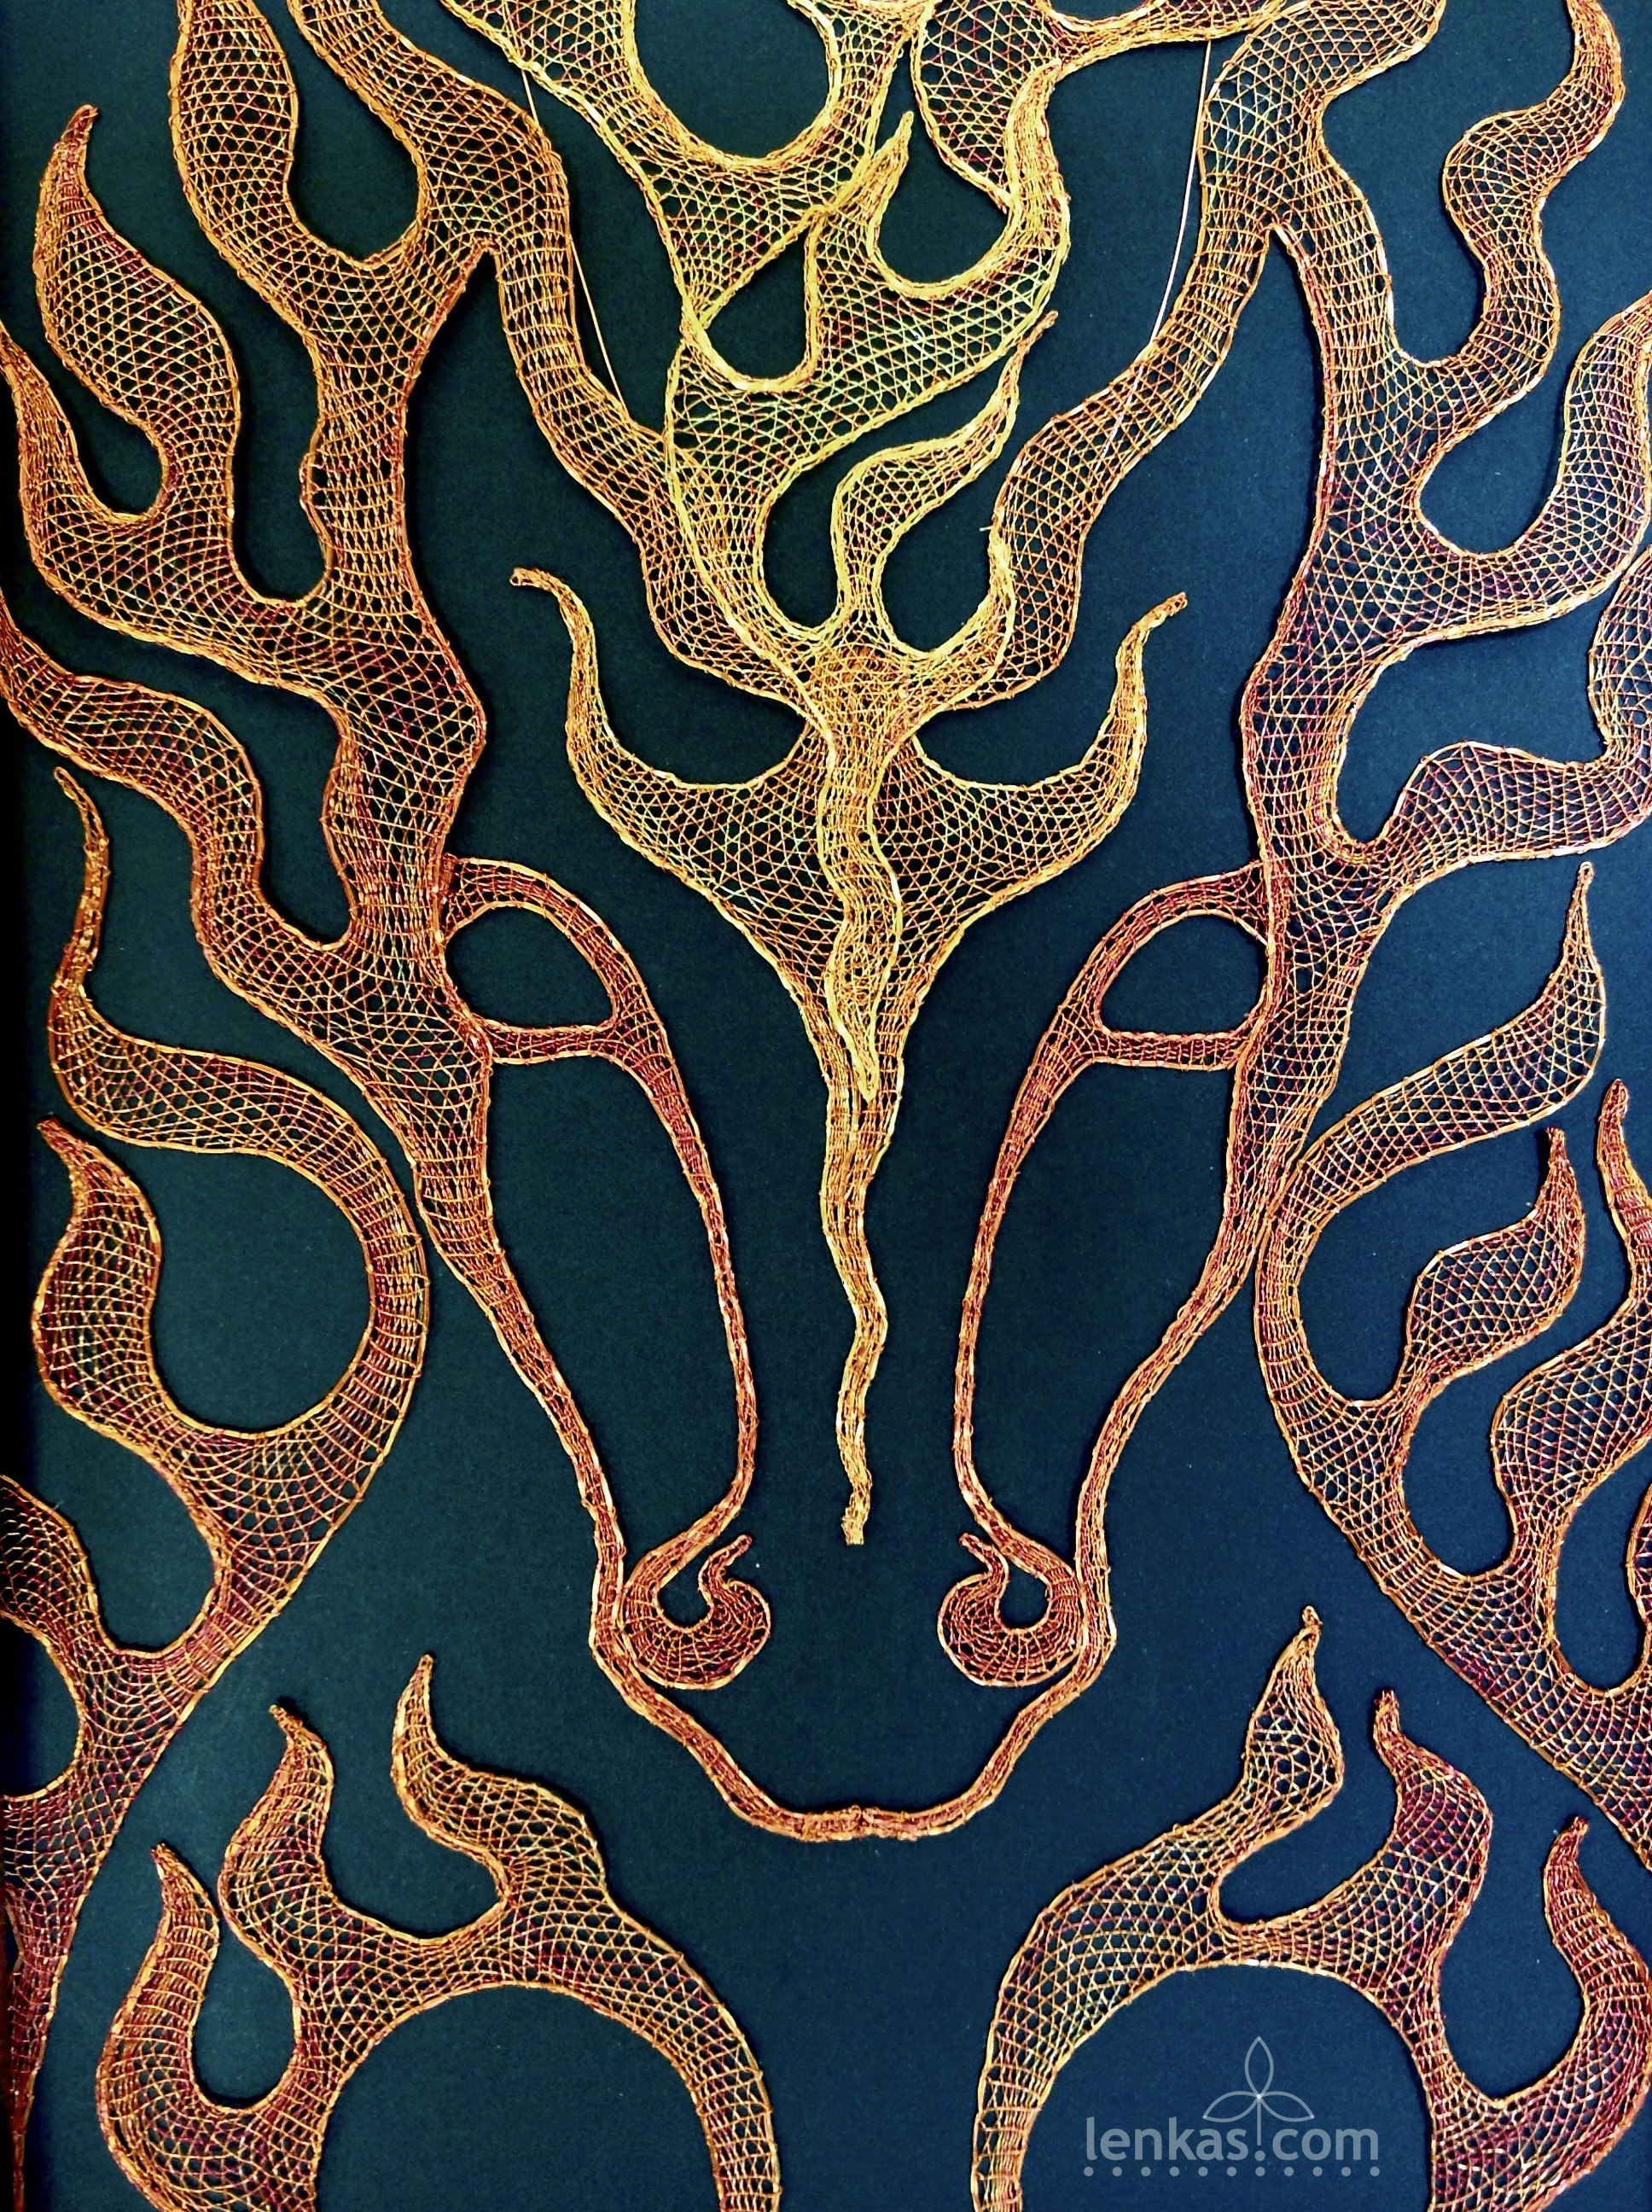
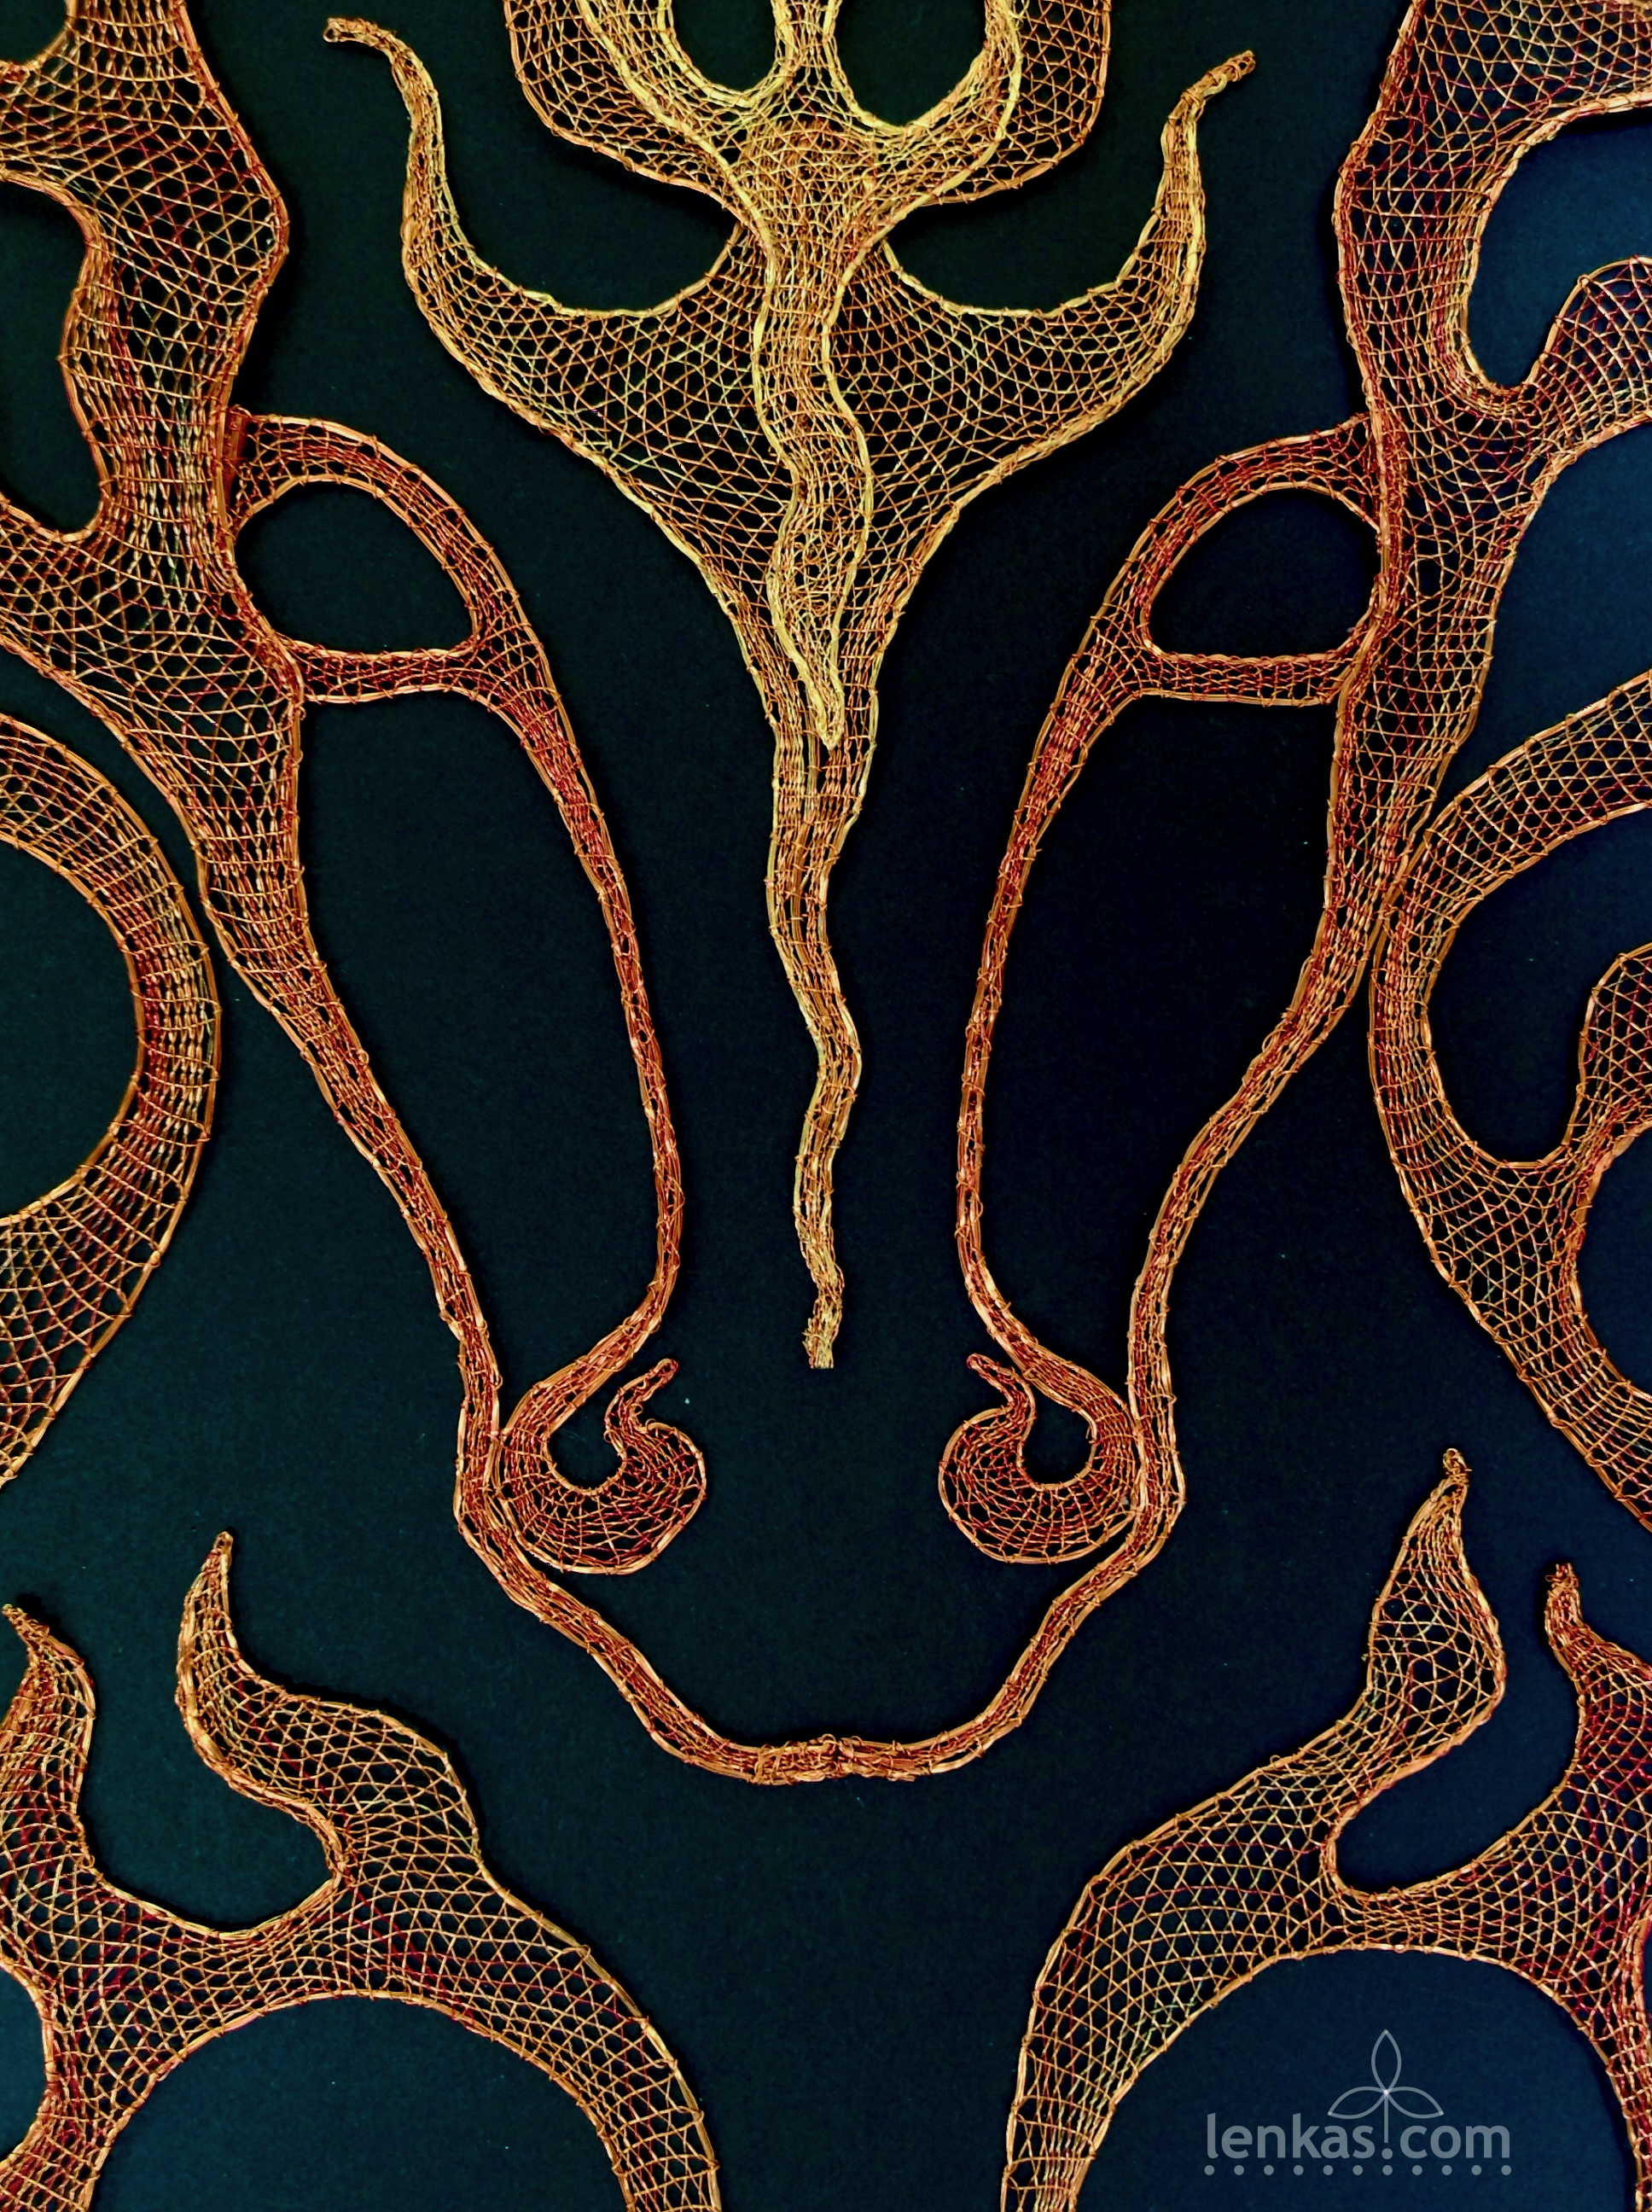
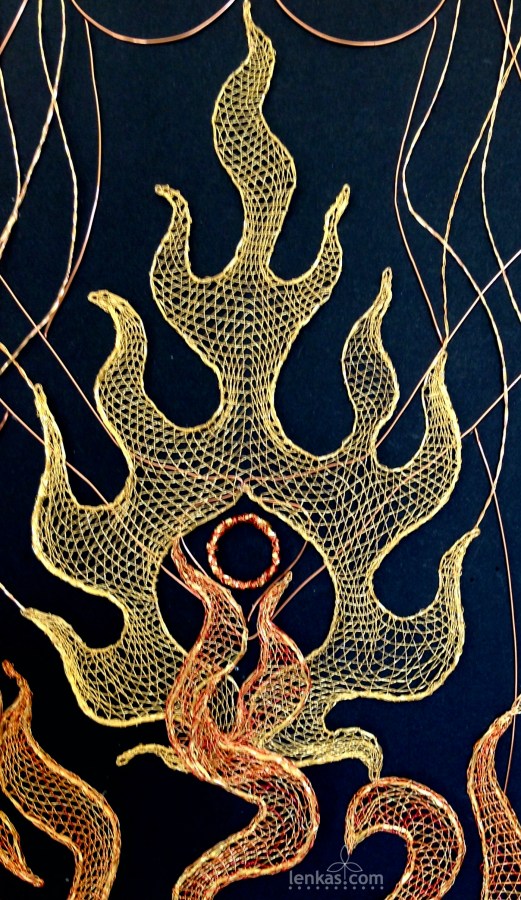
The second encounter with the Fire Horse came years later, when I was working on the third panel for the Venus Triptych, dedicated to the Divine Feminine manifestation through the fire element. In the ancient European mythology, the fire horse represented destruction and at the same time purification that prepares grounds for renewal. It was a very interesting project. Wire in multiple colours blended in a simple half stitch pattern, creating a fiery surge against the dark negative space. I still remember the intensity of the work so focused that it at times felt like being consumed by the flames. Interestingly, when the viewers look at the picture, they often see the flames, without noticing the horse. Once they realize it is there, they can’t take their eyes away from the fiery creature.
The third rendezvous is happening now: the Year of the Fire Horse just started and it will undoubtedly bring a lot of raw energy and many passionate moments. While the sheer power of the fire element in high speed motion might seem frightening, with the right intention and focus it can be harnessed to deliver profound transformations.
We are in for a wild ride !
Happy Birthday, Julia !!
And a happy, visionary and fertile year to all fearlessly creative artists, including the gentle but high-spirited lacemakers !!!
Year of the Snake
Posted on January 28, 2025
January 29, 2025

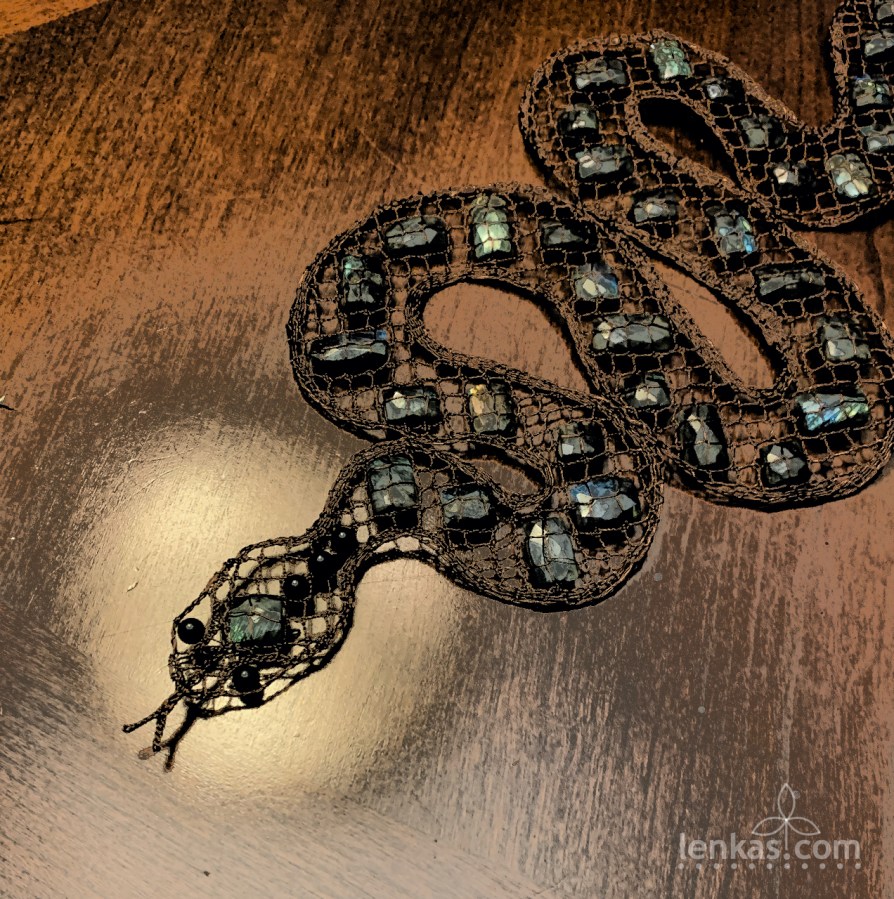
Snake in enamelled copper with labradorite stones – tape lace with torchon ground filling.


The Year of Old Wise Trees
Posted on December 30, 2024
December 30, 2024
I am pleased to conclude the 2024 blog with a post about a new addition to the Old Wise Tree Gallery – a picture that is especially well suited for marking a transition from the old to new year.
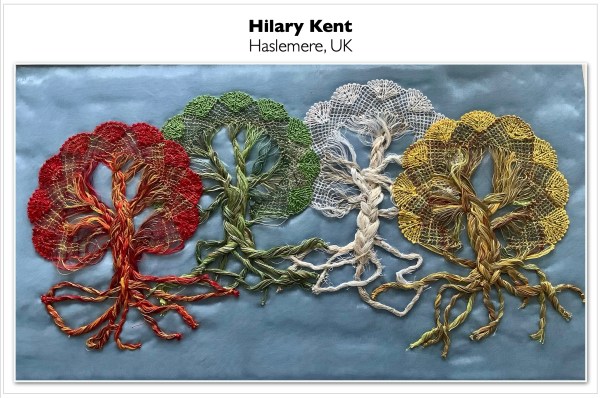
Hilary Kent from Haslemere in the UK shared a photograph of her Old Wise Tree creation: Four trees framed together in one picture as a beautiful illustration of the passage of time. Each tree, woven in multicoloured threads to a visually dramatic effect, is a unique artwork – original, bold and expressive. Daring choice of colours lends a distinctive character to individual trees. From subtle white and ecru threads, through soft greens, earthy yellows and browns, to flaming reds, the gradation of colours achieves a striking effect. All together, the trees create a harmonious whole. With their crowns overlapping and roots connecting, they seem to be morphing one to another in a natural progression of time.
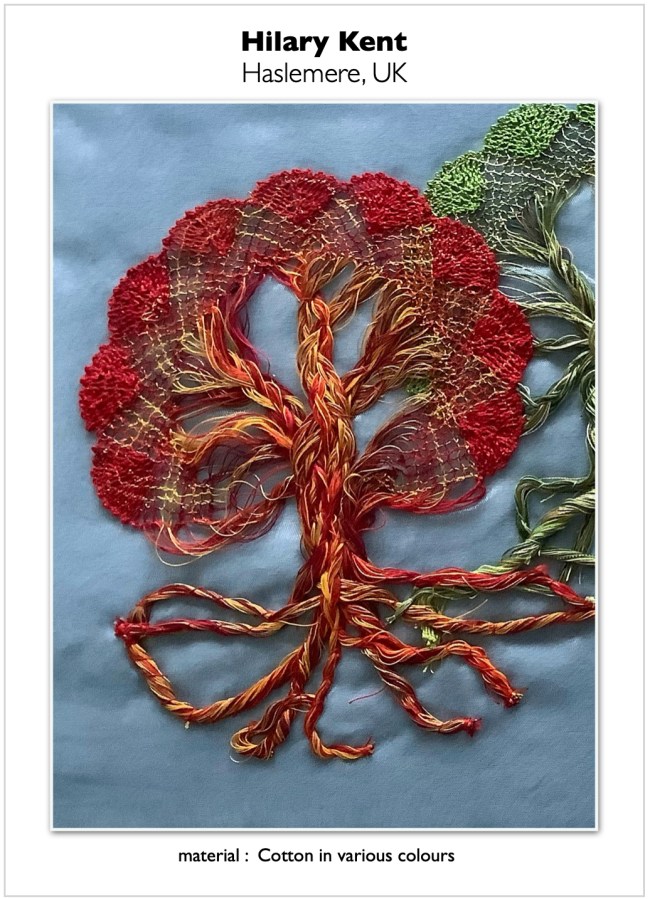
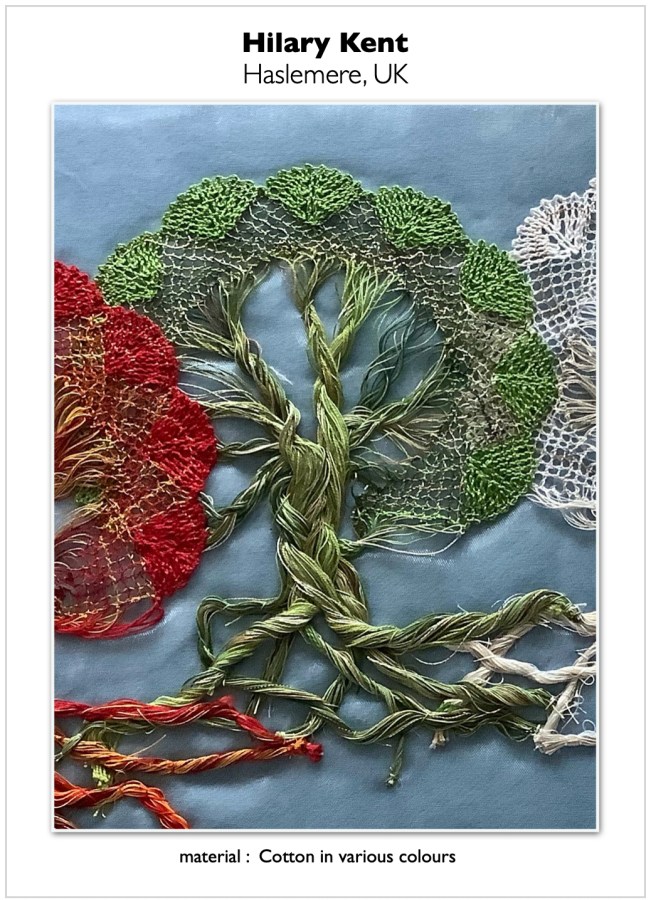
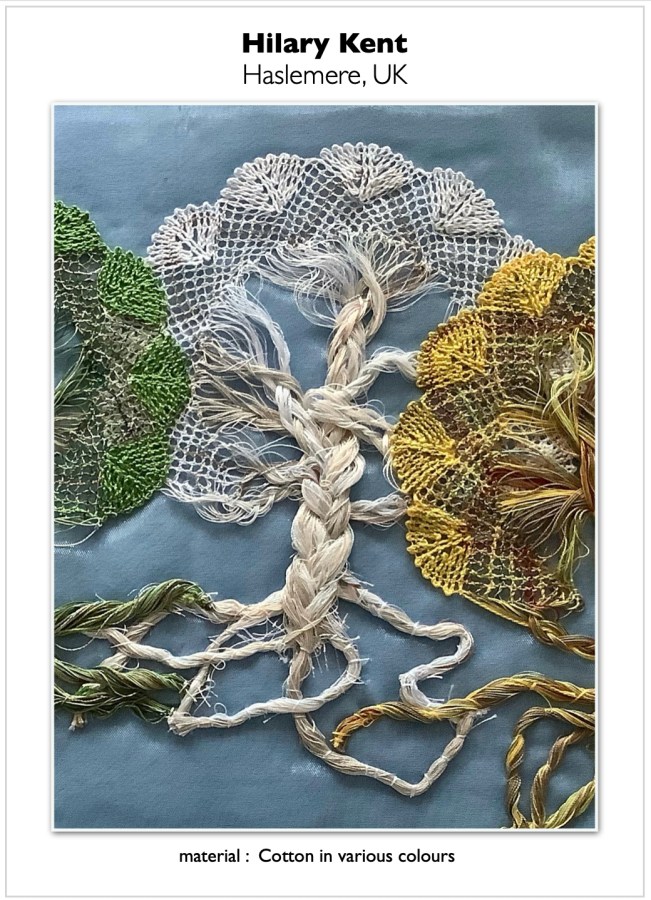

It pleases me greatly to see a well made polychromatic lace. Looking at the craft evolution I think that the most important contribution of the modern era is the use of colours. With a few regional exemptions (e.g. in Russia, Slovakia, Spain, South America,.. ) hand made lace was traditionally made in white, ecru or black, and previous generations of lacemakers and lace designers achieved an ultimate mastery of expression in those sole colours. From the height of their accomplishments the handmade lace production began to decline as the industrial revolution conquered Europe. Ensuing two terrible world wars could had seen the fine lace craft completely eliminated, but it was not to be. Lace was reborn in the hearts and hands of artists who envisioned a bright, colourful future for the craft, as a part of the new textile art movement. They succeeded, and it is an honour and joy to continue on the path to expand the creative horizons of handmade lace. Current generation of lacemakers has such wonderful choice of materials in myriad of colours, from linen, cotton and silk to manmade fibres, and – yes – even wires. All we have to do is use them!
Thank you, Hilary, for sharing your unique lace creation. Seeing your work, and all other Old Wise Trees in the exclusive online gallery, gives me confidence that the wisdom of old trees and and old lace is not lost to those who seek and create…
Cheers to an imaginative, inspired and colourful new year!
Lenka
The Free Old Wise Tree Pattern and Tutorial was published on this website on January 16th, 2021.
As of Dec 30th, 2024, the Old Wise Tree Pattern and Tutorial page has been viewed 14,857 times
3137 visitors downloaded the pricking
41 artworks from 8 countries have been submitted to the Old Wise Tree Gallery
Everybody is welcome to use the free Old Wise Tree pattern and create an original interpretation of the theme!
If you do, please consider sharing your creation with the world – send a photo of your tree with following information to this email address: old.wise.tree@lenkas.com
Your Name + City / Country + Materials used + Pricking size (if different than the original 100%)
+ Optional: Notes (any specific information you would like to add)
Disclaimer: By submitting the photo/s and requested information you agree that your work will be displayed in the Old Wise Tree Gallery hosted on this website.
Happy lacemaking!
Year of the Wood Dragon
Posted on February 10, 2024
February 10, 2024
Living and working in a truly multicultural place (Metro Vancouver, Canada) we are lucky to learn and experience traditions that people from all around the world brought with them to their adoptive country. Chinese New Year celebration is one such example, a joyous and vibrant tradition that survived millennia of turbulent evolution. Based on a lunisolar calendar, a complex system combining earthly and universal events, the ancient Chinese visionaries attributed certain qualities to each year and predicted their influence on people at many levels, from spiritual to material.
Yesterday’s New Moon ushered in the Year of the Wood Dragon.
* The Dragon is a majestic creature in Chinese folklore, symbolizing bravery, creativity and innovation. Dragon people (those who were born in a Year of Dragon) are charismatic, ambitious, adventurous and fearless. They have confidence and independence, and are not afraid to pursue their dreams.
Therefore, the Year of the Dragon in 2024 is expected to be a time of visionary leaders and problem solvers. It is also predicted to be a great year to start new projects and explore new opportunities.
In the Year of the Wood Dragon 2024, the fixed element of the Dragon is Earth, which represents stability, honesty and loyalty. The variable element is Yang Wood, which represents growth, vision and flexibility.
The rare combination of the dragon’s power and the wood’s creativity brings a potential to pursue one’s dreams, express ideas and expand horizons. It is also a year to be generous, compassionate and inspired.*
What more can we wish for?

I like the sky roaming dragons so much that I even made one in lace. Envisioned as a wild wearable piece, it took a life of its own and eventually found a place in my friends’ eclectic art collection. After they had it properly mounted by a master framer, I was really surprised how the Dragon came alive in the custom setting. And pleased to know that it did not fly too far away from me!
Thank you, Lulu and BP, I remain grateful for your patronage 🙂

I look forward to a full year of creative energy and can’t wait to see what the Wood Dragon brings to the world, and to art of lace in particular!
*Source: https://www.thechinesezodiac.org/year-of-the-dragon/
Divine Harmony: Offering to Mother Earth and Father Sun
Posted on November 19, 2023
November 19, 2023
Frame:
Reclaimed red cedar – designed and made by Colin Hamilton of Thuja Wood Art
Handmade Bobbin Lace:
Enamelled copper wire, silk, wool
Semi-precious stones and beads:
Chrysocolla, Calcite, Citrine, Aventurine, Sunstone, Garnet, Serpentine, Quartz
Dimensions in centimetres: h:50 x w:50 x d:10
Dimensions in inches: h:20 x w:20x d:4
~
This work completes a series of offerings dedicated to the magnificent Nature, in a creative collaboration with Colin Hamilton of Thuja Wood Art. Colin’s work is deeply rooted in the West Coast tradition, while my metal bobbin lace evolved from centuries old European craft. Unexpected meeting of two very different disciplines resulted in a unique, one-of-a-kind body of work: ‘Offering to the Tree of Life’ (2015), ‘Waves: Offering to the Moon’ (2015), ‘West Coast Mandala’ (2017), ‘Red Berries’ (2019), and finally, the ‘Divine Harmony’ (2023).
It took a long time to bring the last work to fruition. When Colin delivered the frames, one in particular caught my attention. It had a strong base and arch that seemed to protect a womb-like inner space. Raw edge on the outside contrasted beautifully with finished wood, in colour as well as texture. Overall, the frame was so well balanced, and so inviting, that I thought right then that it will become a special piece.
As time went by, one by one the wood/lace sculptures were completed and sent off to the world. The last frame seemed content sitting empty on my studio bench. I imagined that the wood must have been from a tree that lived a long life, then drifted in the Pacific ocean to reach Gulf Islands, dried on the beach there, and waited for Colin to salvage it and use the reclaimed wood for the frame. What a couple of years could mean in its life cycle? That perspective gave me freedom to wait for the right idea. Because the simplest things are sometimes the most difficult to express in art.

On New Year’s Day 2020 I took a photo while strolling in an urban forest in my neighbourhood. It was a peaceful day, ideal for contemplation. Admiring nature’s contentment and ability to maintain equilibrium regardless of season, weather or time, I wondered if it is possible for a man to live that way, too – in balance, instead of struggling in self-created chaos. The serene moment became an inspiration for the final Offering.
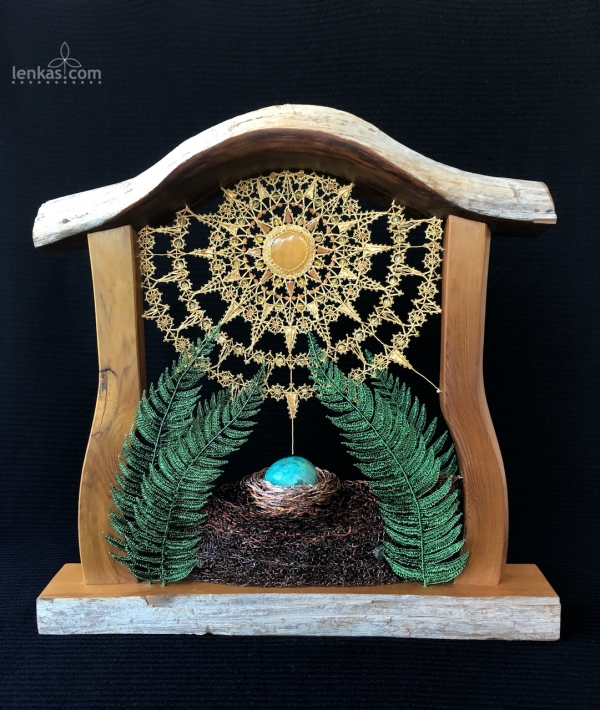
‘Divine Harmony: Offering to Mother Earth and Father Sun’ is a tribute to the two forces that permeate all that is, on our planet and in the whole universe.
Called by Indigenous North Americans Father Sun/Sky and Mother Earth, and in many cultures by other names – Shiva and Shakti, Yin and Yang, Pachamama and Inti, the Creative and the Receptive, Ida and Pingala, Masculine and Feminine – they are the two fundamental energies which exist and work together. They are of opposing qualities, but not antagonist. Being different, they compliment and complete each other. When they are in balance, life happens.
As my time for lacemaking became limited due to unprecedented circumstances, the months working on the “Divine Harmony” turned into years. Despite the slow progress, or maybe because of it, I enjoyed every moment at my drafting table and lacemaking pillow. Lost in lace and in space, I learned a lot about the fine lace craft, and even more about myself and the source of my profound need for balance and tranquility.
Mother Earth
Starting form the ground…
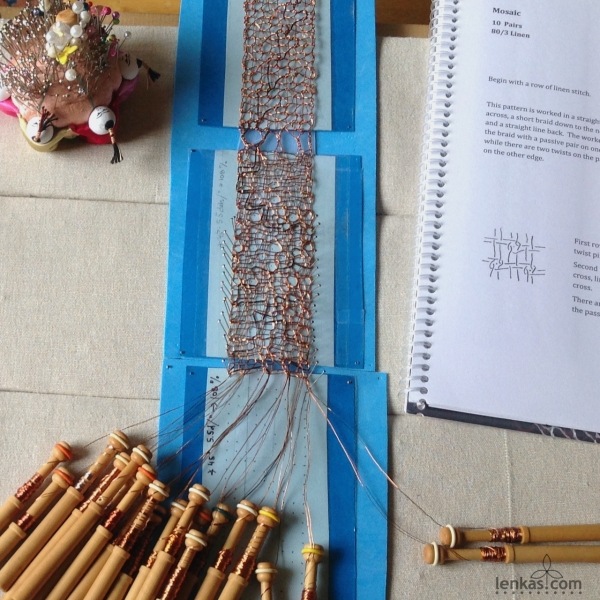
The Earth’s strength lies in the ground, and there is nothing more important than the soil cover. It holds all resources for life to flourish. Everything grows from the soil and returns to the soil in an infinite cycle. Soil is the most amazing complex of organic and inorganic matter living in total synergy, hidden under the surface, yet influencing everything above. I was looking for a pattern that is structured yet fluid, like a weave of roots, and I found it in an experimental and very interesting book ‘Using Modern Grounds’ by Michèle Kelly.
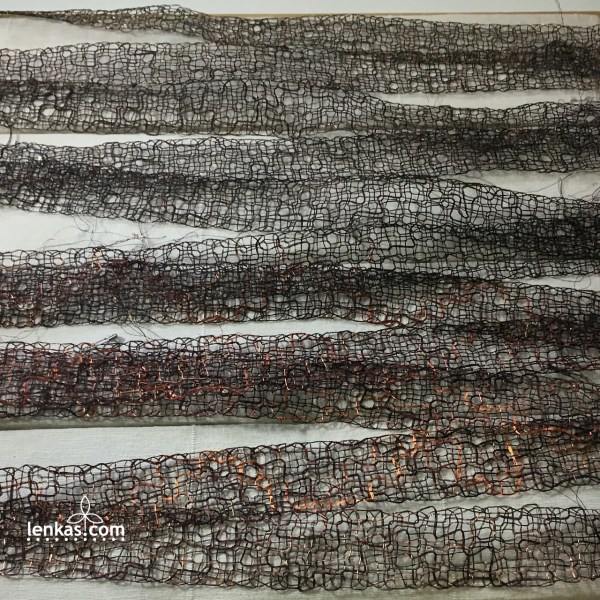
The Mosaic pattern was fun to make and allowed me to play with texture and colours. Mixing black and brown wires in multiple strands of three to six ply in random order produced an organic texture in variegated colours that were changing along the length of the lace. Once the pattern was committed to memory the work became pleasantly rhythmic, with bobbins flowing and gently clicking. Unlike traditional lace grounds, this pattern is worked in horizontal rows. Wire provided good support the open structure, so I was able to omit the interior pinholes and place pins only at the foot sides, which sped up the work considerably. Six yards were needed for building a strong ground foundation of the sculpture. The work on this pattern was so pleasant that I almost regretted reaching the required length rather quickly.
The finished yardage was folded and shaped to create a dense soil. Between the layers, I enclosed a handful of raw semi-precious stones (garnet, citrine, serpentine and quartz). While the minerals are hardly noticeable in the dense weave, their presence grounds the earth and infuses it with strong energy patterns.
In the centre of the soil a shallow recess was prepared for the nest.


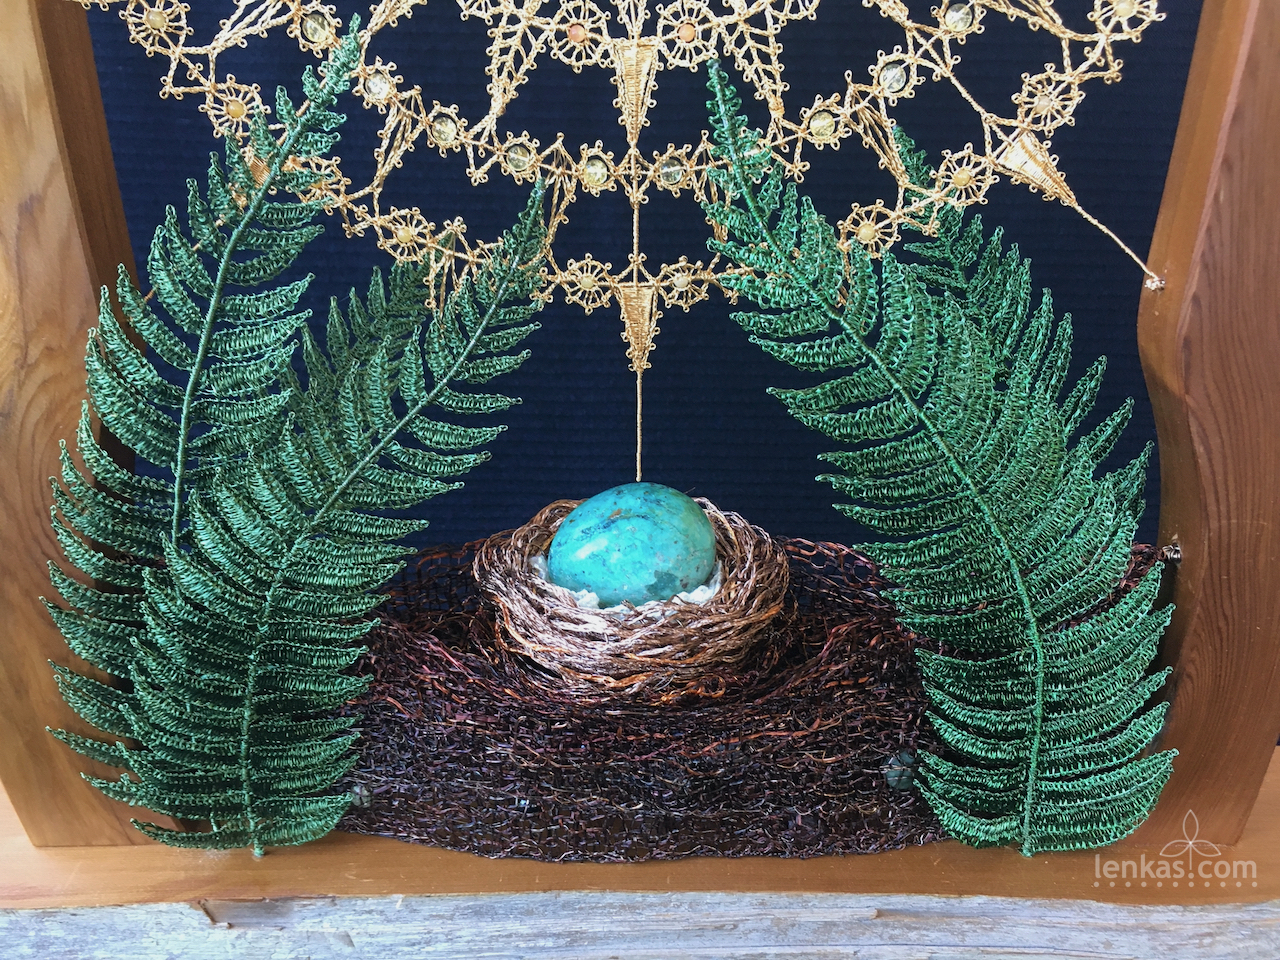
Growing ferns…
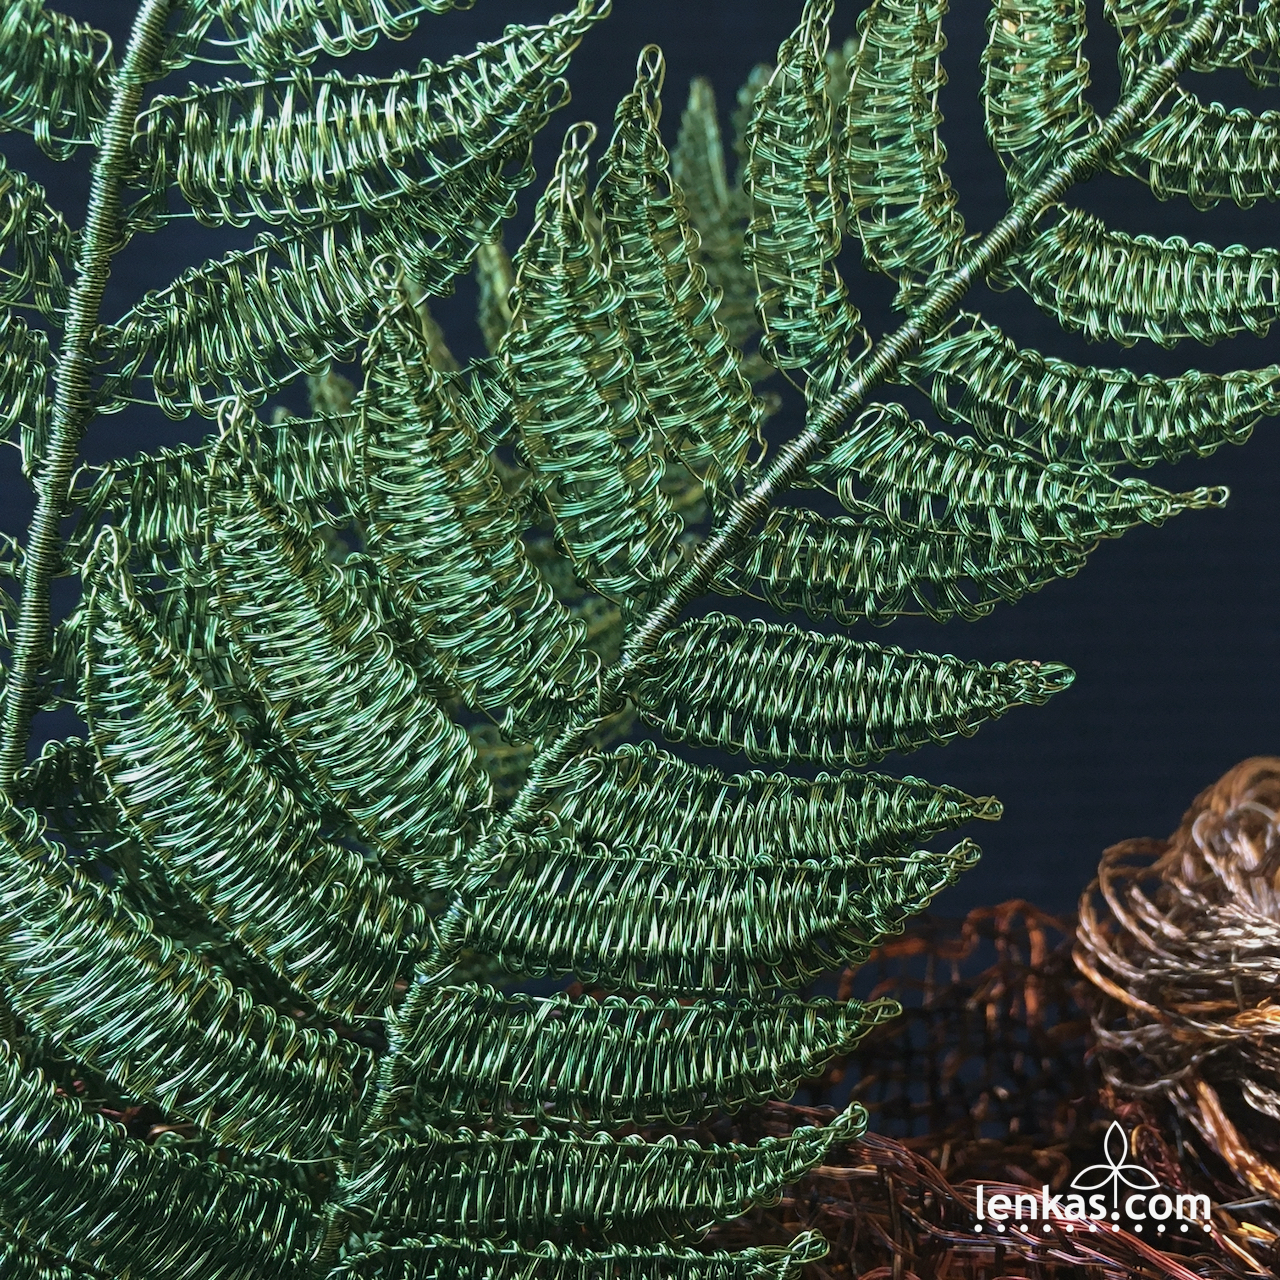
Coastal Mountains forests are full of ferns. A diverse species of ancient origin, these plants thrive in our humid climate and grow everywhere, gracing the landscape with cascades of fronds in many shapes and shades of green. Despite not producing flowers, ferns are very beautiful, ornamental, and prolific. Many stay lush all year around and provide microhabitat for various other plants as well as animals.
Fern leaves made in wire are an attestation to the potential of free style lace design. With just four pairs of bobbins, and a lot of patience, the lace fern grows and unfurls, one leaf at a time. This very slow process leads not only to a total tactile and cerebral satisfaction but also to deep appreciation of all Earth’s creation. In the Offering, the ferns play an important role of providing a protected space for a new life.


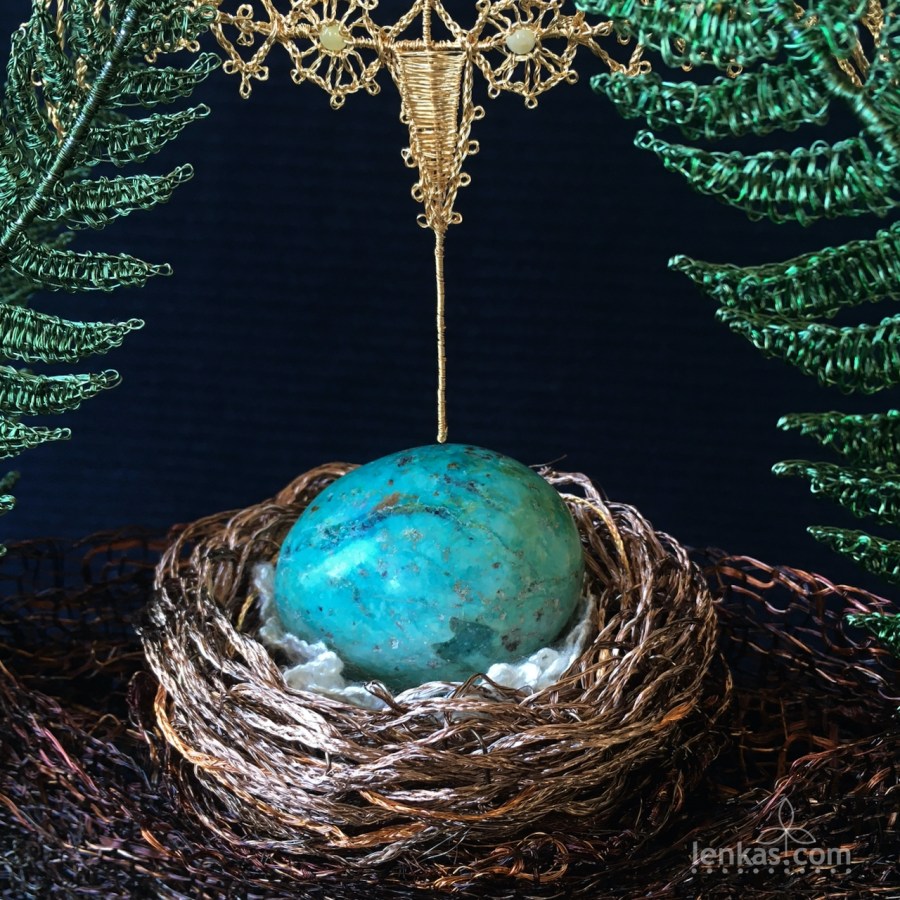
Building nest …
With the foundation laid, it is only a matter of time for a nest to be built. As opposed to real nests made by birds, the expert builders with highly specialized skills, mine was pretty simple, constructed from long plaits, wound and interwoven together. To make it more welcoming, I lined the bottom of the nest with lace made from wool and silk fibres.

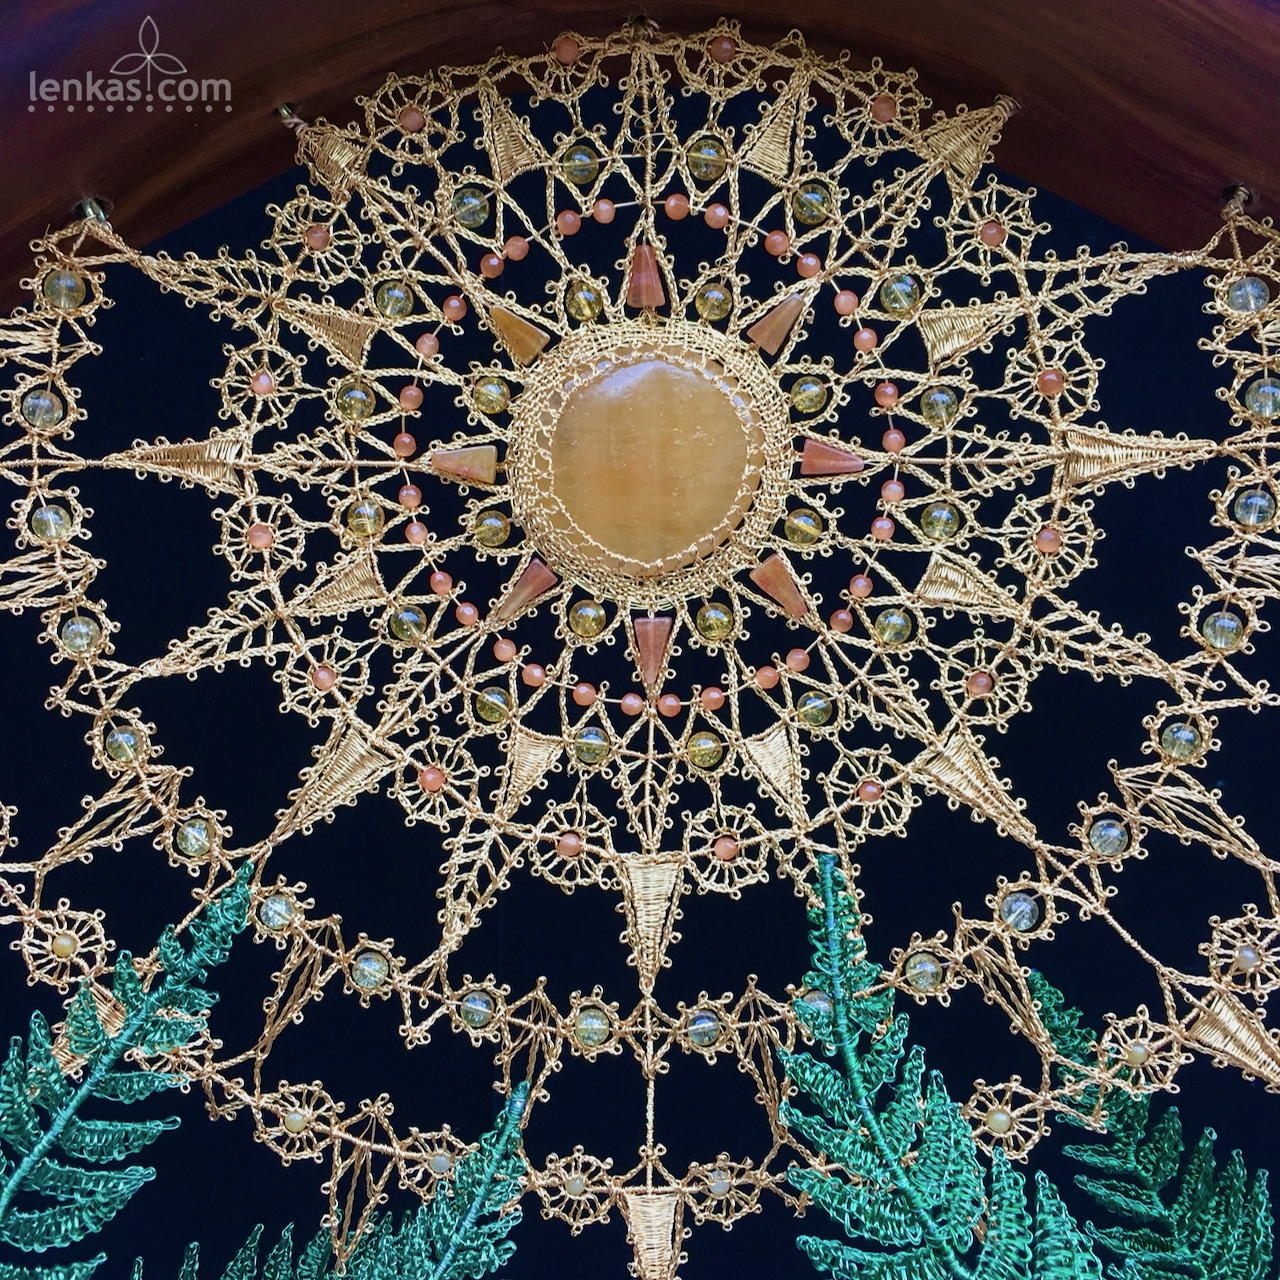
Father Sun
Temperate rainforests of the Pacific Northwest are humid and cool. When the sun penetrates a dense tree canopy, its warm rays are received with deep reverence by the earth, animals and people. Sun is precious, and therefore worshiped as the vital force.
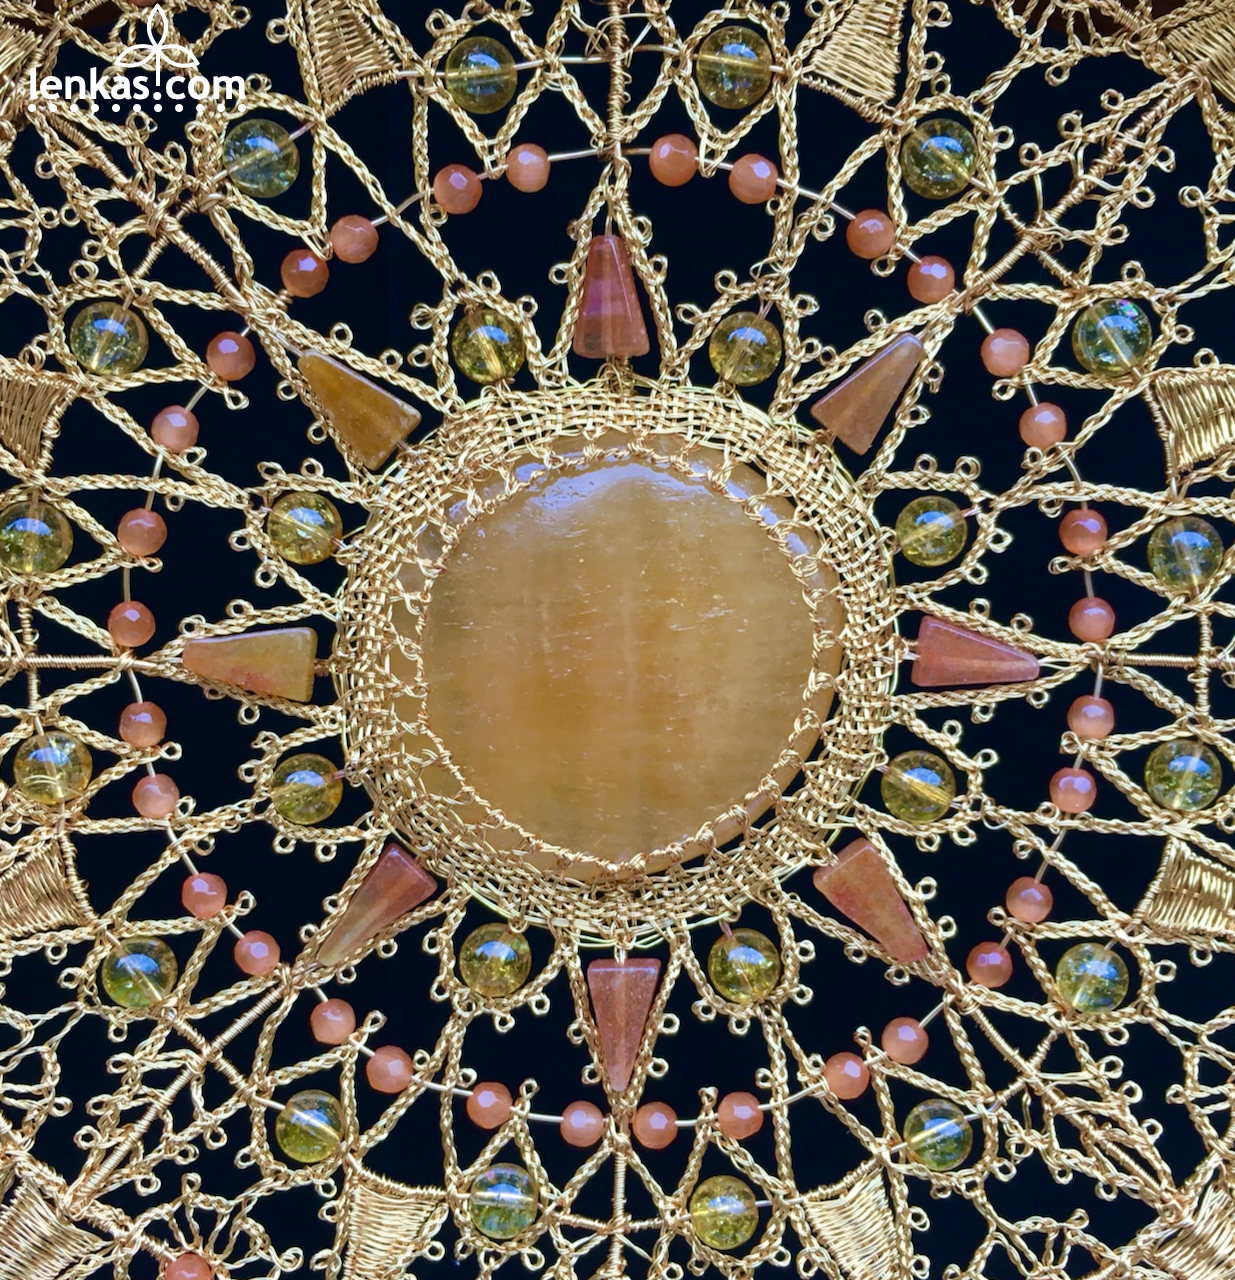
How to express a venerated sun in the language of lace? I reached deep back in time to the old Italian tradition. Originated in the Renaissance, plaited laces of Venice and Genoa epitomize the spirit of an exceptionally fertile historical period. Art and science then merged in a great creative surge and propelled Europe from medieval to modern era. Five centuries old Italian designs have lost nothing of their beauty and vitality, and today they lend themselves exceptionally well to the wire medium. I love their geometrical patterns of plaits and tallies, and their fearless expansion into empty space. They seem to be made for wire and I couldn’t envision a better form for the Sun.


Natural calcite, citrin, aventurine and sunstone enhanced the gold colour copper wires to represent qualities of the creative force: power, light, potentiality. The sacred geometry inherent in the pattern directs the energy from its source out, through waves of concentric circles and along the sun rays stretching towards the Earth.

New Life
When Father Sun reaches the receptive Mother Earth, a miracle of life happens.
Symbolized by a chrysocolla egg, the new life originates from both fundamental energies: the creative and the receptive, light and dark, masculine and feminine, the cosmic and the earthly. Therefore, it is complete, perfect and faultless.
It is humbling and at the same time uplifting to realize that humanity has the same origin.
I offer the ‘Divine Harmony’ with heartfelt gratitude to the Mother Earth and Father Sun for their boundless, immeasurable Love. With each sunrise we are given a new chance to witness their magnificent creation and through it comprehend Life and Truth.
I believe that without such introspection humanity cannot solve current problems and conflicts, and The ‘Divine Harmony’ is my prayer to bring forth the fundamental law and honour the dignity and possibility of our existence.


I am grateful for being able to realize this work despite the challenging times, and thus completing the latest chapter of my lacemaking journey.
Thank you for reading this very long post. If you find it worthwhile, please share with your friends.
Lenka
Offering: Red Berries
Posted on March 26, 2019

Frame:
Cedar driftwood (designed and made by Colin Hamilton of Thuja Wood Art
Lace:
Enamelled copper and stainless steel wires
Semi-precious stones and beads:
Bamboo Coral, Clear Quartz Crystal, Hawk’s Eye, Rudraksha Seeds
Technique: handmade bobbin lace – TesseLace pattern
Dimensions in centimetres: h:43 x w:43 x d:5
Dimensions in inches: h:17 x w:18 x d:2
If cold winter months are good for something else than hibernating, it is for lacemaking. Long, dark nights offer quiet time for uninterrupted work and allow sustained focus that reaches almost a state of meditation.
Cocooning in my studio, I was looking for an idea for lace that would fit in one of Colin’s driftwood frames. Dried by sun and fresh air the wood feels so warm, as it is radiating energy collected over many summers. Just like standing cedar trees, the driftwood offers assurance that we, too, will survive yet another winter. Living on the West Coast of Canada for thirty years, I came to understand why cedar has been considered sacred by indigenous people.

majestic cedar tree in my backyard
An empty red cedar driftwood frame has been standing on the shelf in my studio for more than a year, patiently waiting for lace. Upon invitation, the images kept appearing, but none of them strong enough to stay and prompt me into action. One day, on a walk through fresh snow in Kwomais Point Park, I was amazed by dark lines of underbrush with embellishments of ice and red berries, set starkly against pristine white background. There is a lot of lace to be found in the forest, but rarely in such plain sight.


I started to work on my next offering. Once again, my connection with Veronika Irvine and her TesseLace worked miracles, and I was able to find the right grid and use the Circular Grid Templates for designing the mandala.


It worked so well that the piece was finished before the snow in the forest melted… It became my offering to the season that makes us revere cedar, to the beauty of snow and ice, and to the berries who know how to say ‘fertility’ like no other.


The Offering: Red Berries will be shown in juried exhibition ‘Just Gates’, organized by Arts Council of Surrey, in April 2019.
Copyright©2019. Lenka Suchanek. All rights reserved.
Meganeura
Posted on September 14, 2018

Material:
stainless steel and enamelled copper wires
drift wood, crystal beads
Technique: handmade bobbin lace – free form
Dimensions: 48 x 72 x 5 cm (19 X 28 x 2 in)
Meganeura is an offering to Gaia and her transformative powers.
Meganeura, a dragonfly’s ancestor from the Carboniferous period, symbolizes transformation, survival, and incredible ability of Earth creatures to adapt and evolve with the environment. Watching dragonflies and knowing that their progenitor Meganeura lived 300 milion years ago, always fills me with awe and reverence for this planet and all life it carries.
This offering is a prayer for us, people of this Earth, to listen to Gaia, and learn from her wisdom… before it is too late.


Copyright©2018. Lenka Suchanek. All rights reserved.
Fiber and Lace: Artists Call
Posted on March 15, 2018
Calling all Metro Vancouver bobbin lace makers who would like to present a piece in the Langley Art’s Council’s – Art in Found Spaces: Fiber and Lace Show. The exhibition will run from September 19th until October 2nd. This will be held at the Langley Civic center (Township of Langley City Hall). All works must be hung and no greater than 16”x20”. This space can hold up to 20-24 works of art, we may be able to include more if there are many smaller works, or if we utilize the upper floors. Mixed media, fiber lace, bobbin lace, anything goes, as long as it is lace based. I would like to showcase the amazing work and talent of our local lace makers. Many people aren’t aware of hand made lace, and we can change that!
Please include a write on your piece complete with how long this piece took you (estimates are fine), how long you have been practicing for, and the inspiration of your piece. Also, please include what you used (fiber, wire, paint, photography, glass, etc.) and if this piece is for sale. All works must be submitted by August 31, 2018 to Sybille. Please contact her via email at kisssyb at gmail dot com, or through New School of Lace at laceaway at gmail dot com.
After our exhibition, The Langley Arts Council will have their annual fundraiser November to December called Incognito. This would be a fine opportunity for us to support the organization that supports fiber and lace art! Any type of work can be submitted as long as it is 10”x10” and 1.5” wide. Another great place to show off your amazing lace talents. All pieces are sold for $50 with $25 going to the artist and $25 going to the Arts Council. All work must be unsigned as it’s Incognito. Once the piece is sold, the buyer will find out the artist’s name and can request a signature. Please contact the Langley Arts Council for more information and to submit your work. Submission date TBA.
New artworks added
Posted on November 14, 2017
Offering: West Coast Mandala Lace Sculpture
Reframed; Lost Art I & II Wall Art
Offering: Moon Reflection Wall Art


Offering: West Coast Mandala
Posted on November 14, 2017
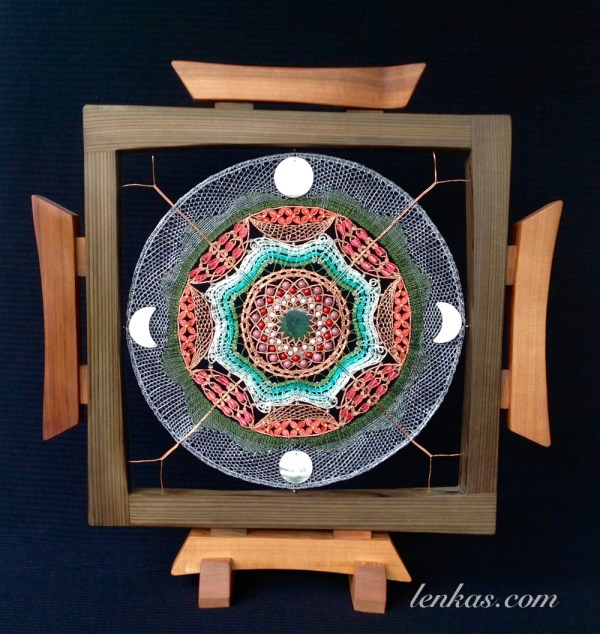
Frame:
Cedar driftwood (designed and made by Colin Hamilton of Thuja Wood Art)
Lace:
Enamelled copper and stainless steel wires
Semi-precious stone cabochons and beads (from centre):
Nephrite (BC jade), Almandine Garnet, Shell, Rose Quartz, Bamboo Coral, Rhodochrosite, Clear Quartz Crystal, Calcite, Blue Tiger’s Eye, Shell, Hematite
Technique: handmade bobbin lace – free form
Dimensions in centimetres: 64 x 61 x 12 ( 4 cm without stands)
Dimensions in inches: 25 x 24 x 5 (2 inches without stands)
West Coast Mandala is an Offering to the magnificent Pacific Northwest nature.
In harsh climate of the temperate rainforest, human life has never been easy. Ancient people called upon spirit powers to receive guidance and protection. They were taught to live in harmony with the land and the ocean, and respect all plants and animals. This wise, timeless teaching still resonates on the West Coast.
The Offering: West Coast Mandala is presented in a frame made from red cedar driftwood, which carries the spirit of the tree of life, and creates a sacred space for reflection and meditation. In its centre, the mandala holds a cabochon of the B.C. jade, and radiates the energy outwards through the copper wire weave. Inner sacred geometry circle with semi-precious stones, coral and shell beads, represents the earth’s depths. Surrounding three currents symbolize underground, surface and ocean water bodies. Water brings fertility and abundance to the soil and to people, and they present offerings of flowers and fish. Fertile land is encircled by a protective range of the coastal mountains, which merge into the mist of the sky dome. From above, water motion, vegetation growth and people’s lives are governed by the moon cycle. All is connected and therefore in harmony with the timeless wisdom.
This artwork is now exhibited in Talisman Gallery on Pender Island, BC.
Copyright©2018. Lenka Suchanek. All rights reserved.
