 Lenka's Way of Lace
Newsletter #2 – Spring 2018
Posted on March 15, 2018
 Spring delivers fresh energy we’ve been waiting for, and sets the best example of natural beauty, creativity and vitality. Let’s look, experience, enjoy and get inspired!
New School of Lace
Weekly classes in fibre and wire lace are in full swing. Everybody is having good time and learning a lot. With more light and warmth the lace on our pillows is going to blossom, there is no question about it!
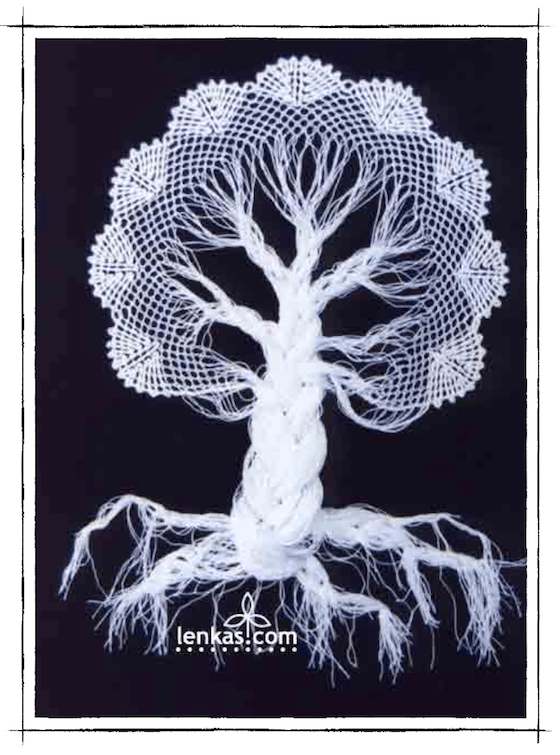
May Workshop has been confirmed. We are going to work on a special “Old Tree” pattern, which is suitable for any media. Some seats are still available, so whether you work in fibre or wire, or both, come and join us on Saturday, May 26th, in Ocean Park Community Hall in South Surrey. As always, we will learn and share and talk… this time about wisdom of old trees and old lace…
Workshop: The Old Tree
Day and time: Saturday, May 26, 10:30 am – 5:30 pm
Location: Ocean Park Community Hall, 1577 128th Street, Surrey, BC
Skill level: intermediate
Registration: laceaway@gmail.com
The Old Tree design is based on basic torchon lace pattern, but it offers much more. It will make your creative juices going like tree sap responding to the season’s call. The pattern is open to colours which can be matched and mixed, and even dyed over (fibre) or coloured and patinated (wire). Tree branches, trunk and roots are finished in a free hand techniques (braiding), which means that every tree will be different, because it will be made with different hands. In this workshop you will learn how to create truly original lace art.
And it is about time, because there are two very exciting events coming up!
Exhibitions, Lectures and Other Events
Artist call for bobbin lace makers:
FIBER and LACE
Calling all bobbin lace makers who would like to present a piece in the Langley Art’s Council’s-Art in Found spaces, Fiber and Lace show. The exhibition will run from September 19th until October 2nd, with an opening night reception. This will be held at the Langley Civic Center (Township of Langley City Hall). All works must be hung and no greater than 16”x20”. This space can hold up to 20-24 works of art, we may be able to include more if there are many smaller works, or if we utilize the upper floors. Mixed media, fiber lace, bobbin lace, anything goes, as long as it is lace based. I would like to showcase the amazing work and talent of our local lace makers. Many people aren’t aware of hand made lace, and we can change that!
Please include a write on your piece complete with how long this piece took you (estimates are fine), how long you have been practicing for, and the inspiration of your piece. Also, please include what you used (fiber, wire, paint, photography, glass, etc.) and if this piece is for sale. All works must be submitted by August 31st to Sybille, please contact her at
kisssyb at gmail dot com, or via New School of Lace email
laceaway at gmail dot com
INCOGNITO
The Langley Arts Council also has their annual fundraiser November to December called Incognito, which can be a fine opportunity to support an organization that supports local lace artists! Any type of work can be submitted as long as it is 10”x10” and 1.5” wide. Another great place to show off your amazing lace talents. All pieces are sold for $50 with $25 going to the artist and $25 going to the Arts Council. All work must be unsigned as it’s Incognito. Once the piece is sold, the buyer will find out the artist’s name and can request a signature. Please contact the Langley Arts Council for more information and to submit your work. Submission date TBA.
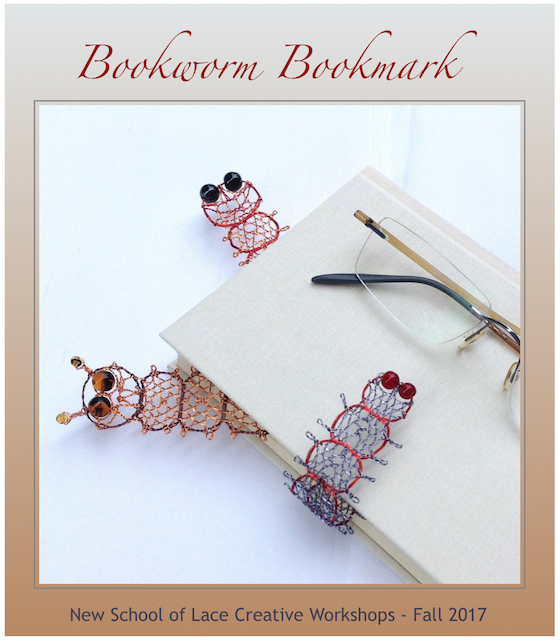
New School of Lace Display in Semiahmoo Library is being wrapped up this week, and three Bookworm Bookmarks will go to the lucky contest winners. Handmade lace mini-exhibit has been well received, and live lacemaking demo well attended. As a result, the New School of Lace has one brand new student-lacemaker!
New School of Lace Display in Ocean Park Library is still on till the end of March, so if you are in vicinity, stop by and see how well do lace and spring go together!

lace | heart | art
It’s been very exciting time for the lace|heart|art team to review all submissions for the 1st International Challenge.
We received many entries from all over the world, and were amazed by creativity of lacemakers, and their wonderful interpretations of Barb’s Heart. It’s been a very special experience, but also very difficult, because we had to choose winners in each category. We did our best, and are looking forward to sharing the results with you.
The lace|heart|art online exhibition will open soon, on April 8, 2018.
Stay tuned!

Before that, we are happy to present a lace|heart|art lecture and slide show at FibresWest:
Join us for presentation on importance of traditional crafts in families and communities, and a tribute to a young woman whose love is reaching lace makers all over the world. Traditional crafts facilitate connecting, sharing and healing in today’s society. Our message, perhaps needed now more than ever, contributes to an important discussion about the value of handwork and crafts for the overall well being of women and their quality of life.

FibresWest 2018
Cloverdale Exhibition Grounds, Surrey, BC
Saturday, March 24, 11:45am
For more information, visit FibresWest
Wire Lace Supplies & Patterns
As some of you already noticed (and followed up), two New School of Lace Patterns & Tutorials were published:
1/ “Snail” Pattern & Tutorial was added to BASIC series. Dedicated to Cloth Stitch and Whole Stitch in Wire Lace, the pattern offers thorough explanation and instruction of stitches that pose perhaps the biggest challenge to lacemakers who transition from fibre to wire lace. Add it to your wire lace library, and you are covered!
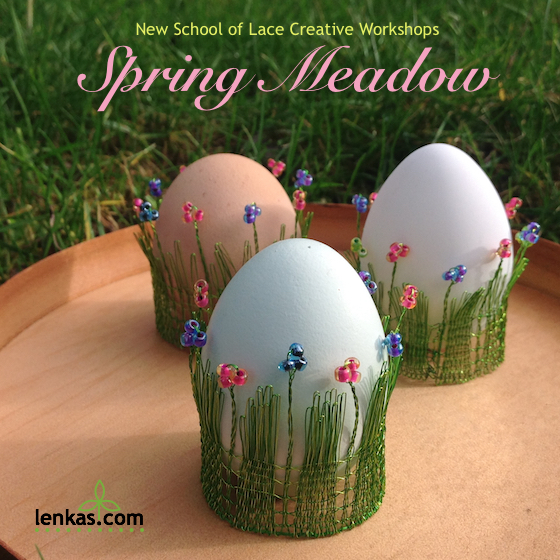
2/ Chicken Egg Stand Pattern & Tutorial opens a new ANIMAL series. Animal images are popular in lace, and in wire lace they come alive in 3D form. The Chicken is not only cute, but also a fully functional egg holder. It is one of those little projects that bring about big smiles. The complete step-by-step tutorial will help you along, so you can create unique decorations for Easter and all upcoming spring celebrations.
Both new patterns are available exclusively in my WireLaceSupplies Shop on Etsy.
While there, you will notice that wires in all colours were fully replenished and the wire lace student kit is back in stock.
Is you prefer to shop live instead online, the next sale event is coming soon:
WireLace Supplies will be at BC Gem Show Tailgate Sale, in Abbotsford.
 Besides the regular stock of fine wires for lacemaking, I will have for sale wires in thicker gauges, that are good for wire wrapping, jewellery making and sculpture. Please visit, and bring with you your craft friends!
 BC Gem Show Tailgate Sale
Saturday, April 7, 2018
Building #2-32470 Haida Drive
Abbotsford, BC
Looking forward to seeing you at any or all spring lace events! If you have any questions, please feel free to contact me at laceaway at gmail dot com.
Happy spring and happy lacemaking!
New artworks added
Posted on November 14, 2017
Offering: West Coast Mandala Lace Sculpture
Reframed; Lost Art I & II Wall Art
Offering: Moon Reflection Wall Art


Making handmade lace art
Posted on November 12, 2017
(How much time does it take?)
Handmade lace art form is not very common in Canada. Whenever I exhibit or demonstrate lacemaking for public, many visitors comment that they have never seen anything like it before. And then comes a standard question: “How much time did it take to make this piece?”
I never know what to say, because I do not keep track of hours when I create. To answer, I usually estimate the number of hours, days, weeks or months that I spent on the project, with a postscript “…and thirty years of experience…”
Lacemaking is an old craft, that preceded invention of an electric power transmission by some 400 years, so there is a lot of manual labour involved in each step of the process. I thought it might be a good idea to explain here what is involved in making lace art, so I can refer any future inquirers to this post.
For this purpose, I chose to document a simpler project, a wall art piece “Offering: Moon Reflection”, as not to overwhelm the readers. Each step of the process is described below, followed by and approximate time count.
Step 1/ Finding a frame
Starting with a frame is simpler for me than creating the lace and then trying to find the right frame for it. I search for empty frames that invoke lace picture, or imagine the lace and then look for the right frame. When I saw this frame, I liked it, but did not buy. As I kept thinking about it, an image of a reflecting moon became clearer and clearer. Eventually, I went back for the frame. It would sit in my studio for a half a year until I had time to make the “Offering”.
(3 hours)
 Step 2/ Making a sketch
Drawing the image on paper is quick. Shown here is the small sketch with notes and some calculations of the future lace pattern.
(30 minutes)
 Step 3/ Choosing a pattern
Having a basic idea about shape and texture of the lace, I look for a pattern which fulfills the visual as well as structural demands of the piece. In this case, I needed rather simple two-dimensional lace in one colour. I envisioned only one pattern, but with a special requirement that it can be graded without losing continuity. To create an image of a water surface, I chose not to use a traditional lace pattern, but rather look for new, unique design with somewhat wavy effect. Perusing Veronika Irvine’s TesseLace, algorithmically designed lace tessellations, available as an Inkscape Bobbin Lace Application (courtesy of Veronika Irvine, tesselace.com), I selected a pattern number 4x4_217 and drafted a set of ten scaled grids. Using a computer program to create these grids is an enormous help to a lace designer, as it requires only a fragment of time that would be otherwise needed if the patterns were all drafted by hand.
(3 hrs)
 4/ Making lace samples
To make sure that the pattern will work, it is the best to make a sample. I used bobbins that were already wound (leftovers from a previous project) and made several swatches. The TesseLace grid is just an outline, showing the paths of the threads in lace. There is an unlimited number of stitch combinations that can be applied to that grid. I tried several options, from which the final design was chosen. This part of work is quite experimental, because even a slight adjustment of stitches can dramatically change the look of lace. Here the designer must rely on experience and also practice restraint, in order to avoid lengthy excursions into the amazing lace wonderland. There many ways to interpret one grid, and I had to decide for just one of them.
(6 hrs)
5/ Making pattern corrections
Comparing the samples revealed that the pattern in small size was right, but the enlarged size was too open, so I went back to the drafting program and used different parameters for scaling the grid. It took some fiddling to finalize grids for all ten segments of lace. My printer was not working smoothly that day, so this step took longer than it should.
(3 hours)
 6/ Preparing working templates (prickings)
In this standard procedure, the printed pattern is attached to a card stock, and covered with a clear plastic sheet. This working template, called a pricking, is then perforated with a pin vise at all cross points of the design. At each hole, a pin will be inserted to support wires during the lacemaking process. Therefore the final look of the finished lace largely depends on the template precision. Knowing that this pricking will be used only once (because this piece will be a one-of-a-kind original, made only once) I used a backing of a lighter card stock, which is easier and therefore faster to perforate.
(3 hours)
 7/ Winding the bobbins
Using just one size and type of wire in this project (stainless steel 0.2mm), the process of winding was straightforward. Because the lace was designed in ten strips, which will be connected together to cover the final width, only 18 pairs (36 pieces) of medium bobbins for wire lace were needed. I used my old mechanical bobbin winder to fill all bobbins with 2-ply of steel wire.
(2 hours)
8/ Making lace
The slowest, most laborious, and most time consuming, and also the most enjoyable part or the work is making the lace. Stitches are created one at the time, by twisting and crossing the threads in an exact sequence. At certain points, pins are placed in the pre-pricked holes. The pins hold the stitches and facilitate tensioning of the wires. Steel wire is willful and a requires a firm tension to create an even weave. This makes working with steel slower than with other wires.
 Work started at the first, narrowest pattern, and each consecutive segment was attached to the previous part by a special sewing technique.With this technique no additional assembly is required at the end.
(30 hrs – 3 hrs per segment x 10)
9/ Finishing lace
According to the design, all wire ends will be hidden under the frame, and therefore no special finishing was required. All ends were simply clipped off with wire cutters. Lace was checked for mistakes. Small errors were corrected, using a nudge tool and pliers. There was one big mistake caused by a wrong alignment of the prickings.. As soon as I spotted it it was sticking out from the pattern as a big irregularity. After much deliberation, I decided to leave the error in, as opposed to redoing the whole segment. The decision was rather atypical and defied my perfectionist tendencies, but as this lace represents ocean waves, which are fluid, free, and irregular, it seemed right to just leave it and let it be. Interestingly, as soon as I made this decision, the mistake was no longer so obvious.
(30 minutes)
10/ Preparing background
I chose a black silk fabric for the background, because it was as smooth and soft as a night sky. It always takes an extra bit of skill and time to stretch silk properly, but I feel it is worth the effort. Two milky marble cabochons, representing the moon and his reflection, were attached to the background.
(2 hours)
 11/ Mounting lace
This lace pattern had (as many bobbin lace patterns do) more twists than crosses, which, combined with willfulness of the stainless steel wire, caused the lace to curl. Therefore the finished lace had to be flattened before mounting. Then it was attached to a support frame. This extra inside frame will lift the lace slightly above the background surface, and give it a deeper perspective. It will also create a sufficient clearance for the lower cabochon.
(30 minutes)
12/ Beading
 Lace stretched on the support frame was ready for beading. I used seven kinds of beads to create an image of shimmering moonlight reflection in the water. For ease of working, I had the lace frame attached to a stretching board, but because of that I lost track of the background. When I checked, it did not look right. There were too many beads. I removed many rows and started all over. The second beading attempt was more successful and only a few small final touches were needed before it was finished.
(8 hours)
12/ Mat was measured and cut (30 minutes)
 13/ Framing
The whole piece was put together in a frame, hanging wire attached, back finished and signed.
(30 minutes)
14/ Photo documentation
The finished piece was photographed for documentation.
(30 minutes)
15/ Archiving
All drafts, prickings and working notes were compiled and archived for a future reference.
(1 hr)
Finished piece:

Title: Offering – Moon Reflection
Material:
steel wire, milky marble cabochons, glass seed beads, silk background
Techniques: handmade bobbin lace, beading
Size: 75 x 27 cm
Approximate total time: 64 hours (… and 30+ years of experience )
Copyright©2017 Lenka Suchanek. All rights reserved.
Offering to the Tree of Life
Posted on December 1, 2015
Offering

Title: Offering to the Tree of Life
Artists: Colin Hamilton and Lenka Suchanek
Material: cedar driftwood frame, bronze and copper lace, serpentine beads
Techniques: hand split cedar with traditional joinery; handmade bobbin lace in metal
Size: 70 x 42 x 10 cm
This artwork was created for West Coast Synergies: fibre + wood + metal
– a collaborative exhibition celebrating the Canadian Year of Craft 2015
ARTISTS’ STATEMENT
Colin and Lenka met this year, because they were both ready to explore new aspects of their craft disciplines: Colin is drawn to making sculptures, which would reveal the natural beauty he perceives in the cedar driftwood. Lenka is seeking to restore connection between lace patterns and nature, which has been all but lost. Although coming from different directions and disciplines, both artisans share a common ground – love and dedication to their craft. They both prefer to express themselves through creative work rather then words, therefore their written statement is simple:
“Inspired by the tree of life, we are looking into the heart of nature’s beauty with the ‘Offering’. Pure and natural, following the grain, following the pattern, to understanding and harmony – a gift for all of us.”
-

- Offering to the Tree of Life
-
- Detail – branch
-

- Detail – vessel, bark and roots
-

- Detail – offering
This artwork is in a private collection.
Copyright©2015-16 Lenka Suchanek. All rights reserved.
