 Lenka's Way of Lace
ARTS 2025 EXHIBITION
Posted on May 19, 2025
May 19, 2025
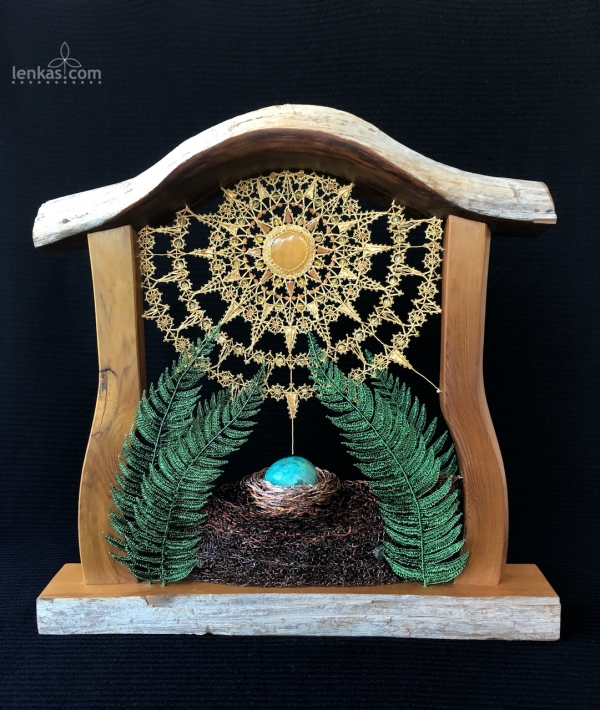
I am pleased to share good news that my work “Divine Harmony: Offering to Mother Earth and Father Sun” has been selected for a group show ARTS 2025.
As described by the organizers, Arts Council of Surrey and the Surrey Art Gallery : “This annual open-juried art exhibition celebrates art making throughout Surrey and beyond. Entries appear in a wide range of themes and media, from captivating landscape paintings to intricate sculptures and weavings. The artworks are displayed throughout Surrey Arts Centre, and visitors are invited to vote for the People’s Choice Award at any time during their visit.”
I participated in this show twice before (2018, 2020) and I am thankful that the organizers are still interested in presenting traditional art forms along the new media, which now also includes AI generated art. Surrey is truly multicultural city and ARTS 2025 exhibition brings together artists from around the world who now call Surrey their home. While the selected works offer a truly colourful mix of ideas and techniques, they all reveal their creators’ common enthusiasm for visual arts and dedication to the creative process.
To be able to participate with a piece made entirely by hand in a five hundred years old technique is rather remarkable in this day and age, and I will use the opportunity to popularize the bobbin lace art to the broad audience. In promotion materials the Divine Harmony is described as Mixed Media, probably due to need for brevity, so I hope for a chance to share more information about my work and bobbin lace technique in general at two related live events: Artist Open Mic on June 5th, or at the Summer Art Party on July 5th.
For those of you unable to visit the the gallery in person, you can see the work here: Divine Harmony
Also, you can watch a short documentary, produced for CBC Creator Network, about Colin Hamilton, an artist woodworker who made the frame for my lace:
“Ancient Craft, Modern Art : On the quiet shores of Pender Island, Colin Hamilton found his calling as a master of the ancient art form of woodworking. Watch as this Canadian artist transforms raw lumber into works of art…”
After years of neglect, the Canadian arts and crafts are finally getting some attention…and that is welcome news indeed!
Please share with your friends and support local arts this spring and summer!
Lenka
The Year of Old Wise Trees
Posted on December 30, 2024
December 30, 2024
I am pleased to conclude the 2024 blog with a post about a new addition to the Old Wise Tree Gallery – a picture that is especially well suited for marking a transition from the old to new year.
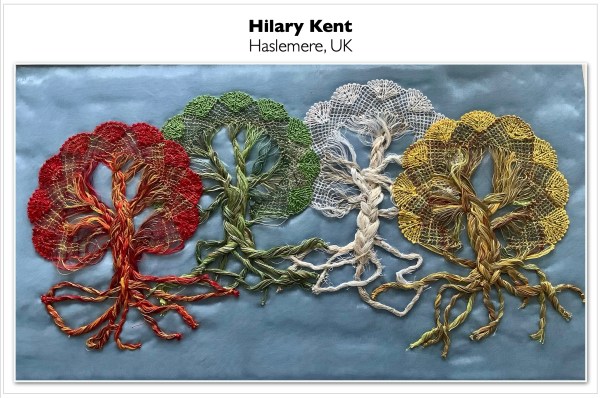
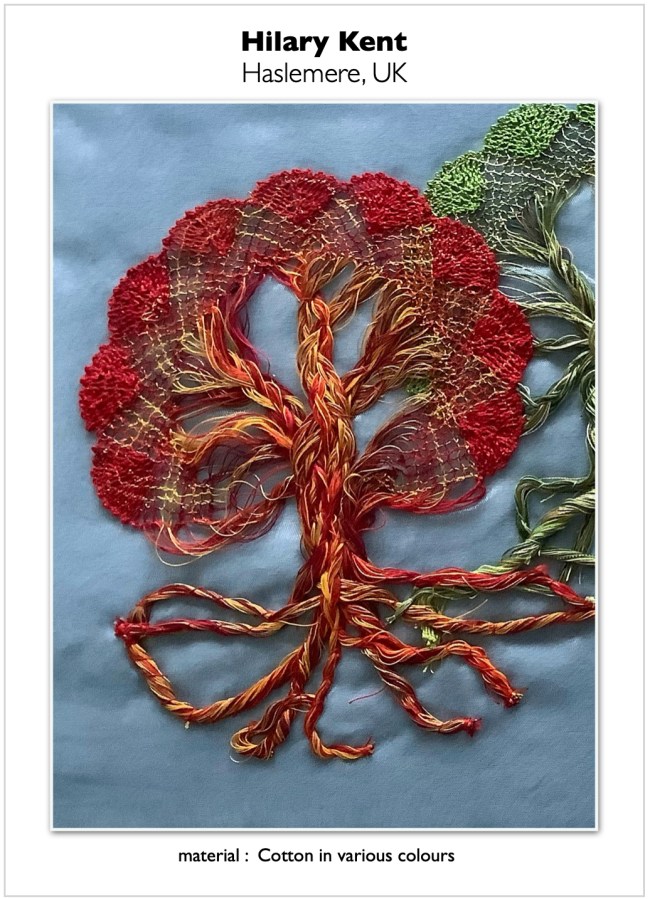
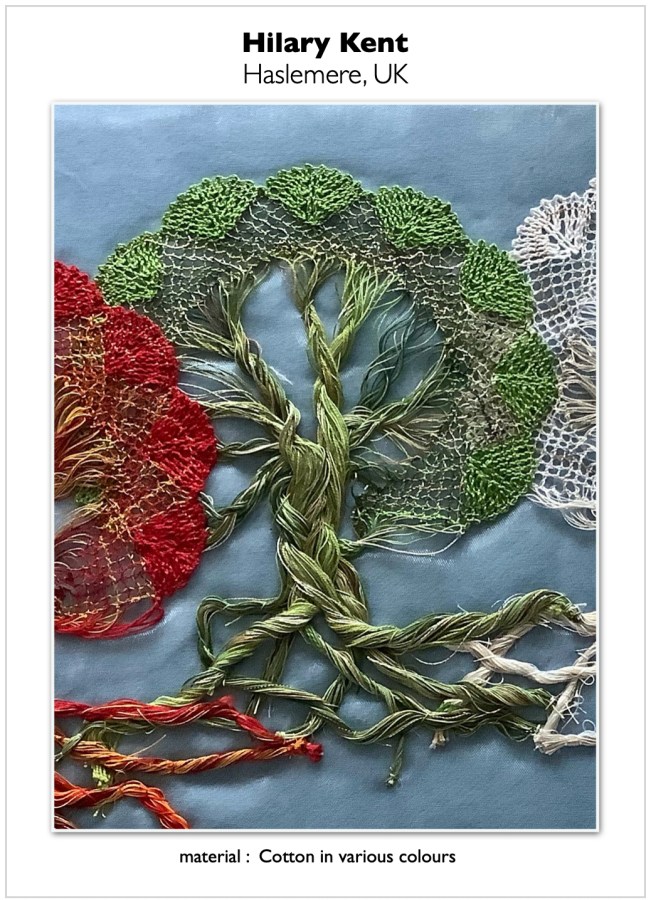
Hilary Kent from Haslemere in the UK shared a photograph of her Old Wise Tree creation: Four trees framed together in one picture as a beautiful illustration of the passage of time. Each tree, woven in multicoloured threads to a visually dramatic effect, is a unique artwork – original, bold and expressive. Daring choice of colours lends a distinctive character to individual trees. From subtle white and ecru threads, through soft greens, earthy yellows and browns, to flaming reds, the gradation of colours achieves a striking effect. All together, the trees create a harmonious whole. With their crowns overlapping and roots connecting, they seem to be morphing one to another in a natural progression of time.
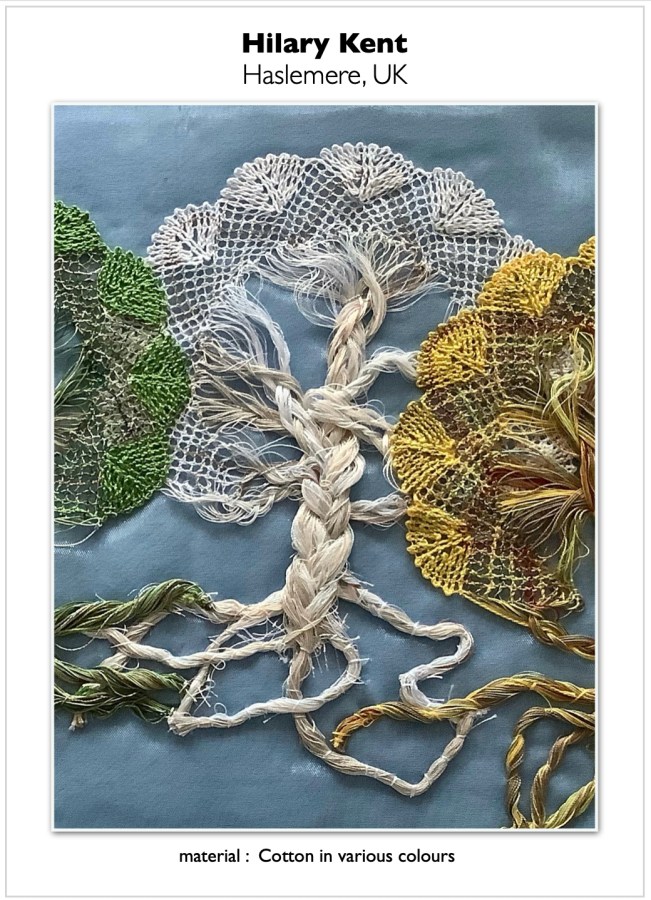

It pleases me greatly to see a well made polychromatic lace. Looking at the craft evolution I think that the most important contribution of the modern era is the use of colours. With a few regional exemptions (e.g. in Russia, Slovakia, Spain, South America,.. ) hand made lace was traditionally made in white, ecru or black, and previous generations of lacemakers and lace designers achieved an ultimate mastery of expression in those sole colours. From the height of their accomplishments the handmade lace production began to decline as the industrial revolution conquered Europe. Ensuing two terrible world wars could had seen the fine lace craft completely eliminated, but it was not to be. Lace was reborn in the hearts and hands of artists who envisioned a bright, colourful future for the craft, as a part of the new textile art movement. They succeeded, and it is an honour and joy to continue on the path to expand the creative horizons of handmade lace. Current generation of lacemakers has such wonderful choice of materials in myriad of colours, from linen, cotton and silk to manmade fibres, and – yes – even wires. All we have to do is use them!
Thank you, Hilary, for sharing your unique lace creation. Seeing your work, and all other Old Wise Trees in the exclusive online gallery, gives me confidence that the wisdom of old trees and and old lace is not lost to those who seek and create…
Cheers to an imaginative, inspired and colourful new year!
Lenka
The Free Old Wise Tree Pattern and Tutorial was published on this website on January 16th, 2021.
As of Dec 30th, 2024, the Old Wise Tree Pattern and Tutorial page has been viewed 14,857 times
3137 visitors downloaded the pricking
41 artworks from 8 countries have been submitted to the Old Wise Tree Gallery
Everybody is welcome to use the free Old Wise Tree pattern and create an original interpretation of the theme!
If you do, please consider sharing your creation with the world – send a photo of your tree with following information to this email address: old.wise.tree@lenkas.com
Your Name + City / Country + Materials used + Pricking size (if different than the original 100%)
+ Optional: Notes (any specific information you would like to add)
Disclaimer: By submitting the photo/s and requested information you agree that your work will be displayed in the Old Wise Tree Gallery hosted on this website.
Happy lacemaking!
Turn Your Flowers into Stars
Posted on November 25, 2024
November 25, 2024
The only flowers left in my yard are lovely and hardy Calendulas, and as the temperature is falling bit by bit every day, even they will be gone soon. In summertime I found so much pleasure in observing and caring for flora around me and now time has come for good rest. I am looking forward to long winter nights to turn my gaze up to the stars. Heavenly contemplation always fills me with wonder and deep gratitude… and lots of creative ideas.
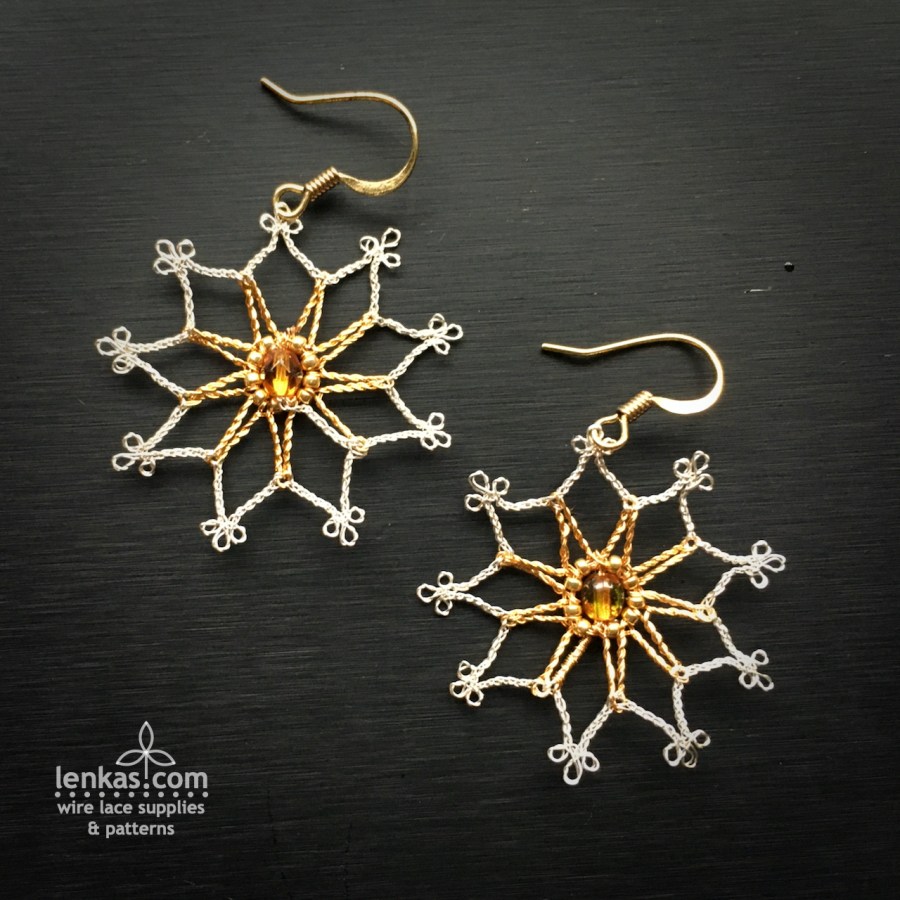
Let’s muse on… how about turning the Flowers into Stars?

It’s easy. With a few simple modifications the Flower Earrings Pattern will produce delicate stars.
All what we need is a couple meters of shiny wires, a dash of sparkling beads, six bobbins and a pillow, and a quiet afternoon. By twilight, our first stars will be ready to shine!
Here is how:
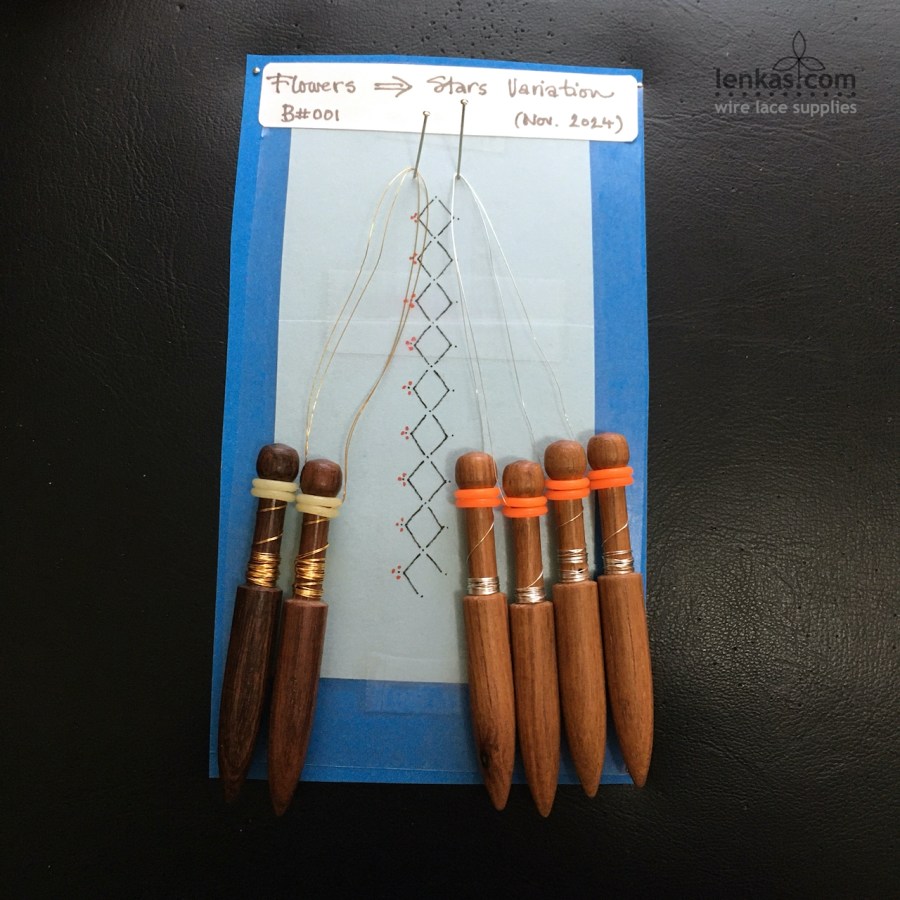
1. Extend the pricking
Print two copies of a pricking A (page 3), and cut and paste them together to get nine repeats of the pattern. The original flower pricking had six repeats and we are adding three more.
2. Add extra dots on pricking for triple picot
As opposed to flower design, the star has three picots at the tips, so it can shine and radiate light. Add three dots evenly around the original single picot dot.


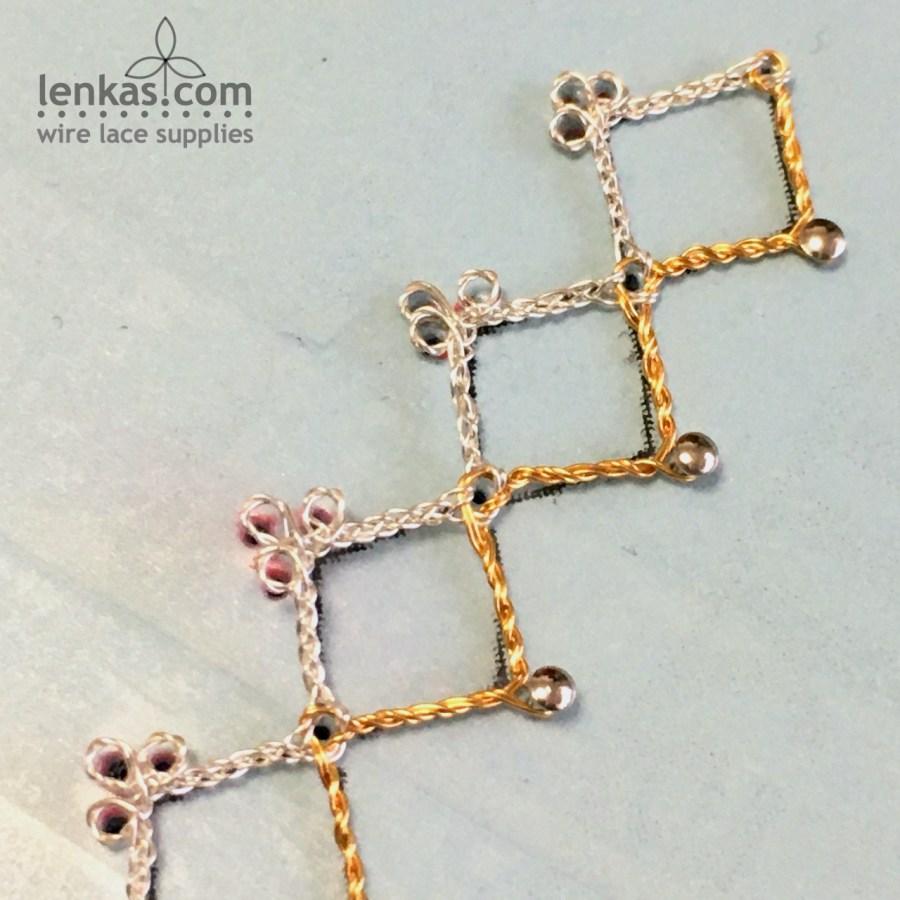
3. Change quantity of bobbins
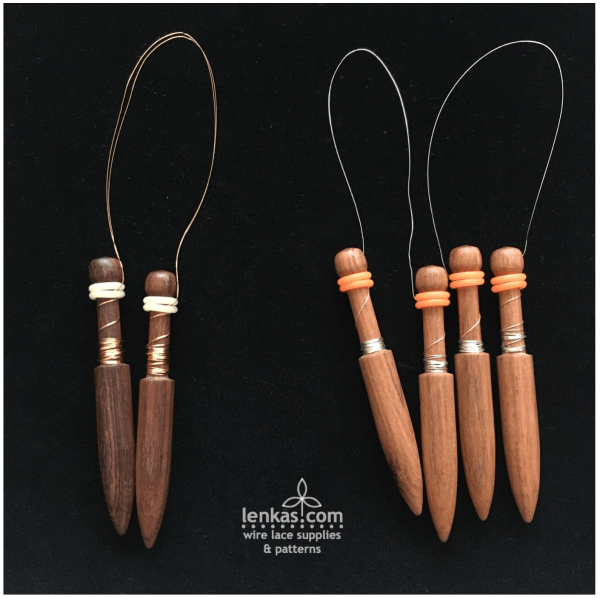
To simplify things and also to make the centre of the future star stronger, two pairs of single-wound bobbins will be replaced by one double-wound pair. So instead of four equal pairs we will work with just three:
– 2 pairs with single wire, 40cm on each bobbin (about 16”)
– 1 pair with double wire, 40cm on each bobbin (about 16”)
All together, there are the same number of wires (8), distributed differently on three pairs instead of four. For clarity, I used two different colours in the sample, silver for single wire pairs and gold for double wire pair. But of course, they can all be the same colour.
4. To finish the star, smaller seed beads are needed – size 10/0 or 11/0 or 15/0 – and one large bead for the centre of the star – 4 or 6mm round or faceted bi-cone.
Let’s start working:
Keep the Flower Earring Pattern on hand for reference.
1. Hang a double pair on left support pin and two single pairs on right support pin, one on top of the other.
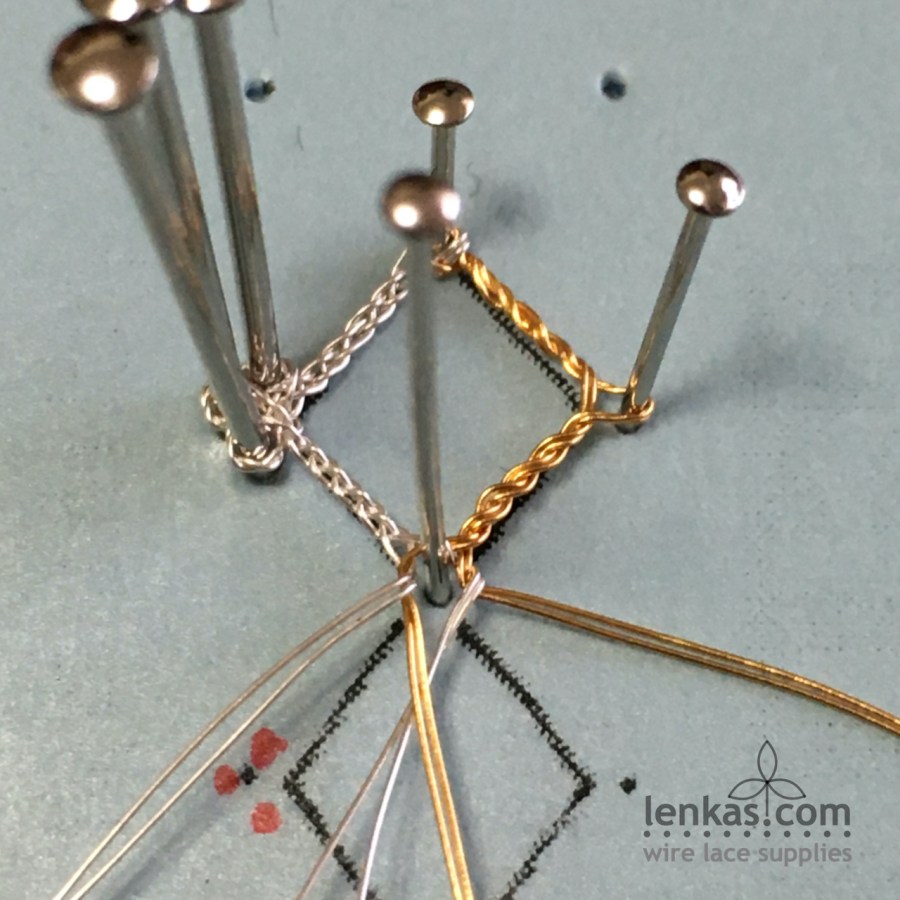
2. Work a regular windmill (see page 7). It will be a little bit easier, because the gold wires are wound only on one pair. Stitch steps are the same: Cross-Twist-pin-Cross-tension.
3. After the windmill, work with the gold double pair on right side, Twist and tension firmly, then repeat five more times to get six twists in total. Lots of twist for a short distance, but with firm tensioning you should be able to fit them all in. If it’s a struggle, just five twists will do, but six of them give stronger support. Place pin. Twist-tension six times.


4. On the headside, work a braid with two pairs, then make a triple picot. Triple picot is made of three regular picots, separated by a cloth stitch. Make the first picot, either scooped or wrapped (see page 11-12), C-T-C-tension, make the second picot, C-T-C-tension, make third picot, C-T-C-tension and continue with the braid towards the next windmill crossing.
5. This windmill crossing and all remaining ones in the pattern are worked as Windmill with a Twist (see page 9 for full explanation). Cross-Twist-pin-Twist-tension-Cross-tension. The extra twist in the middle of crossing will keep the single (silver) pairs on the headside and the double (gold) pair on the footside.
Keep repeating the steps until the end of pattern.

Beading and finishing is the same as the Flower (see page 17, and page 23).

A tip for finishing two coloured star:
Connecting the end and start points to complete the circle is done with two outer pairs, which are then braided towards the centre. It means that this last braid will be a “wrong” colour (silver in the sample). To cover that irregularity, use one of the gold wires, lead it towards the start/end windmill, thread the wire through the crossing to secure it there, and then wrap the wire tightly around the silver braid, all the way to the centre of the star. It’s a fiddly job, but worth the effort if you want your star earrings to be perfect.


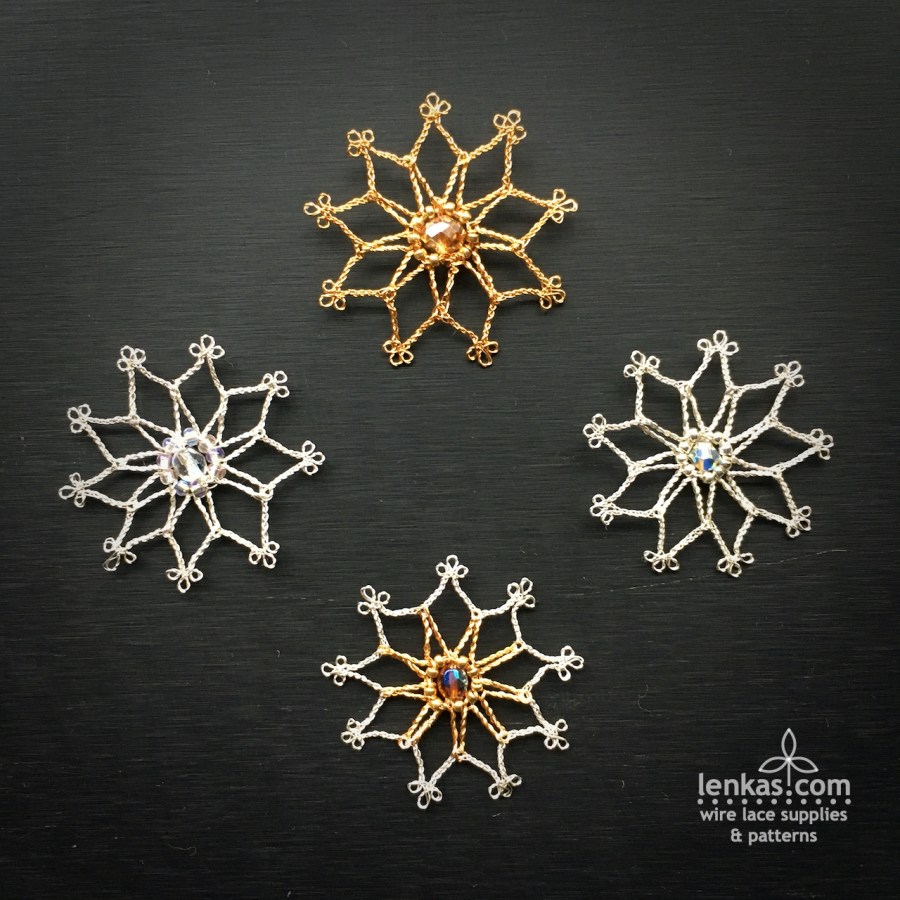
The star’s final shape will be determined by the size of seed beads in the centre – smaller beads make the centre tighter, while use of bigger seed beads leads to a larger opening. Choose a focal bead that fits in the middle – round or bi-cone faceted crystals in size 4-6mm work well, because they give a nice, sparkly accent to the star. The centre bead also provides ample hiding space for the wire ends, since the seed beads in sizes 10-15/0 are too small to contain all of them.

Add a finishing touch to the star by gently squeezing the braids together under the windmill crossings and triple picots. It will make the rays look sharper and neater.
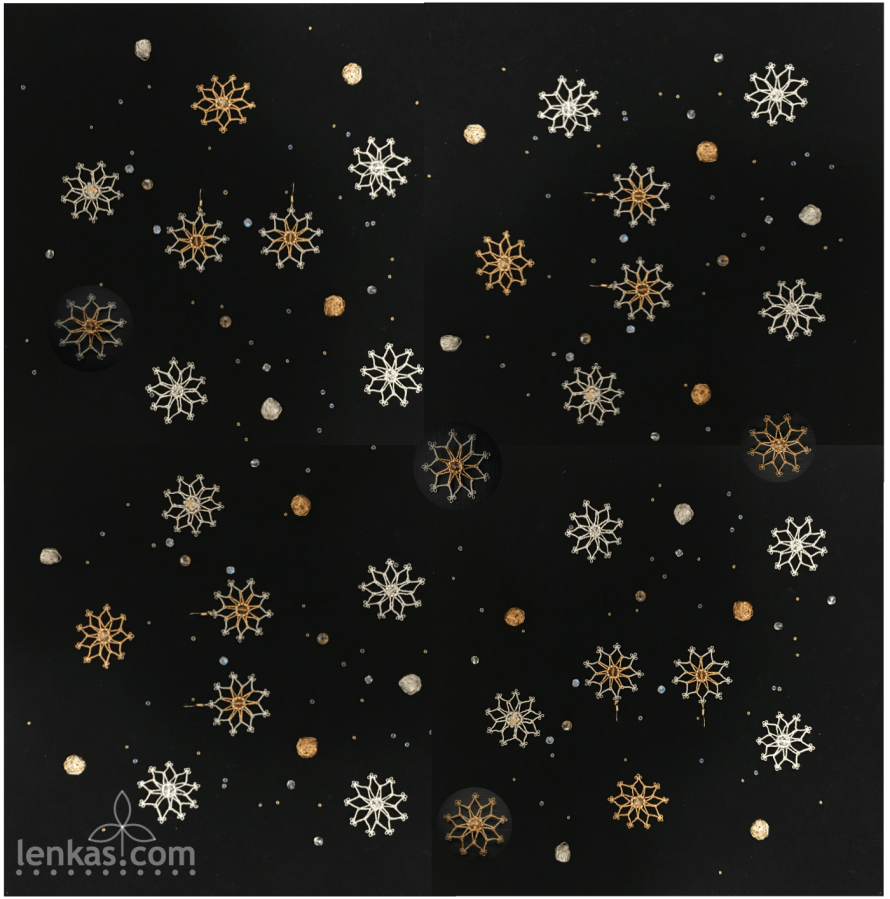
Have fun, play with wires and beads, and make a lot of stars to illuminate the path during winter months. Find ways to distribute them far and wide – on greeting cards, special gift tags or festive ornaments. They are small and delicate, but being handmade, they radiate love and light as if by magic.
If you don’t have the Flower Earrings Pattern & Tutorial yet you might be pleased to know that during Wire Lace Supplies Christmas Sale, from November 26 to December 26, 2024, there is 20% discount on all patterns. Go ahead and give the Flower/Star a try!

Happy lacemaking and star making,
Lenka
Divine Harmony: Offering to Mother Earth and Father Sun
Posted on November 19, 2023
November 19, 2023
Frame:
Reclaimed red cedar – designed and made by Colin Hamilton of Thuja Wood Art
Handmade Bobbin Lace:
Enamelled copper wire, silk, wool
Semi-precious stones and beads:
Chrysocolla, Calcite, Citrine, Aventurine, Sunstone, Garnet, Serpentine, Quartz
Dimensions in centimetres: h:50 x w:50 x d:10
Dimensions in inches: h:20 x w:20x d:4
~
This work completes a series of offerings dedicated to the magnificent Nature, in a creative collaboration with Colin Hamilton of Thuja Wood Art. Colin’s work is deeply rooted in the West Coast tradition, while my metal bobbin lace evolved from centuries old European craft. Unexpected meeting of two very different disciplines resulted in a unique, one-of-a-kind body of work: ‘Offering to the Tree of Life’ (2015), ‘Waves: Offering to the Moon’ (2015), ‘West Coast Mandala’ (2017), ‘Red Berries’ (2019), and finally, the ‘Divine Harmony’ (2023).
It took a long time to bring the last work to fruition. When Colin delivered the frames, one in particular caught my attention. It had a strong base and arch that seemed to protect a womb-like inner space. Raw edge on the outside contrasted beautifully with finished wood, in colour as well as texture. Overall, the frame was so well balanced, and so inviting, that I thought right then that it will become a special piece.
As time went by, one by one the wood/lace sculptures were completed and sent off to the world. The last frame seemed content sitting empty on my studio bench. I imagined that the wood must have been from a tree that lived a long life, then drifted in the Pacific ocean to reach Gulf Islands, dried on the beach there, and waited for Colin to salvage it and use the reclaimed wood for the frame. What a couple of years could mean in its life cycle? That perspective gave me freedom to wait for the right idea. Because the simplest things are sometimes the most difficult to express in art.

On New Year’s Day 2020 I took a photo while strolling in an urban forest in my neighbourhood. It was a peaceful day, ideal for contemplation. Admiring nature’s contentment and ability to maintain equilibrium regardless of season, weather or time, I wondered if it is possible for a man to live that way, too – in balance, instead of struggling in self-created chaos. The serene moment became an inspiration for the final Offering.
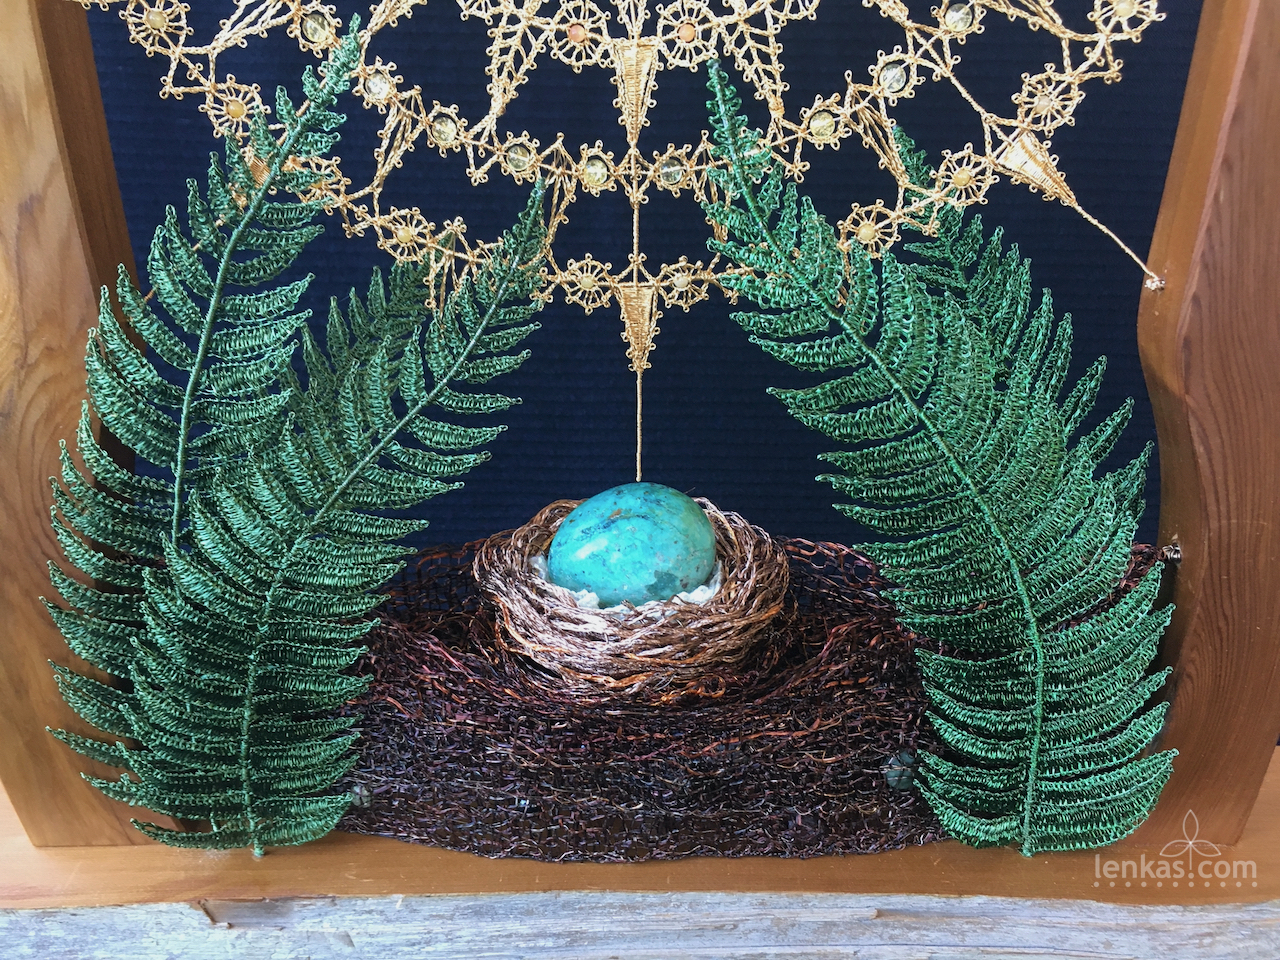
‘Divine Harmony: Offering to Mother Earth and Father Sun’ is a tribute to the two forces that permeate all that is, on our planet and in the whole universe.
Called by Indigenous North Americans Father Sun/Sky and Mother Earth, and in many cultures by other names – Shiva and Shakti, Yin and Yang, Pachamama and Inti, the Creative and the Receptive, Ida and Pingala, Masculine and Feminine – they are the two fundamental energies which exist and work together. They are of opposing qualities, but not antagonist. Being different, they compliment and complete each other. When they are in balance, life happens.
As my time for lacemaking became limited due to unprecedented circumstances, the months working on the “Divine Harmony” turned into years. Despite the slow progress, or maybe because of it, I enjoyed every moment at my drafting table and lacemaking pillow. Lost in lace and in space, I learned a lot about the fine lace craft, and even more about myself and the source of my profound need for balance and tranquility.
Mother Earth
Starting form the ground…
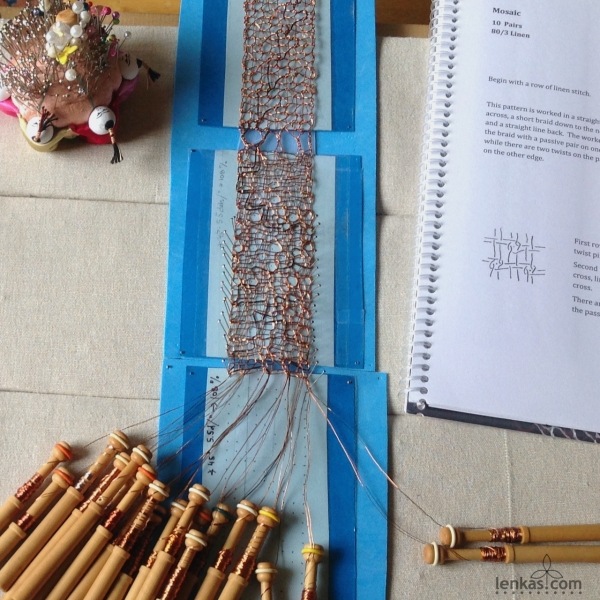
The Earth’s strength lies in the ground, and there is nothing more important than the soil cover. It holds all resources for life to flourish. Everything grows from the soil and returns to the soil in an infinite cycle. Soil is the most amazing complex of organic and inorganic matter living in total synergy, hidden under the surface, yet influencing everything above. I was looking for a pattern that is structured yet fluid, like a weave of roots, and I found it in an experimental and very interesting book ‘Using Modern Grounds’ by Michèle Kelly.
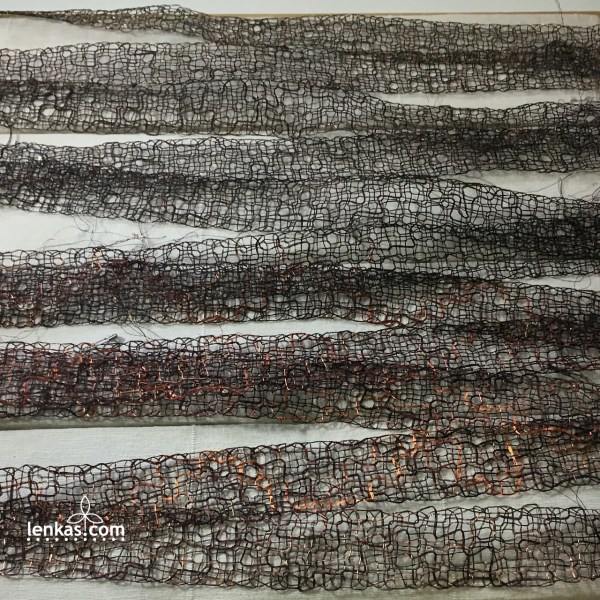
The Mosaic pattern was fun to make and allowed me to play with texture and colours. Mixing black and brown wires in multiple strands of three to six ply in random order produced an organic texture in variegated colours that were changing along the length of the lace. Once the pattern was committed to memory the work became pleasantly rhythmic, with bobbins flowing and gently clicking. Unlike traditional lace grounds, this pattern is worked in horizontal rows. Wire provided good support the open structure, so I was able to omit the interior pinholes and place pins only at the foot sides, which sped up the work considerably. Six yards were needed for building a strong ground foundation of the sculpture. The work on this pattern was so pleasant that I almost regretted reaching the required length rather quickly.
The finished yardage was folded and shaped to create a dense soil. Between the layers, I enclosed a handful of raw semi-precious stones (garnet, citrine, serpentine and quartz). While the minerals are hardly noticeable in the dense weave, their presence grounds the earth and infuses it with strong energy patterns.
In the centre of the soil a shallow recess was prepared for the nest.


Growing ferns…
Coastal Mountains forests are full of ferns. A diverse species of ancient origin, these plants thrive in our humid climate and grow everywhere, gracing the landscape with cascades of fronds in many shapes and shades of green. Despite not producing flowers, ferns are very beautiful, ornamental, and prolific. Many stay lush all year around and provide microhabitat for various other plants as well as animals.
Fern leaves made in wire are an attestation to the potential of free style lace design. With just four pairs of bobbins, and a lot of patience, the lace fern grows and unfurls, one leaf at a time. This very slow process leads not only to a total tactile and cerebral satisfaction but also to deep appreciation of all Earth’s creation. In the Offering, the ferns play an important role of providing a protected space for a new life.


Building nest …
With the foundation laid, it is only a matter of time for a nest to be built. As opposed to real nests made by birds, the expert builders with highly specialized skills, mine was pretty simple, constructed from long plaits, wound and interwoven together. To make it more welcoming, I lined the bottom of the nest with lace made from wool and silk fibres.

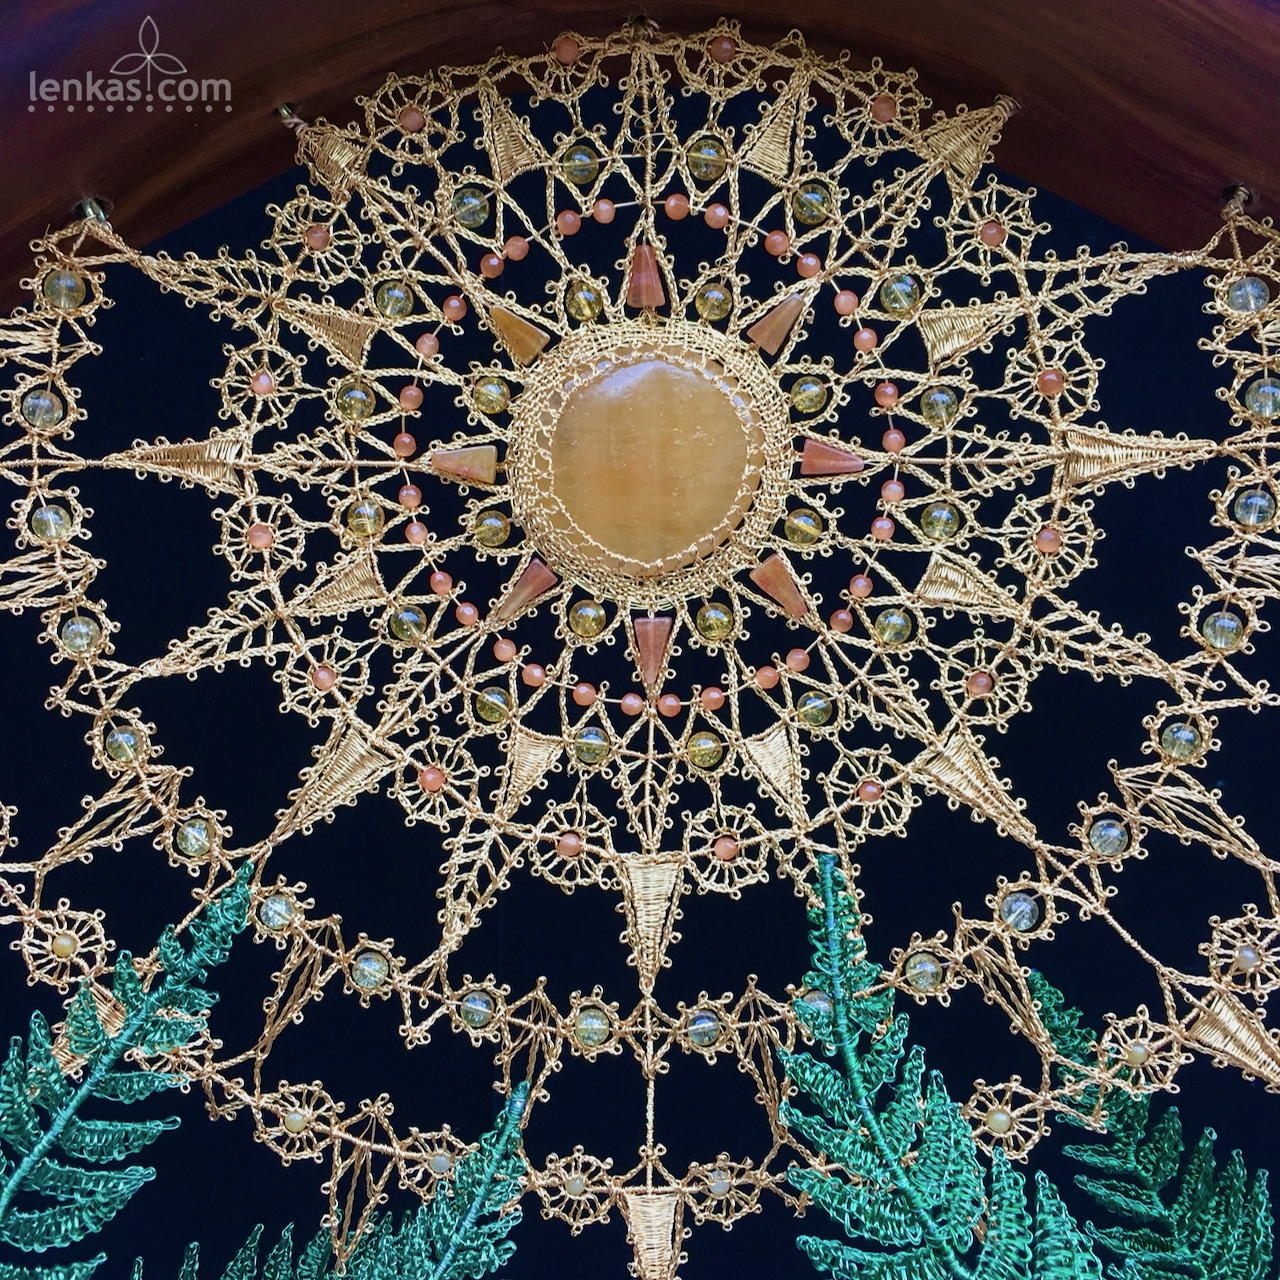
Father Sun
Temperate rainforests of the Pacific Northwest are humid and cool. When the sun penetrates a dense tree canopy, its warm rays are received with deep reverence by the earth, animals and people. Sun is precious, and therefore worshiped as the vital force.
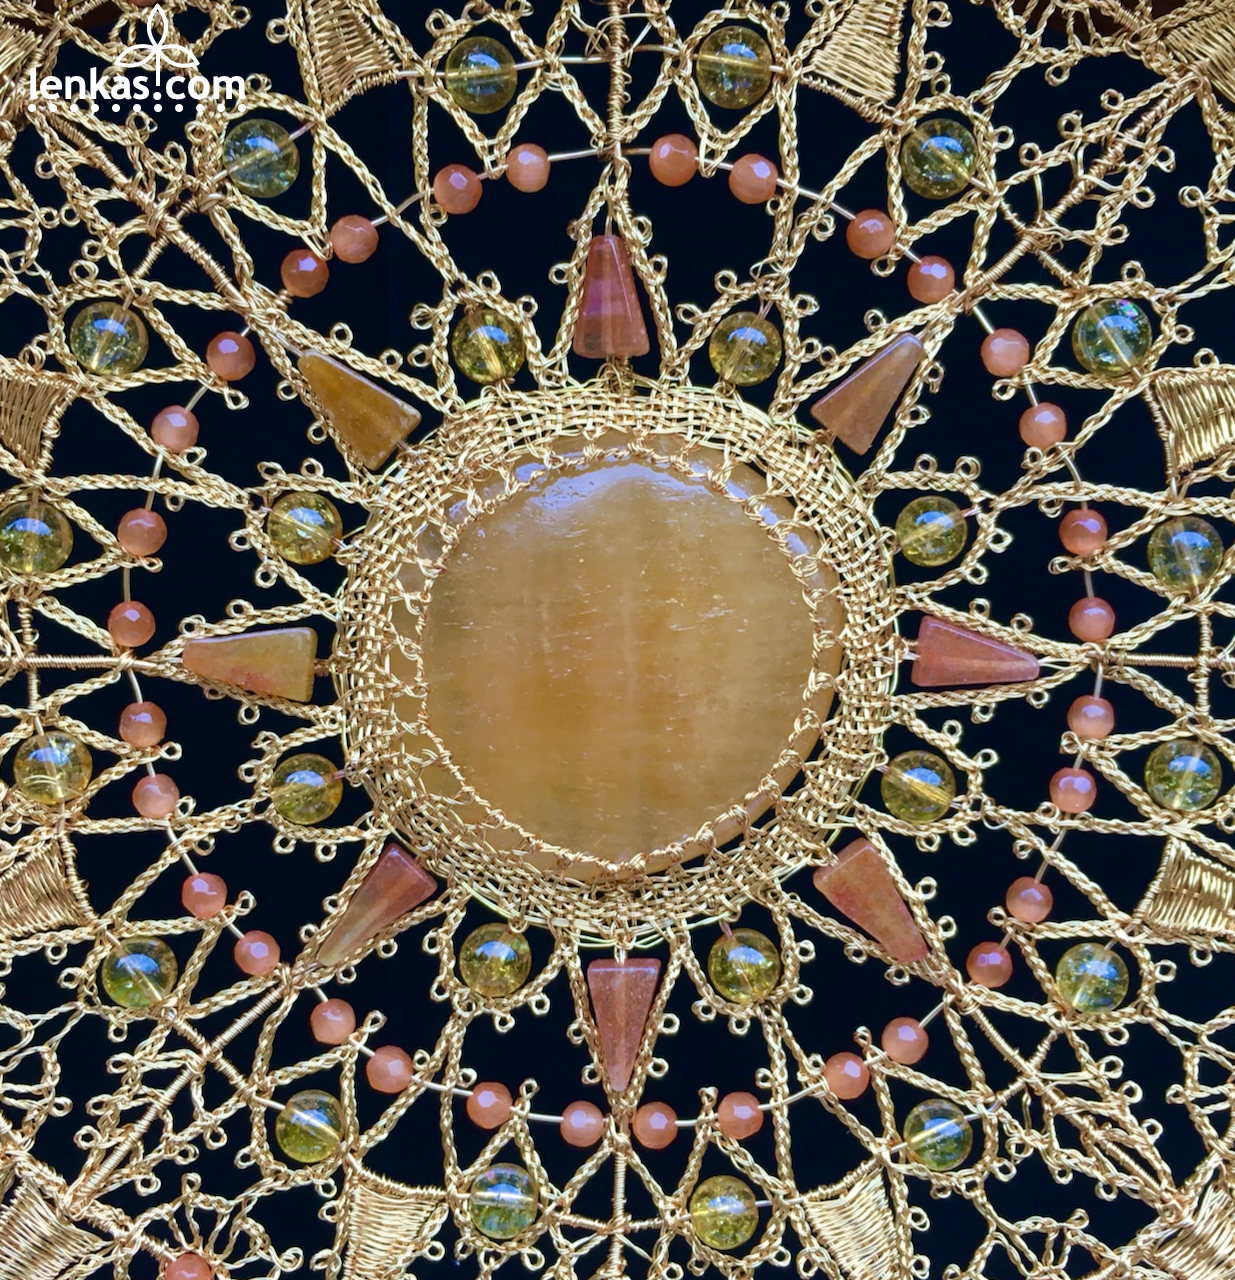
How to express a venerated sun in the language of lace? I reached deep back in time to the old Italian tradition. Originated in the Renaissance, plaited laces of Venice and Genoa epitomize the spirit of an exceptionally fertile historical period. Art and science then merged in a great creative surge and propelled Europe from medieval to modern era. Five centuries old Italian designs have lost nothing of their beauty and vitality, and today they lend themselves exceptionally well to the wire medium. I love their geometrical patterns of plaits and tallies, and their fearless expansion into empty space. They seem to be made for wire and I couldn’t envision a better form for the Sun.


Natural calcite, citrin, aventurine and sunstone enhanced the gold colour copper wires to represent qualities of the creative force: power, light, potentiality. The sacred geometry inherent in the pattern directs the energy from its source out, through waves of concentric circles and along the sun rays stretching towards the Earth.

New Life
When Father Sun reaches the receptive Mother Earth, a miracle of life happens.
Symbolized by a chrysocolla egg, the new life originates from both fundamental energies: the creative and the receptive, light and dark, masculine and feminine, the cosmic and the earthly. Therefore, it is complete, perfect and faultless.

It is humbling and at the same time uplifting to realize that humanity has the same origin.
I offer the ‘Divine Harmony’ with heartfelt gratitude to the Mother Earth and Father Sun for their boundless, immeasurable Love. With each sunrise we are given a new chance to witness their magnificent creation and through it comprehend Life and Truth.
I believe that without such introspection humanity cannot solve current problems and conflicts, and The ‘Divine Harmony’ is my prayer to bring forth the fundamental law and honour the dignity and possibility of our existence.


I am grateful for being able to realize this work despite the challenging times, and thus completing the latest chapter of my lacemaking journey.
Thank you for reading this very long post. If you find it worthwhile, please share with your friends.
Lenka
Free Old Wise Tree PATTERN/TUTORIAL
Posted on January 16, 2021
The first new moon of the new year has been born in the midst of darkness to mark a new beginning. Days are getting longer in the Northern Hemisphere, which means that the solar system is still in sync, and we are safe to make plans for the months ahead.
With an obvious bias I say: “Let’s make a lot of lace this year!” And I really mean it.
The virtual world that is a part of our present experience is bewitching as it flounders in a perpetual chaos. But the real world, and real everyday life benefits from at least some order. Handmade lace craft inherently contains that harmony. I believe that throughout the centuries, lacemakers were finding tremendous satisfaction in transforming a multitude of loose threads into symmetrical patterns. And today is no different.
In our times of exaggerated efficiency, it may seem useless, or even wasteful and selfish to spend hours at the lacemaking pillow, with no other purpose than to enjoy peaceful, slow, ‘unplugged’ activity. But if you have ever experienced the inner peace achieved through the handwork, and noticed how that tranquility fills the surrounding space and transfers to the lace itself, you know better.
You know that the true purpose and true fulfilment in life comes from within.
To contribute to a good start of the New Lace Year 2021, I am offering a free Old Wise Tree Pattern and Tutorial to all lacemakers who are looking for a new creative project. The pattern is suitable for fibre or wire lace, and it would be great if it inspires lacemakers to work in both mediums.
The comprehensive tutorial includes step-by-step instructions with detailed photographs of the whole work, from preparations to mounting the lace to the background. The Old Wise Tree Gallery is coming soon to showcase the unique lace trees, and you can add yours too, if you wish to share it.

Enjoy, explore and create!
And keep in mind, that the fine balance of this world might as well be in lacemakers’ hands 😉
Free Trial Pattern for Wire Lace
Posted on June 2, 2020
Give wire lace a try in this easy excercise!

Handmade bobbin lace keeps evolving, and many contemporary lacemakers and lace artist use non-traditional materials, such as metal. In the last twenty years wire lace has gained considerable popularity, and more and more lacemakers are attracted to it.
Lacemakers who work with fibre are often curious about working with wire: How difficult is it? Can anybody do it? Are the special tolls really necessary?
Based on my experience of making lace with metal for more than 30 years and teaching wire lace techniques to others for almost as long, my answer is always affirmative: “Yes, you can do it!” and “Yes, it is better to have the right tools and materials for the best results”.
In the simple manual “Wire Lacework – Lenka’s Introduction to Bobbin Lace in Wire” written with an aim of helping lacemakers with the transition from fibre to wire lace, I explained the basic differences between tools and materials. A series of basic patterns for wire lace followed, each dedicated to a particular technique in full detail. These publications are available for purchase in my Wire Lace Supplies shop on Etsy, and many lacemakers have downloaded them already. Special bobbins for wire lace, together with colourful wires, are popular as well, and I am happy to supply them to lacemakers around the world to help make the wire lacework accessible to all.
But what about those who are not sure if they will like the medium? Or can’t justify investing in a new set of bobbins yet? For those of you, the new Trial Pattern for Wire Lace Newbies is here to help.
You can try making wire lace with the tools you already have and test the new medium in this simple trial pattern.
You will need:
- 6 pairs or regular lacemaking bobbins that you use for fibre lace
- copper wire
- old scissors for cutting wire
- lacemaking pillow (any style)
- pins
- materials for preparing the pricking (same as for fibre lace)
Let’s start from the beginning, with the most important points first:
1) Attitude
Approach this project as a playful excercise, and not as a serious assignment (rather like a first date, as opposed to a wedding day). Do not set any expectations and keep your mind open to the new experience. Wire is different than thread and it needs different handling. The best way to discover its qualities is to go slowly and pay close attention wire’s behaviour. Allow the wire to show you the way and follow gently. You know the stitches, and wire knows its own preferences. When you work together, you will make a fine team.
2) Wire
Make sure that you have the right wire. This is absolutely essential. Unsuitable material can turn you off wire lace forever, and that would be a real shame. I recommend copper wire in sizes 0.2mm – 0.25mm (in American Wire Gauges #30-32). Good quality copper wire should be soft and pliable to accommodate the stitches. Stay away from brass and aluminum and from wires with unknown content. While it is possible to work with those wires (later, when you have more experience), your first wire lace should be attempted with the most compatible wire, and that is a pure copper wire.
You can make a simple test of the wire pliability: cut a piece of wire and tie a basic bow with it. If you are able to work with the wire easily, and the knot can be tied almost as tightly as with a thread, the wire is suitable for lacework. If the wire feels stiff and the knot doesn’t close, the wire is not acceptable, because it has too much resistance to conform to the stitches.
Red bow – unknown content, coated – too thick and rigid – not suitable for wire lace
Purple bow – pure copper 0.2mm (AWG 32) – perfect for wire lace If your wire is not up to the standard, do yourself a favour and postpone the wire lace trial until you have the right material.
3) Lacemaking pillow
Any pillow will work for this pattern. I used a student pillow, that has been serving to beginners in my studio (and many of my own projects in between) for the last 5 years (and is still good to use!)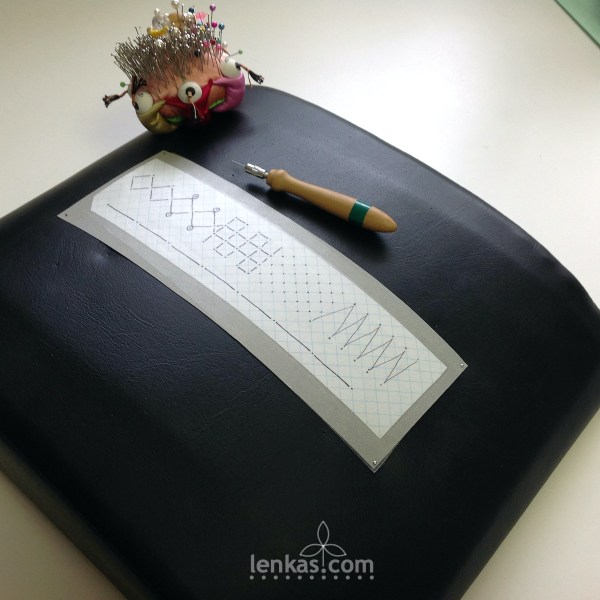 4) Pins
Generic dressmakers pins are better than fine lacemaking pins. In the sample, extra long dressmakers pins were used, and extra thick pins for picots.
5) Bobbins
Use the bobbins you would utilize for making lace with linen #40/2, which are generally bigger, thicker and heavier than those for fine lace. I used traditional Belgian Torchon bobbins that I recommend for students who are learning fibre lace basics.
It is important that the bobbins are not empty, but wound with thread. Leftovers from the past project are ideal. The threads will help to anchor wire, so it won’t be slipping and unwinding from the end.
PREPARATION:
Bobbin winding
Prepare 6 pairs:
0.9 meter (3ft) per bobbin [1.8m (6ft) total wire length for one pair, divided equally between 2 bobbins]
Match the fibre and wire end and tie them together with a simple knot. 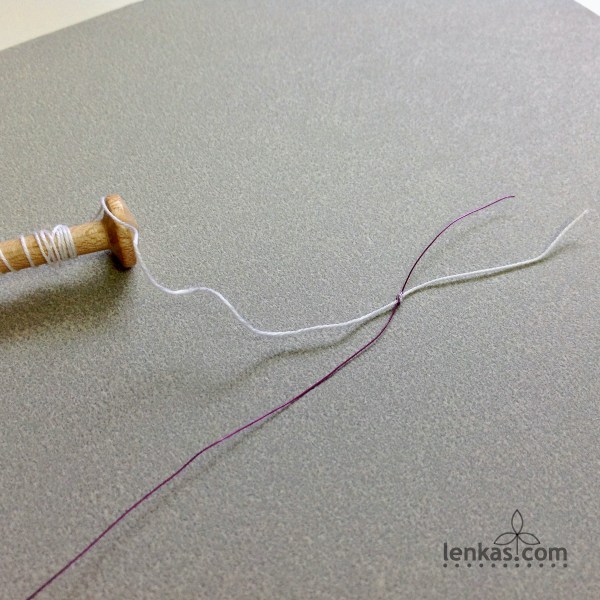 Start winding the wire at the lower part of the neck, wrapping several turns over the ends. This should bury the knot in the layers of fibre underneath, and hide the sharp wire end.
 Work slowly and watch the wire. Keep it open and free at all times to prevent kinks or snags. Observe your good habits from fibre lace and add wire by the means of turning the bobbin (as opposed to wrapping the wire around bobbin). Layer the wire rows over the thread, not too tightly, but not too loosely either. Secure the wire with a half hitch. This one loop is enough to hold the wire on the bobbin and is easy to release.
 Pricking
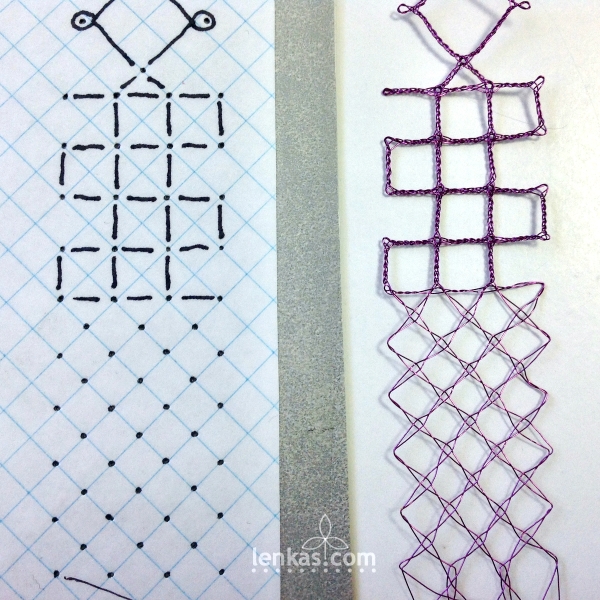
Using a squared paper: imperial 1/4 inch (metric 6x6mm or 5x5mm), draft the pattern as in the picture.  Alternatively, print the pricking from the Free Trial Pattern for Wire Lace Newbies pdf file
Make sure that your printer is set to 100% to print the correct size (size check is included next to the pricking).
 Prepare the pricking as you would for traditional fibre lace. If your pillow is on softer side, use a bit heavier card stock for backing. It will help anchor the pins to withstand firm tensioning.
WORKING INSTRUCTIONS:
Plaits
Hang 2 pairs on the vertical line’s top pin.
Keep the “leashes” short – wire length from the pin to bobbin’s head should not be more than one length of the bobbin. Work simple plait: *start with linen stitch (cloth stitch) C-T-C and tension. Continue braiding T-C-tension, T-C-tension, … until the pinhole is reached. Pin between the pairs.** Repeat from * to **
. Work slowly and concentrate on tensioning both pairs well after each Cross. Feel the wire and learn how much to pull in order to tension the plait well. Continue working until the braid is nice and even. Compared to fibre lace, the plait made from wire should be textured and three-dimensional.
 Unpin the plait and move it to the pillow side. Use another 2 pairs and repeat the plait work.
 Windmill Crossings and Picots
Pin both plaits above the pricking so they are ready to start working at the top of the main pattern. At the first pin, 4 pairs start with windmill crossing. With each pair working as one bobbin make C-T-pin-C, tension.
 After the windmill, two left pairs start with a linen stitch (C-T-C), and continue to plait (T-C-tension, T-C-t,…) towards left pinhole, pin between the pairs. Start the next plait towards the centre pin. When done, work with two right pairs in the same way (plait, pin, plait).
 . Make windmill crossing in the centre. Repeat.
In the 3rd diamond, add picot on the footside. Simple wrapped picot is easy: twist outside pair 3 times (tension after each twist: T-tension, T-tension, T-tension), wrap the twisted pair around the picot pin (clockwise movement on left footside, counterclockwise on right footside). Tension the picot well and start the outgoing plait with C-T-C.


When 4 diamonds are finished, take a short break: If you reached this point without encountering a major frustration, congratulations! That is a promising start. Reflect on your experience and let the new skills sink in.
If you feel that you could do better with more practice, unpin your lace, move it up and repeat 2 or 3 diamonds. When you are ready, proceed to the next part – plaited square grid.
Before you start, have a look at your bobbins – some wires might be short, some longer. Depending on your tensioning technique, sometimes wire gets released when the bobbin is pulled, and other times the pull actually tightens and locks the hitch. That is the nature of the half hitch, and the only remedy is to patiently adjust the lengths of the leashes by undoing the hitch and releasing wire if it is short, or re-winding if it is too long. When your bobbins are all adjusted to the same length, it’s time to proceed to the next segment of the pattern.
Plaited Square Grid
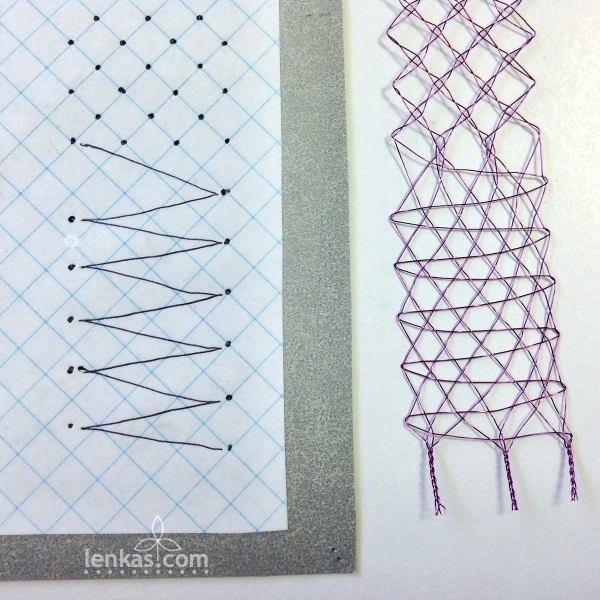
On the left side of the pricking, add 2 remaining pairs. Make a plait towards the next pin, work windmill crossing, plait, windmill crossing, plait, pin between pairs at the right edge pin. Continue working the grid. The intervals between the pins are identical, so each plait is the same length. It is helpful here to count number of plait stitches and repeat them in each segment to achieve uniformity of the braid. In the sample, I worked C-T-C to start the plait and then repeated T-C-tension 4 times (altogether 6 Crosses between the pins). In the last row of squares, I tensioned more and was able to squeeze one more T-C, to the total of 7 Crosses between the pins. See what you can do. Bear in mind that tensioning depends on the material. Every wire is slightly different, some are softer and therefore easier to tension, some are harder, and no matter how well you tension, minute gaps in the braid remain. That is fine, as long as the plait is nice and even.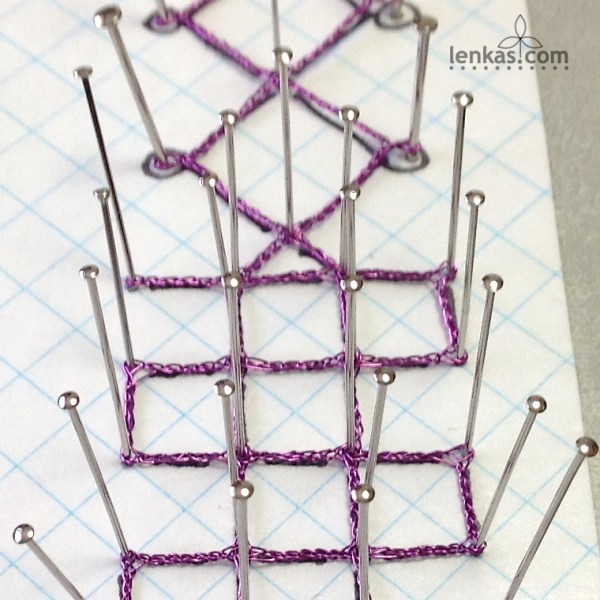 Before the last grid row (from left to right) leave the left plait pair behind, and finish the row with only the right pair: Twist the pair 3 times, work 3 pair windmill crossing, 3xT, 3-pair windmill crossing, pin under the pair at the edge pin hole. This distributes the pairs for the next segment: Torchon Ground.
 Torchon Ground
Torchon ground is easy to work and tension.The ground is done the same way as in fibre by following diagonal lines: C-T-pin-C-T-tension. Make sure to tension after each stitch. Once the wire is formed, it is hard to change its shape. Pulling on the diagonal pair at the end of the row, routinely used in fibre lace, is not very effective in wire medium.  Because wire keeps its shape so well, it does not require continual support of pins. It is therefore possible to start reusing pins from the top rows now.
 Half Stitch
The last part of this trial pattern is a half stitch weave. First row starts on the left, worker makes half stitch C-T with each passive pair. Tension the worker well at the end of the row. Pin, add one Twist to worker, tension. If the single worker line sags instead of being straight, undo the extra twist and re-tension every passive pair (starting from the beginning of the row, all the way to the last passive pair). Then re-tension the worker, add 1 extra twist to it (to the total of two twists). Continue with half stitch weave.
After the last row, plait the neighbouring pairs to create 3 tails. Cut off bobbins.
Unpin gently and admire your first wire lace 🙂
Results
A) If you enjoyed this excercise and are happy with the results, it means that you have a natural talent for wire lace. With what you learned already, you can start exploring other designs – more complex plaited lace or Torchon ground patterns. At the beginning, avoid patterns with cloth stitch. While easy to make in fibre, cloth stitch requires more experience in wire lace, and therefore it is better left for later.
B) If you had fun doing this excercise, but are not wholly satisfied with the outcome, try to work the pattern again and concentrate on the points which need improvement. Since you already know the stitches, it will be easier to pay more attention to the technique, and the outcome will be more competent.
C) If you did not have fun at all and are not thrilled with your first wire lace sample, it might mean that wire lace is not for you, and that is OK, too. You tried and now you know. There are many laces to choose from and lacemakers have to select wisely to which projects they will dedicate their time and effort. You can share your experience with your lace friends and tell them about the Trial Pattern for Newbies, so they can make their own wire lace sampler.
I hope that this Trial Pattern for Wire Lace Newbies encourages more lacemakers to give wire lace a try!
If you have any questions regarding this project or wire lace in general, feel free to ask using the LEAVE A REPLY box below.
Additional Information
To learn more about techniques used in this tutorial, the Flower Earrings Pattern and Tutorial (Basics #001) offers more information about plaits and windmills. Half Stitch Leaf Pattern and Tutorial (Basics #002) is dedicated to mastering half stitch weave, and also explains how to mix colours with doubled wires.
Lenka’s Wire Lace Bobbins
The more wire lace you make, the more you will understand why dedicated wire lace bobbins are beneficial. They are designed to anchor the wire ends securely, and to hold and release wire gently and quickly. Having thicker necks, the bobbins prevent excessive curling (and therefore hardening) of the material, which results in happier wire and consecutively, a happier lacemaker. Medium bobbins for wire lace are extremely easy to use, and they are suitable for many styles of wire lace and many sizes of projects. On top of it, they work equally well for metallic threads. In my humble opinion, they would enhance every lacemaker’s toolbox 🙂
Lenka’s Medium Bobbins for Wire Lace are available exclusively in my Wire Lace Supply online store, currently hosted on Etsy.

Medium bobbins for wire lace are extremely easy to use, and they are suitable for many styles of wire lace and many sizes of projects. On top of it, they work equally well for metallic threads.
In my humble opinion, they would enhance every lacemaker’s toolbox 🙂


Happy lacemaking,
Lenka
Happy Easter, Happy Lace!
Posted on April 18, 2019
If you feel the spring energy surging and looking to manifest through you, here are some ideas for projects in wire lace! We have quite a collection of spring patterns in the New School of Lace design book… in bobbin lace as well as needle lace:


Some of them are available exclusively from Wire Lace Supplies shop on Etsy, the others were workshop projects that are still waiting to be published in the Pattern&Tutorial format.
Get inspired, have fun and express your creative self in wire lace!
Offering: Red Berries
Posted on March 26, 2019

Frame:
Cedar driftwood (designed and made by Colin Hamilton of Thuja Wood Art
Lace:
Enamelled copper and stainless steel wires
Semi-precious stones and beads:
Bamboo Coral, Clear Quartz Crystal, Hawk’s Eye, Rudraksha Seeds
Technique: handmade bobbin lace – TesseLace pattern
Dimensions in centimetres: h:43 x w:43 x d:5
Dimensions in inches: h:17 x w:18 x d:2
If cold winter months are good for something else than hibernating, it is for lacemaking. Long, dark nights offer quiet time for uninterrupted work and allow sustained focus that reaches almost a state of meditation.
Cocooning in my studio, I was looking for an idea for lace that would fit in one of Colin’s driftwood frames. Dried by sun and fresh air the wood feels so warm, as it is radiating energy collected over many summers. Just like standing cedar trees, the driftwood offers assurance that we, too, will survive yet another winter. Living on the West Coast of Canada for thirty years, I came to understand why cedar has been considered sacred by indigenous people.

majestic cedar tree in my backyard
An empty red cedar driftwood frame has been standing on the shelf in my studio for more than a year, patiently waiting for lace. Upon invitation, the images kept appearing, but none of them strong enough to stay and prompt me into action. One day, on a walk through fresh snow in Kwomais Point Park, I was amazed by dark lines of underbrush with embellishments of ice and red berries, set starkly against pristine white background. There is a lot of lace to be found in the forest, but rarely in such plain sight.


I started to work on my next offering. Once again, my connection with Veronika Irvine and her TesseLace worked miracles, and I was able to find the right grid and use the Circular Grid Templates for designing the mandala.


It worked so well that the piece was finished before the snow in the forest melted… It became my offering to the season that makes us revere cedar, to the beauty of snow and ice, and to the berries who know how to say ‘fertility’ like no other.


The Offering: Red Berries will be shown in juried exhibition ‘Just Gates’, organized by Arts Council of Surrey, in April 2019.
Copyright©2019. Lenka Suchanek. All rights reserved.
Merry and Happy…
Posted on December 21, 2018

Happy celebrations of solstitium – wherever you are and in whatever tradition is closest to your heart.
In the stillness of this moment let’s align with the Earth and experience cosmic equilibrium.
It’s good for our bodies and souls… and for our bobbins as well 🙂
NEW: Pattern & Tutorial #12 – Snowflake
Posted on November 28, 2018

Available exclusively in my Wire Lace Supplies shop on Etsy.
Pattern #12: SNOWFLAKE is an ornament for winter festivities. It can be used as a decoration on a Christmas tree or windows, added to season’s greeting cards, or made as a gift for someone special. When fitted with a bail or attached to a bangle frame, the Snowflake can be worn as a pendant, especially when made in fine silver wire.
Required Wire Bobbin Lace Skills :
Plaits and Windmills (PT 001), Half Stitch (PT 002), Leaf Tallies and Sewings (PT 003)
Skill level: 1
Pairs: 4
This pattern looks great when made in Non-Tarnish Silver (0.2mm) or Ivory colour. But it can be done in many other colours: in gold it will look like a star, in red, purple or yellow, it will blossom as a flower. Imagination in wire lace has no boundaries!
