 Lenka's Way of Lace
Old Wise Tree from the Netherlands
Posted on April 1, 2026
March 31, 2026
In the last days of winter an email from the Netherlands delivered a special news: there is a new Old Wise Tree, and it is made from copper wire! What a welcome addition to the Old Wise Tree Gallery; until now, only eight trees out of forty-one have been made in metal – seven in copper and one in bronze. With the new tree from Ephrem Muskee, the wire grove is now covering more than twenty percent of the gallery space. That is fantastic!
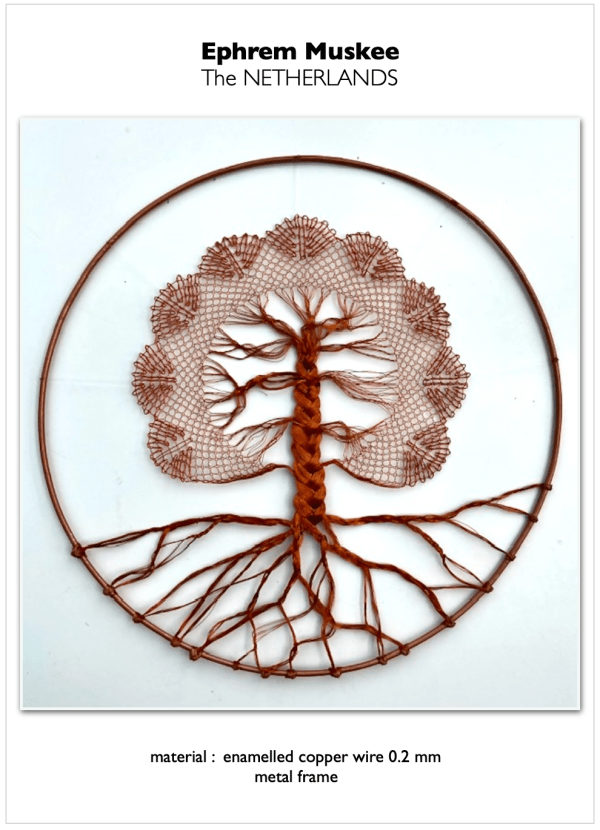
Wire is my favourite material for lacemaking, and I love to see its potential emerge and expand in hands of other lacemakers. Ephrem’s Old Wise Tree does just that and presents wire lace art at its best. The work shows a sound technique of an experienced lacemaker. Precise tensioning of the ground and the fan worker reveals that Ephrem mastered the wire medium, which is not an easy task, especially for a lacemaker used to work with fine threads. The tree’s branches, trunk and roots, too, are perfectly formed. Braiding and twisting 300+ strands of lively wires is a challenge, and it requires a lot of patience and practice to succeed.
Ephrem’s original work brings forth two most important assets of the wire medium – its strength and its response to light.
In this work, copper wire gives sufficient support for lace to be mounted in an open frame. A robust root system, simply anchored to the frame, creates strong foundation for the burly tree trunk. The airy, yet sturdy, crown is secured to the outline by only a few invisible nylon strings.
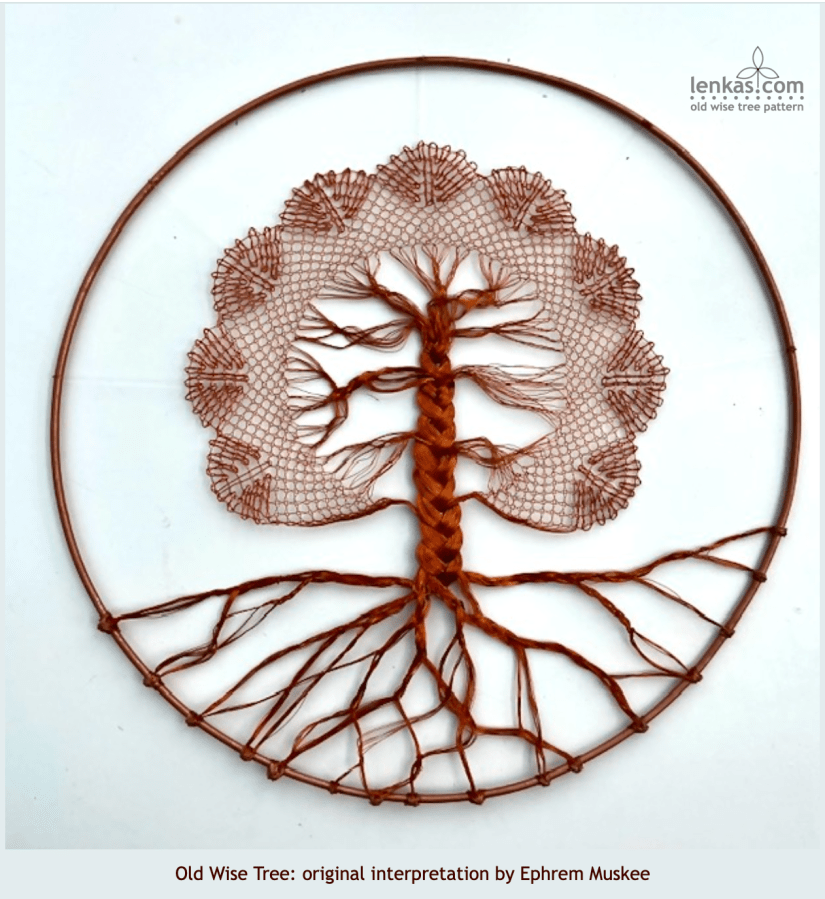
Two photographs of the tree, one against black and the other against white background, demonstrate the unique quality of wire lace to reflect light. In natural light a minute detail is revealed, so it looks very much like fibre lace. In a spotlight the lace bursts out with brilliant shine, like fine metalwork, and bright colours, like glass. The enamelled copper wire is essentially a combination of both materials, pure metal coated with a glass-like polymers. And light loves to play with them.
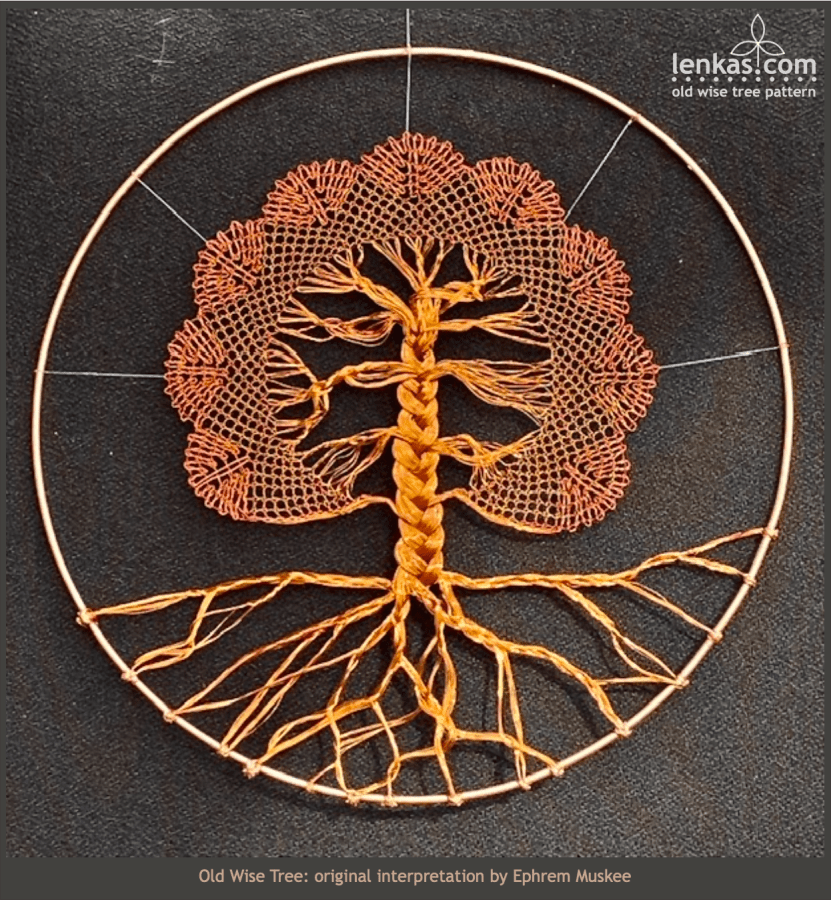
I envision this Old Wise Tree suspended in an open space, where it is transformed by light, natural and artificial, during the course of the day. With its shadow echoing the intricate pattern around, the Old Wise Tree fills the room with a delicate charm that only handmade lace can achieve.
As long as the character of the technique is respected, bobbin lace readily adapts to new materials without losing her beauty.
What an amazing interpretation of the Old Wise Tree theme. Congratulation, Ephrem ! Thank you for sharing your original lace art 🙂
Please find the new tree in a company of others in the Old Wise Tree Gallery
The online gallery is always open and welcomes all visitors!
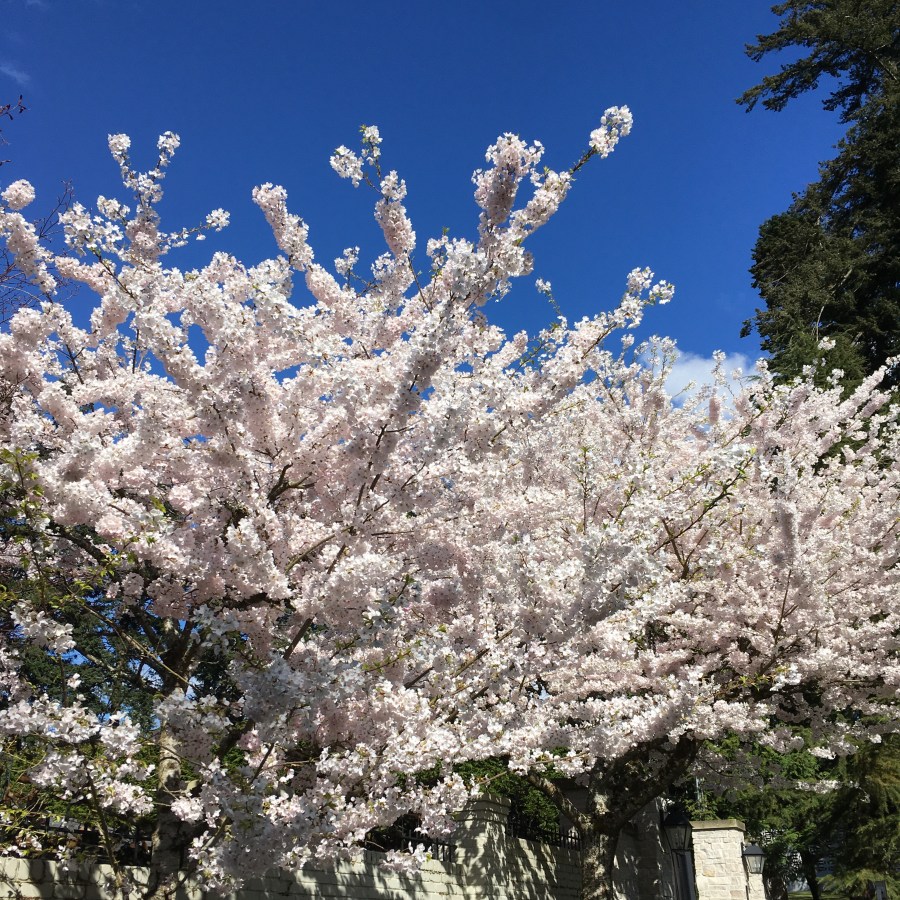
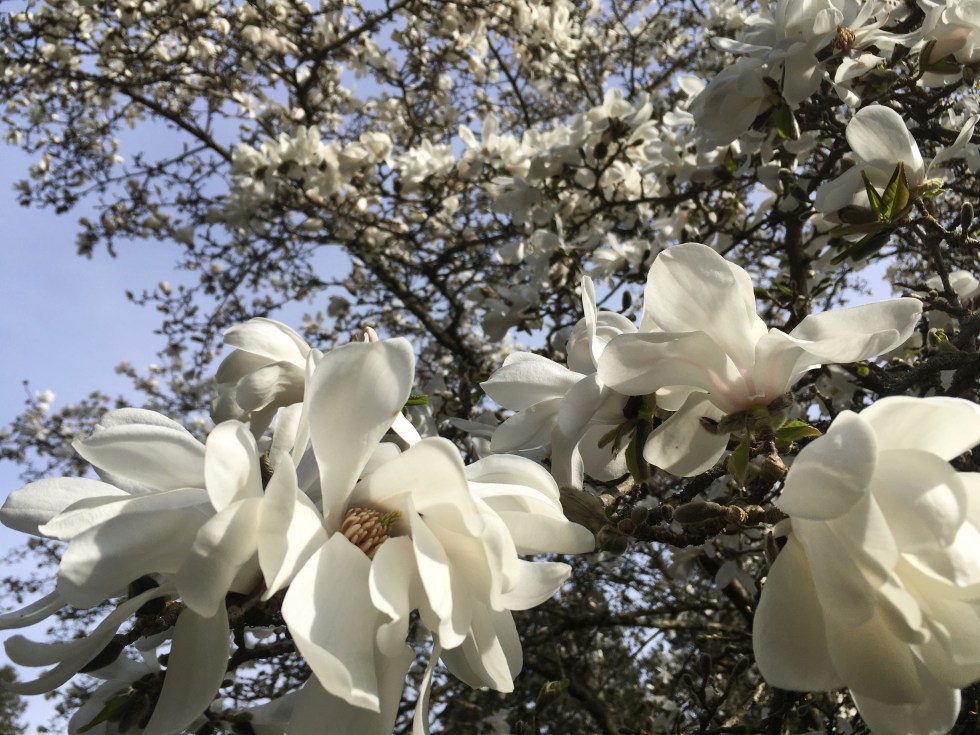
It is a wonderful spring in Vancouver now. Cherry trees, magnolias and big maples are in bloom and all plants are sending new shoots. Air is filled with youthful energy and the sun, when it comes out of the clouds, is nice and warm. I think it is the best time to find inspiration in nature’s fertile creativity and perhaps think about planting a seed of another Old Wise Tree…


The Free Old Wise Tree Pattern, with a full tutorial, was published on this website on January 16th, 2021.
As of March 30th, 2026, the Old Wise Tree page has been viewed 15,629 times; 4018 visitors downloaded the pricking; 42 artworks from 9 countries have been submitted to the Old Wise Tree Gallery.
Everybody is welcome to use the free pattern and create an original interpretation of the theme!
If you do, please consider sharing your creation with us :
Send a photo (or more) of your tree with following information to this email address:
Your Name + City / Country + Materials used + Pricking size (if different than the original 100%)
+ Optional: Notes (any specific information you would like to add)
Happy lacemaking to all,
Lenka
The Year of Old Wise Trees
Posted on December 30, 2024

December 30, 2024
I am pleased to conclude the 2024 blog with a post about a new addition to the Old Wise Tree Gallery – a picture that is especially well suited for marking a transition from the old to new year.
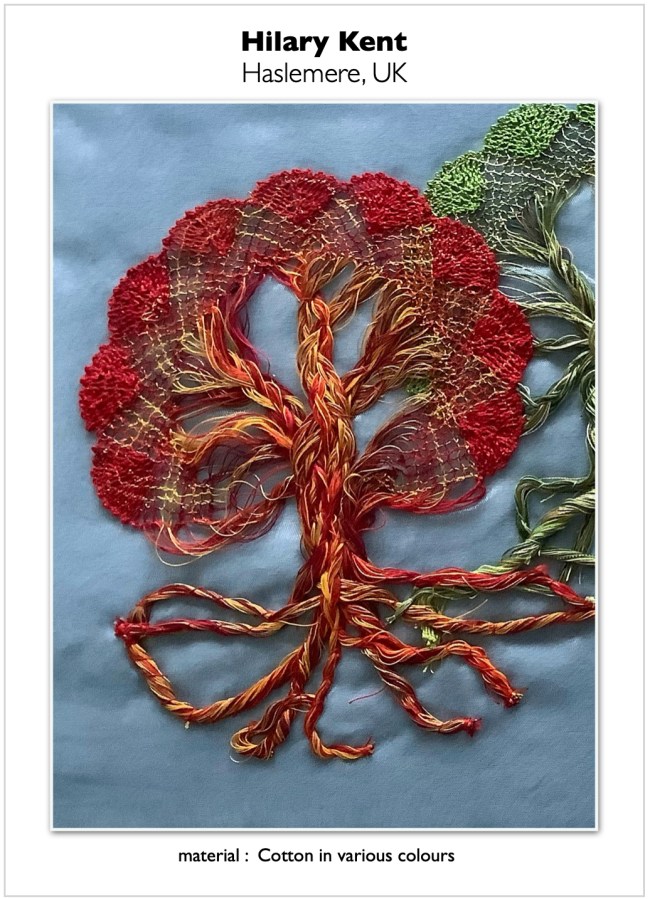
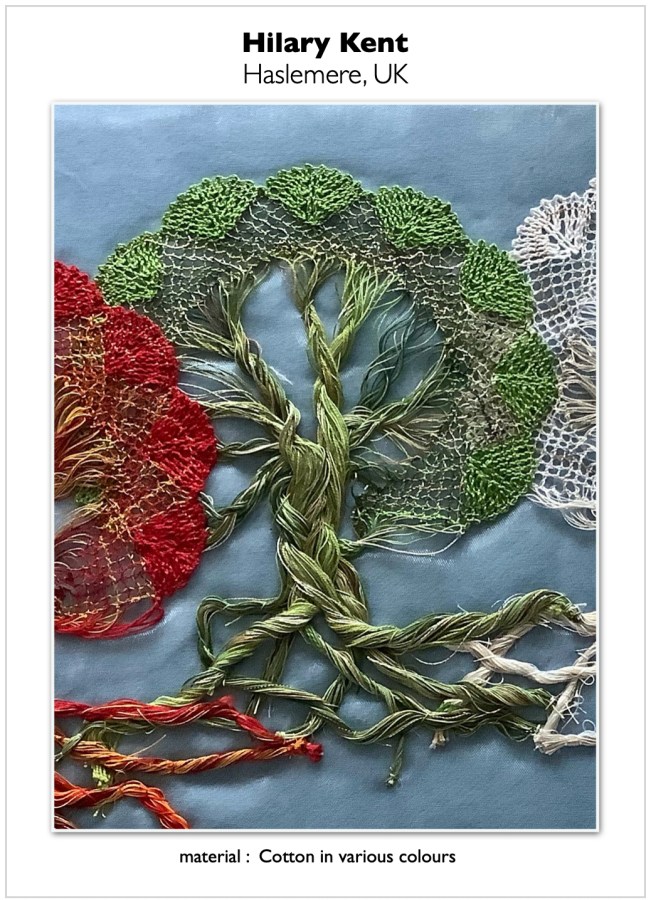
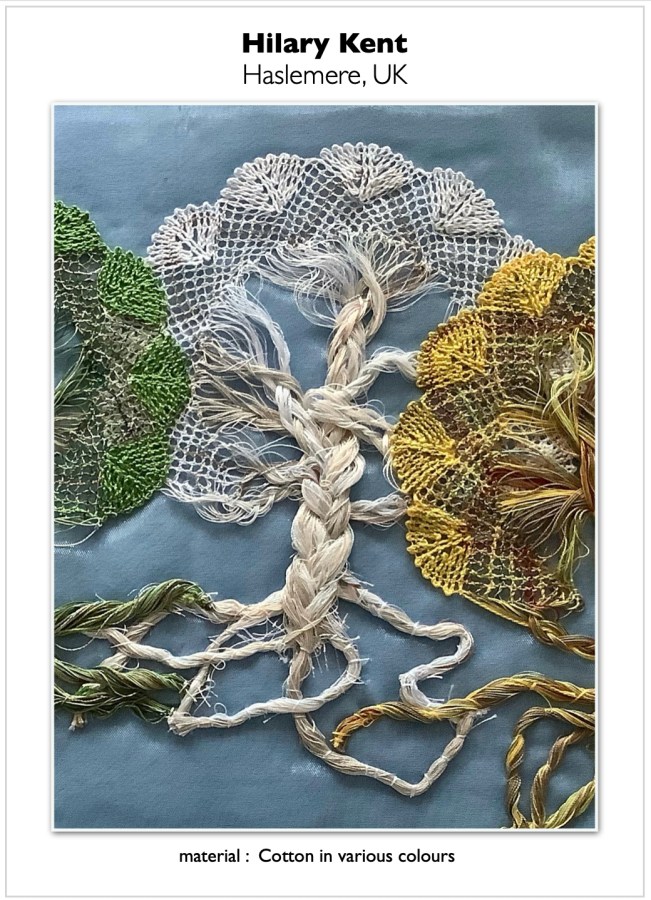
Hilary Kent from Haslemere in the UK shared a photograph of her Old Wise Tree creation: Four trees framed together in one picture as a beautiful illustration of the passage of time. Each tree, woven in multicoloured threads to a visually dramatic effect, is a unique artwork – original, bold and expressive. Daring choice of colours lends a distinctive character to individual trees. From subtle white and ecru threads, through soft greens, earthy yellows and browns, to flaming reds, the gradation of colours achieves a striking effect. All together, the trees create a harmonious whole. With their crowns overlapping and roots connecting, they seem to be morphing one to another in a natural progression of time.

It pleases me greatly to see a well made polychromatic lace. Looking at the craft evolution I think that the most important contribution of the modern era is the use of colours. With a few regional exemptions (e.g. in Russia, Slovakia, Spain, South America,.. ) hand made lace was traditionally made in white, ecru or black, and previous generations of lacemakers and lace designers achieved an ultimate mastery of expression in those sole colours. From the height of their accomplishments the handmade lace production began to decline as the industrial revolution conquered Europe. Ensuing two terrible world wars could had seen the fine lace craft completely eliminated, but it was not to be. Lace was reborn in the hearts and hands of artists who envisioned a bright, colourful future for the craft, as a part of the new textile art movement. They succeeded, and it is an honour and joy to continue on the path to expand the creative horizons of handmade lace. Current generation of lacemakers has such wonderful choice of materials in myriad of colours, from linen, cotton and silk to manmade fibres, and – yes – even wires. All we have to do is use them!
Thank you, Hilary, for sharing your unique lace creation. Seeing your work, and all other Old Wise Trees in the exclusive online gallery, gives me confidence that the wisdom of old trees and and old lace is not lost to those who seek and create…
Cheers to an imaginative, inspired and colourful new year!
Lenka
The Free Old Wise Tree Pattern and Tutorial was published on this website on January 16th, 2021.
As of Dec 30th, 2024, the Old Wise Tree Pattern and Tutorial page has been viewed 14,857 times
3137 visitors downloaded the pricking
41 artworks from 8 countries have been submitted to the Old Wise Tree Gallery
Everybody is welcome to use the free Old Wise Tree pattern and create an original interpretation of the theme!
If you do, please consider sharing your creation with the world – send a photo of your tree with following information to this email address: old.wise.tree@lenkas.com
Your Name + City / Country + Materials used + Pricking size (if different than the original 100%)
+ Optional: Notes (any specific information you would like to add)
Disclaimer: By submitting the photo/s and requested information you agree that your work will be displayed in the Old Wise Tree Gallery hosted on this website.
Happy lacemaking!
Quintet of Old Wise Trees from Stratton Lace Makers in the United Kingdom
Posted on October 14, 2024

October 14, 2024
It’s always a special day when an Old Wise Tree photo reaches my email inbox. When five of them come together, it’s a celebration! I love to see interpretation of the pattern and never fail to be impressed with lacemakers’ imagination, creativity and skills.
Recent arrival of an Old Wise Tree quintet from Stratton Lace Makers in Dorset, UK, couldn’t have come at better time. Summer in Vancouver, Canada, was ending, and because it was short and mild, I did not feel quite ready for change of seasons. The collection of the Old Wise Trees from Dorset reminded me that trees are beautiful in every season, from spring to winter, as they follow the wisdom of Nature’s cycle without resistance. That was exactly what I needed to realize in order to welcome autumnal equinox with poise and embrace the upcoming fall.
Besides communicating a positive massage trough their art, the Stratton lace makers fulfilled another goal of the Old Wise Tree project: working as a group they contributed to keeping lacemaking alive in communities. As a self-taught lacemaker I experienced limits of learning the craft in isolation, and therefore, throughout my lacemaking career, I initiated many projects for groups. I watched with great satisfaction how well lacemakers learned together, how they encouraged and helped each other, overcame obstacles and shared success. I believe that this bond is inherent to textile crafts, and lacemaking wouldn’t have grown as fast and lasted as long without it. By carrying on the fine craft tradition, together we belong to the same time-honoured family tree. The first Old Wise Trees were created with my pupils in the New School of Lace classes, and when the Old Wise Tree moved online, I hoped that more lace groups will find it.
Gillian Membury, who organized the Old Wise Tree project for Stratton Lace Makers, wrote:
“It was a fun project to complete as a group as we watched each tree grow and develop. We all agreed that the most difficult part was getting the roots to lie in a tidy way!”
I agree – the roots are the biggest challenge! And it is because the way how the roots are made in the Old Wise Tree is an antithesis to bobbin lace.
Lacemakers love patterns. We are all attracted to geometrical grids of dots and complex system of twists and crosses. We love our very orderly bobbins which keep our threads tidy. Within the structure, no matter how complicated, we can lead multitude of threads to successful completion of an intricate pattern. But when it comes to loose threads, we seem to get lost. That’s exactly where lies the test of the Old Wise Tree: the root work takes us to uncharted territory. We have to step out of the lacemaker’s mind, let go of an idea of a perfect order and work with unbound threads. At first, it is uncomfortable, confusing, even bewildering, but as soon as we give up control the roots start to flow and find their place. The finished tree brings a big relief and a sense of accomplishment, earned through the difficult underground journey.
And then, when we return to our beloved bobbin lace we enjoy our perfect patterns and charming sound of clicking bobbins more than ever before.
When I designed the Old Wise Tree, of course I did not mean to torment myself, let alone other gentle people. I just thought that the contrast between orderliness of the crown and disorder of the roots is interesting and that side-by-side comparison draws attention to the intricate bobbin lace weave. Many non-lacemakers find the Old Wise Tree intriguing, and want to know more about the technique. And for the lacemakers, the pattern opens door to experimenting and trying something different. The challenge is such that only the strongest individuals succeed!
Please allow me to introduce five of them – Stratton Lace Makers- from Dorset in the United Kingdom :
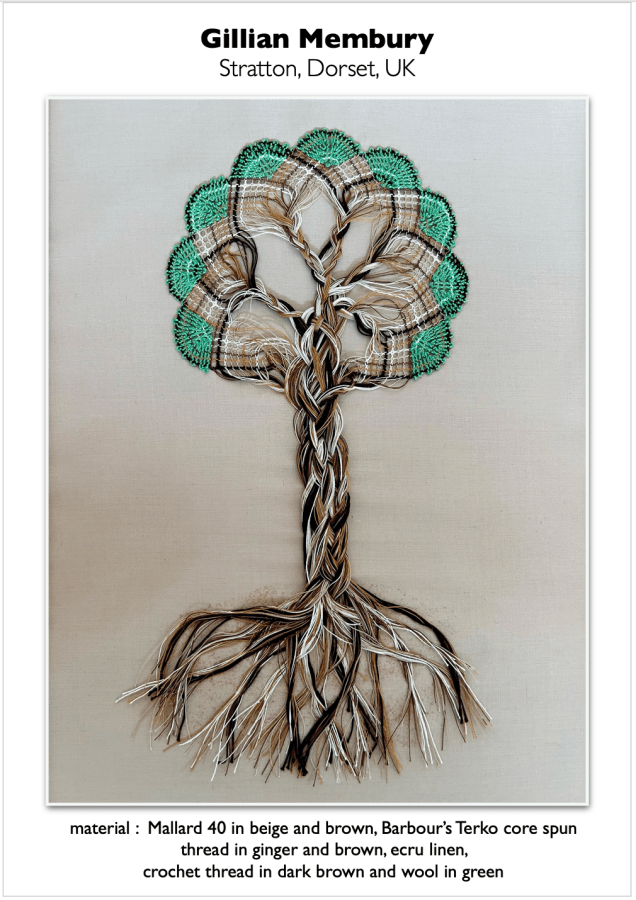
Gillian’s Old Wise Tree reminds of early spring, with fresh and soft green crown growing from branches that look as if covered with morning frost. Contrasting colours of threads in variety of materials add a lot of interest to the crown and accentuate the branches and imaginatively braided trunk. The strong tree is supported by equally strong roots which indicate future vigorous growth. Well made and very unique Old Wise Tree!

Anthea’s choice of colours evoke dream-like atmosphere of late spring-early summer season. Interestingly, a variety of effects in this work was achieved with just one size of thread (Finca Cotton #40). The threads in mixed colours flow from vast and delicate root system up through the trunk and branches, blending to achieve watercolour-like softness and movement. In juxtaposition, two strong colours that boldly define the crown remind of a palette knife painting technique, a perfect choice for portraying robust and vigorous foliage. In Anthea’s work the soft and subtle merges with strong and powerful, and it is evident that lace art can express both aspects of nature equally well.
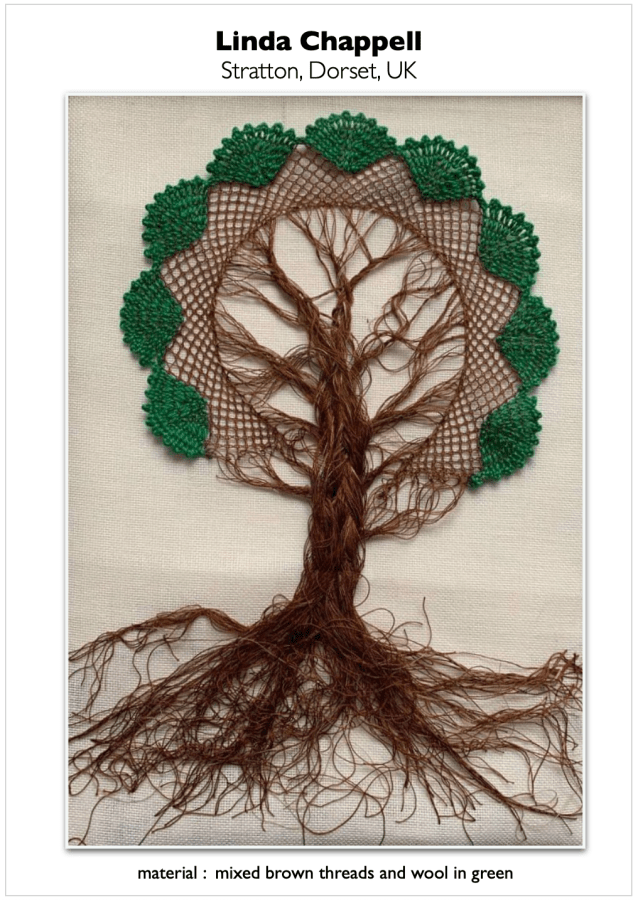
As a prime example of the design challenge that I explained above, Linda’s Old Wise Tree aptly illustrates the pattern dilemma. Her flawlessly executed bobbin lace Torchon ground in the crown stands out against free, organic body of the tree. Linda emphasized the ground with added footside as if to point out the pattern’s connection to traditional doilies. The concentric line clearly separates lace part from freely formed branches, trunk and roots. As the threads leave the pattern to bundle and braid, their texture and subtle colouring becomes more prominent until it takes on almost organic feel of a tree bark. Linda’s artistic approach to the tree foundation is open and relaxed and the roots are unapologetically wild – bundled, knotted, gnarled – and free. A truly unique Old Wise Tree!
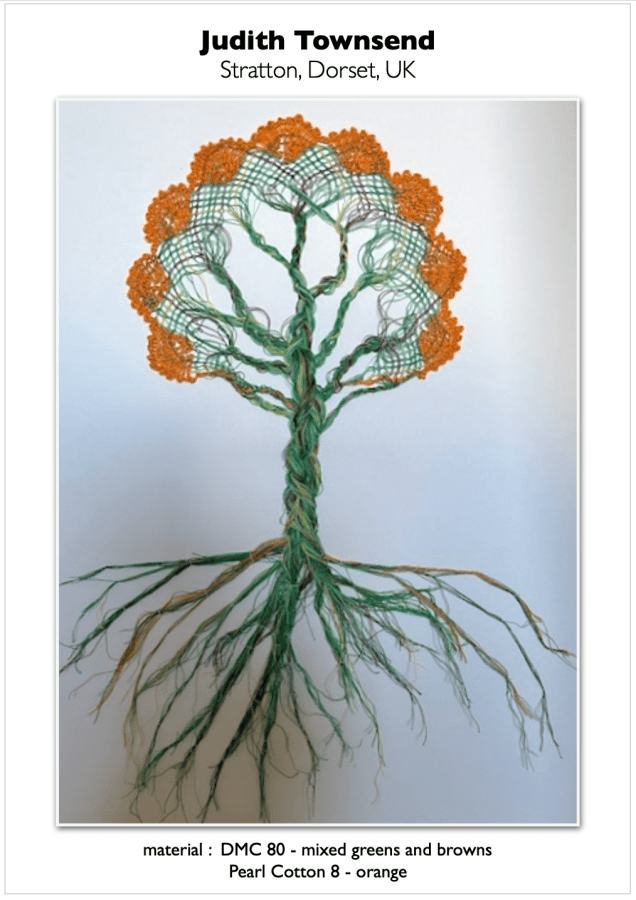
It was Judith’s Old Wise Tree with its cheerful tall crown that reminded me about the autumnal beauty. Threads in lively greens with brown accents create a fun pattern in the crown and add depth to braided branches and trunk. Pearl Cotton in bright orange fills the crown with gorgeous display of carotenoids and the tree seems to be dancing with joy in its new dress. Interplay of colours between the leaves, branches, trunk and deep roots calls to mind the way that real trees move water through their entire system and distribute nutrients for healthy growth. And by the way, just as a byproduct, supply oxygen for all aerobic creatures on this planet… Trees are simply amazing!
And Judith’s Old Wise Tree is a tribute to their beauty, vivacity and generosity.

Anette’s Old Wise Tree looks like a majestic oak at the beginning of winter. Its strong and sturdy wide-spread crown is supported by muscular brunches growing from a well built trunk. Underground root system shows the same robustness and resolve to grow to its fullest potential. Anette’s choice of threads greatly contributes to a successful portrait of this handsome tree. Linen, metallics and polyester mix delivers lovely tones and shading with subtle sheen. It was probably not easy to work with such variety of materials simultaneously, but it produced very good effect in Torchon ground and excellent volume in the rest of the tree, especially in the trunk. Dark pearls randomly distributed throughout the crown added a sparkle that contributes to a royal look of this Old Wise Tree.
What a wonderful journey through seasons! Thank you, Stratton Lace Makers, for sharing your original lace creations. Your quintet of Old Wise Trees makes a truly special addition to the Old Wise Tree Online Gallery!
I invite everybody to visit the Gallery to view the new works together with others, thirty seven Old Wise Trees in total. If you perused the online gallery before, this time please remember to pay close attention not just to the beautiful tree crowns, but also to the amazing roots!
With thanks,
Lenka
The Free Old Wise Tree Pattern and Tutorial was published on this website on January 16th, 2021.
As of October Oct 1st, 2024
- the page has been viewed 14,406 times
- 2904 visitors downloaded the pricking
- 37 artworks from 8 countries have been submitted to be exhibited in the Old Wise Tree Gallery
Together we are slowly growing an Old Wise Grove. Big thanks and a round of applause to all participating lacemakers!
Are there more lace trees growing in the world?
Please consider reaching out by sending a photo of your tree with following information to this email address:
Your Name + City / Country + Materials used + Pricking size (if different than the original 100%)
+ Optional: Notes (any specific information you would like to add)
**************************************************************************
Disclaimer: By submitting the photo/s and requested information you agree that your work will be displayed in the Old Wise Tree Gallery hosted on this website.
**************************************************************************
Old Wise Trees in the United States of America
Posted on April 18, 2024
April 18, 2024
Yes, the Old Wise Trees grow in the United States of America as well!
I always thought so, even heard about them occasionally, and wondered whether they will ever allow to be seen. Finally it happened. Two trees arrived within the same week as a delightful proof. They are beautiful, each in its own distinctive way, and they aptly represent the eclectic nature of lacemaking craft in America.
One of the trees is not just old, it is ancient. It was made it in 2008, which means that the pattern must have come from my old Silver Pin Studio website. I remember offering a free pattern there with very basic instructions, leaving it up to lacemakers to figure out a lot of steps on their own. It was quite common in those times. Lacemaking was young and rather rare craft in North America. Lacemakers who were few and spread all over the vast continent had to be resourceful and self-sufficient. When I eventually met some of them I found them to be keen, dedicated and fun to work with. They were open to learning any technique, from traditional to modern, in any material, from fine threads to wire. Without ingrained traditional styles, it was possible to explore and expand handmade lace together toward new horizons.
With the same enthusiasm, the American lacemakers embraced internet and started to share resources online. Interestingly, some lacemakers, especially in California, were employed in computer industry and were quite proud about the connection between binary code in software and bobbin lace. Looking back, I don’t think any of us imagined how much and how fast will internet help with preserving the fine craft of lace by making the sources readily accessible for many lacemakers around the world.
And I did not know then that Old Wise Tree project will one day have its own online gallery!
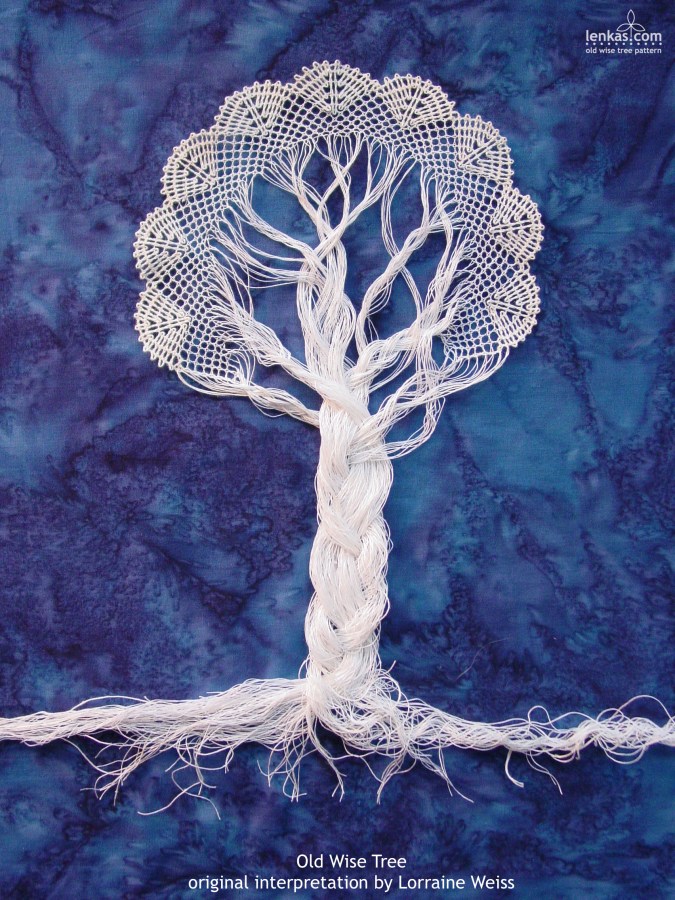
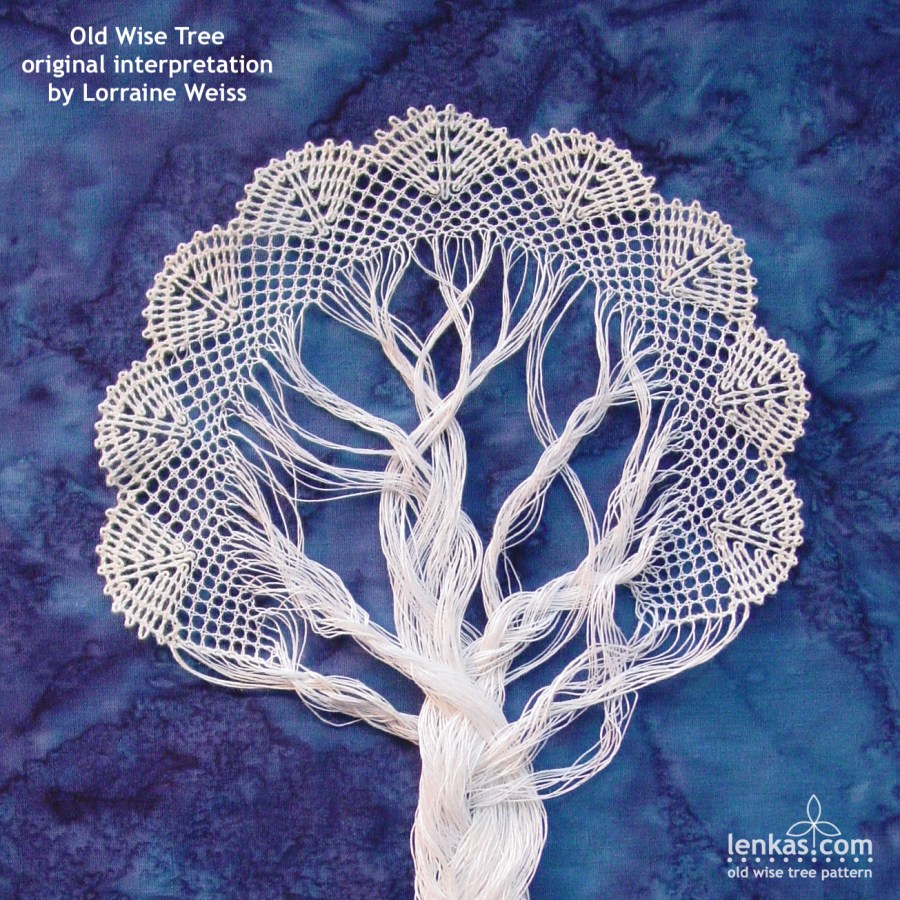
That ancient wise tree I am talking about was made by Lorraine Weiss of Albany, New York. And it is very well done.

In pristine white thread standing out against deep blue background, the tree looks immaculate. White was the colour of choice for most handmade laces throughout the history. As the colour symbolizes innocence and purity, it was considered auspicious for celebrating special occasions in women’s life. The delicate white lace was cherished and treasured as part of cultural and familial heritage.
Lorraine made the Old Wise Tree for her niece, whose Bat Mitzvah torah portion was on the Tree of Life. And it fulfilled the purpose beautifully – the tree stands tall and strong, its widely spread roots foretelling long, fruitful life. With precise torchon ground of the crown and neatness of braided branches and trunk the tree looks composed and serene. Blues in the background add not only visual, but also spiritual depth to the whole picture, elevating this Old Wise Tree to a very special family heirloom. Wonderful work, Lorraine!

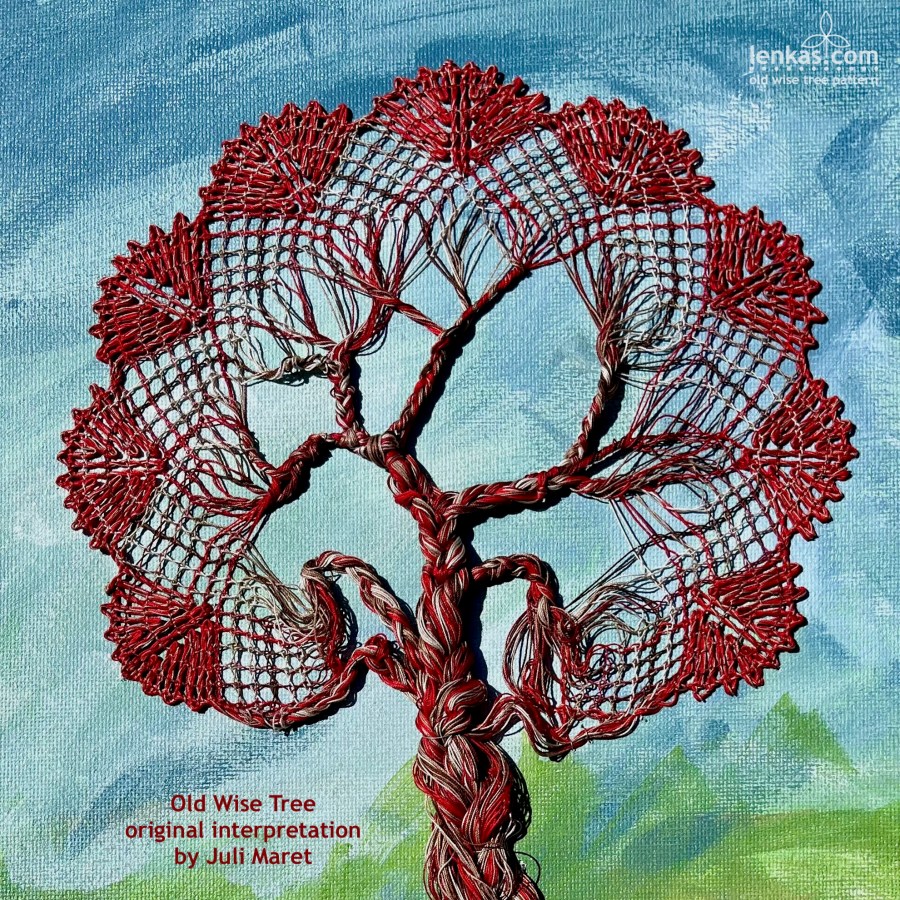
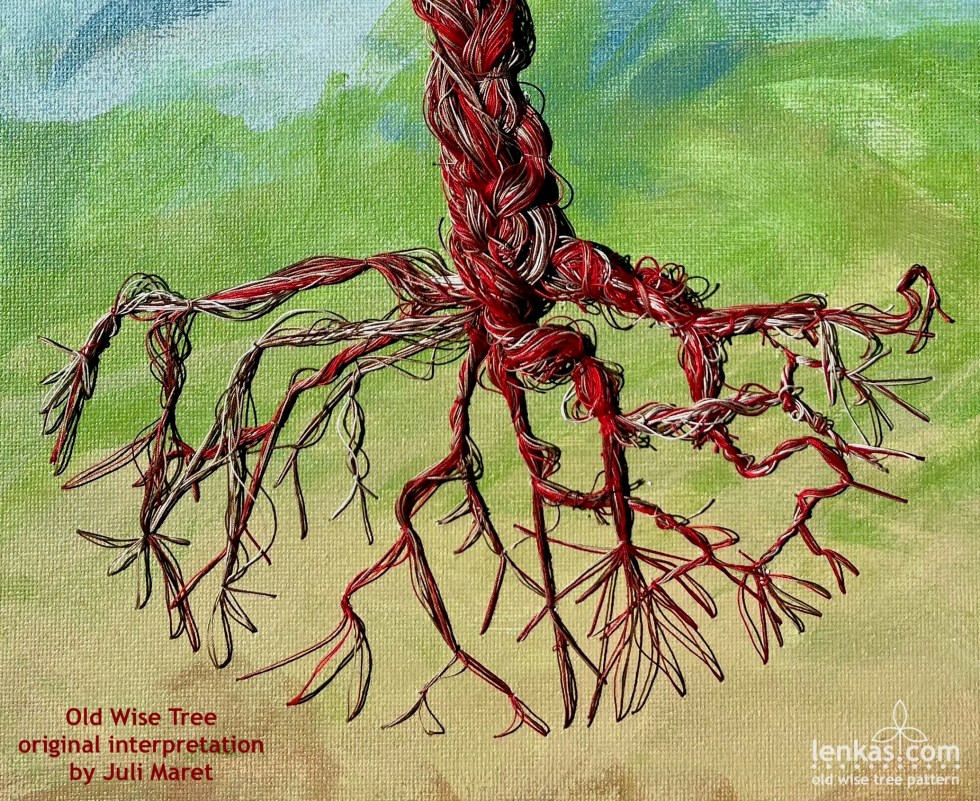
The Old Wise Tree from Juli Maret of St. Louis, Missouri, is equally beautiful yet totally different.

Juli’s choice of cotton thread in six contrasting colours works really well. Unexpected vivid reds give the tree intensity, character and unapologetic originality. They infuse the crown with joie de vivre, and continue to flow through the branches, trunk and roots like blood running in the veins of this flourishing tree. The tightly braided branches and trunk look so realistic, one almost forgets that they are made from soft fibres. Only the gnarly trunk and roots communicate the wisdom collected through many seasons, and readiness to face more with strength and passion.
Expressive background hand painted in acrylics on canvas greatly contributes to the picture’s originality. While it suggests all earthly elements needed for the physical growth, it allows the tree to live in its own space, exalted and jubilant.
Great interpretation of the Old Wise Tree theme. Congratulation, Juli!


Looking at these trees, and all other in the Old Wise Tree Gallery, I am overwhelmed by a humble joy from realization that a very simple pattern from my lace workshop has inspired so much creativity and beauty. I feel like being in nature and observing living trees where I often wonder if trees know how magnificent they are. They never respond, they just are. And I always tell them: “Yes, you are very beautiful and I am happy to share the life on Earth with you!”
Old Wise Tree Gallery is always open and welcomes all visitors!
The Free Old Wise Tree Pattern and Tutorial was published on this website on January 16th, 2021.
With thirty two trees from eight countries submitted to the online exhibition, together we are slowly growing an Old Wise Grove. Big thanks and a round of applause to all participating lacemakers!
Are there more lace trees growing in the world?
Please consider reaching out by sending a photo of your tree with following information to this email address:
Your Name + City / Country + Materials used + Pricking size (if different than the original 100%)
+ Optional: Notes (any specific information you would like to add)
**************************************************************************
Disclaimer: By submitting the photo/s and requested information you agree that your work will be displayed in the Old Wise Tree Gallery hosted on this website.
**************************************************************************
Happy lacemaking,
Lenka
Remembering Barbara Jean Jones and the lace|heart|art challenges
Posted on April 8, 2024
April 8th was a special date in the New School of Lace. On this day, for three consecutive years of 2018, 2019 and 2020, we celebrated an opening of the lace|heart|art, International Online Exhibition of Handmade Bobbin Lace in Colour . We took delight in sharing beautiful lace creations from all around the world with online audience. Each heart reminded us of our dear friend, Barbara Jean Jones, whose memory the lace|heart|art challenge was dedicated to.

The following years brought another kind of challenge, rather devastating to small artisanal workshops. While the New School of Lace was closed, the lace|heart|art competition was put on hold. Unfortunatelly, it was not possible to reopen the school and resume all related projects.
Yet the lace|heart|art challenge still lives on this website. The free patterns and working instructions are still available and are frequently downloaded by many visitors. That makes us think that the heart patterns are still doing their magic, inspiring lacemakers to explore colours in handmade bobbin lace. With instructions offered in fibre as well as wire medium, lacemakers are encouraged to explore both materials. Making the heart in traditional threads and then in wire provides a wonderful comparison between the two mediums. I often recommend it as a self-study project to lacemakers who are asking questions about wire lacework.
Barbara first learned lacemaking with fibre, like most of my students, and she enjoyed working on patterns of torchon, bucks point and tape lace. And then she really wanted to learn how to work with wire. Because she loved colours, she was attracted by brilliant hues of coloured copper and also by potential of embellishing wire lace with crystal beads.
Barb’s slender hands had a delicate lacemaker’s touch, and she found working with wire difficult at the beginning. With her characteristic enthusiasm and perseverance, she practiced new tensioning techniques on a simple heart pattern until she succeeded. Handmade bobbin lace in wire proved to be a perfect match for young lacemaker’s imagination and creativity, and she enjoyed the fine craft as long as she could.


Today would be Barb’s thirty seventh birthday. She remains in our hearts, and her positive attitude lives on as an inspiration for us to face life challenges with acceptance, equanimity and love.
Let’s keep the lace|heart|art alive for present and future!
Free Patterns :
1st lace|heart|art challenge 2018 – free pattern and working instructions
2nd lace|heart|art challenge 2019 – free pattern and working instructions
3rd lace|heart|art challenge 2020 – free pattern and working instructions
Online Exhibitions :
1st lace|heart|art online exhibition
Old Wise Tree in France
Posted on March 20, 2024
March 18, 2024
When an Old Wise Tree reached my mailbox a couple weeks ago, it brightened up the gloominess of the winters’ last days. This time of a year we often wonder if the light and colours will ever return. It is the art that saves the day and raises our spirits. And in my case, the lace art works like a magic. The recent photo of the Old Wise Tree reminded me to have a fresh look at the trees around me and enjoy the intricate lacework of their branches before it disappears under new foliage. And think about the roots, hardened by cold and wet weather, getting ready to deliver all materials and supplies for the tree’s brand new attire.
The photo of the Old Wise Tree came all the way from France, a country with long lacemaking tradition. French lace reached the highest peaks of artistic expression as well as technical excellence, and gave the world most exquisite lace artifacts. Lacemaking is still alive in France and its high standard of craftsmanship is meticulously maintained. I thought that the basic torchon pattern of the Old Wise Tree would hardly appeal to accomplished lacemakers, and therefore an entry from France has come as a surprise.

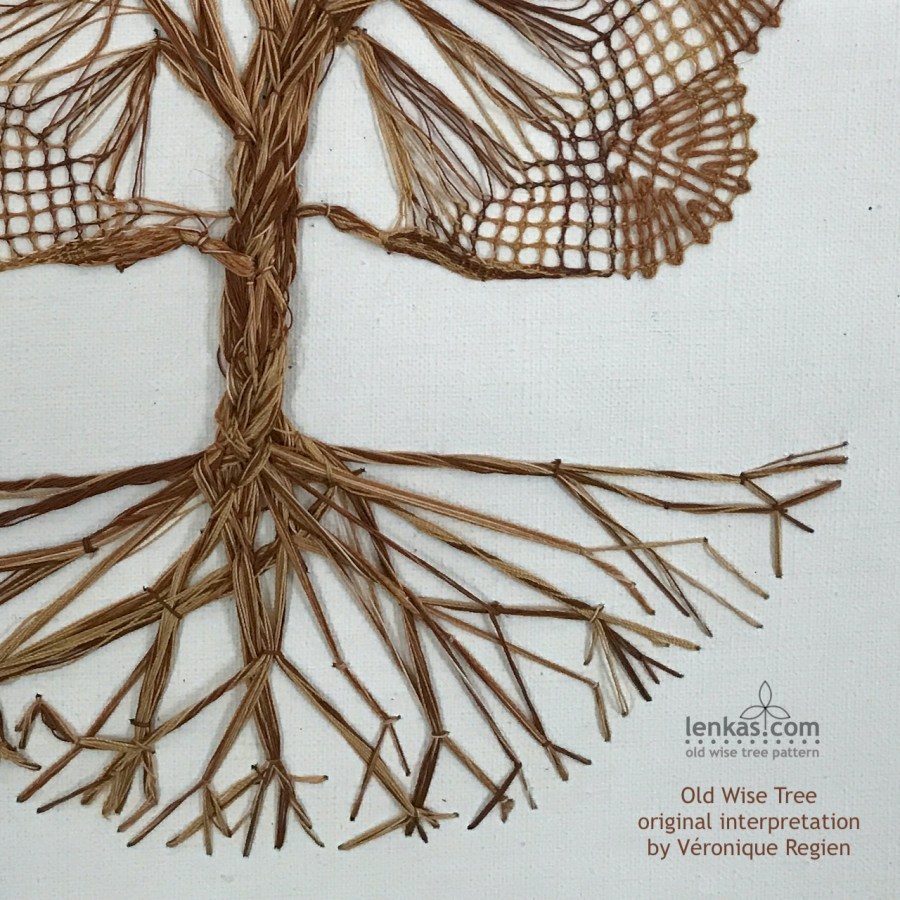
Created by Véronique Regien, who describes herself as a beginner, the tree is well made and has quite an artistic flair. Threads in five [?] shades of brown, from light to dark, create a random, lively pattern in the torchon ground. The colours blend well in the branches and trunk, and in braids achieve an interesting bark-like surface. Strong and dynamic roots give a good base to the spacious crown. Adding extra support stitches to secure the branches the same way as roots was a great idea. It established a visual connection between the tree’s upper and lower parts and helped to create a well balanced, harmonious picture. Overall, this Old Wise Tree looks attractive, vigorous and… young! A rather surprising outcome and a wonderfull addition to the Old Wise Tree Gallery.
Congratulations, Véronique, well done! Thank you for sharing your lace artwork with us.

The Free Old Wise Tree Pattern and Tutorial was published on this website on January 16th, 2021.
As of today, on March 18th, 2024
- the page has been viewed 12,216 times
- 2,508 visitors downloaded the pricking
With thirty trees from seven countries submitted to the online exhibition, together we are slowly growing an Old Wise Grove. Big thanks and a round of applause to all participating lacemakers!
Are there more lace trees growing in the world?
Please consider reaching out by sending a photo of your tree with following information to this email address:
Your Name + City / Country + Materials used + Pricking size (if different than the original 100%)
+ Optional: Notes (any specific information you would like to add)
**************************************************************************
Disclaimer: By submitting the photo/s and requested information you agree that your work will be displayed in the Old Wise Tree Gallery hosted on this website.
**************************************************************************
Happy lacemaking and old wise tree growing,
Lenka
Old Wise Trees in Australia and Germany
Posted on December 2, 2023
December 2, 2023
It’s always exciting when a new Old Wise Tree reaches my email inbox, and this month it was not one but four beautiful lace creations! They were perfectly timed, arriving in November, when the real trees in Vancouver present a spectacular display of colours before revealing delicate lacework of their bare branches.
The new lace trees added even more beauty to the season.

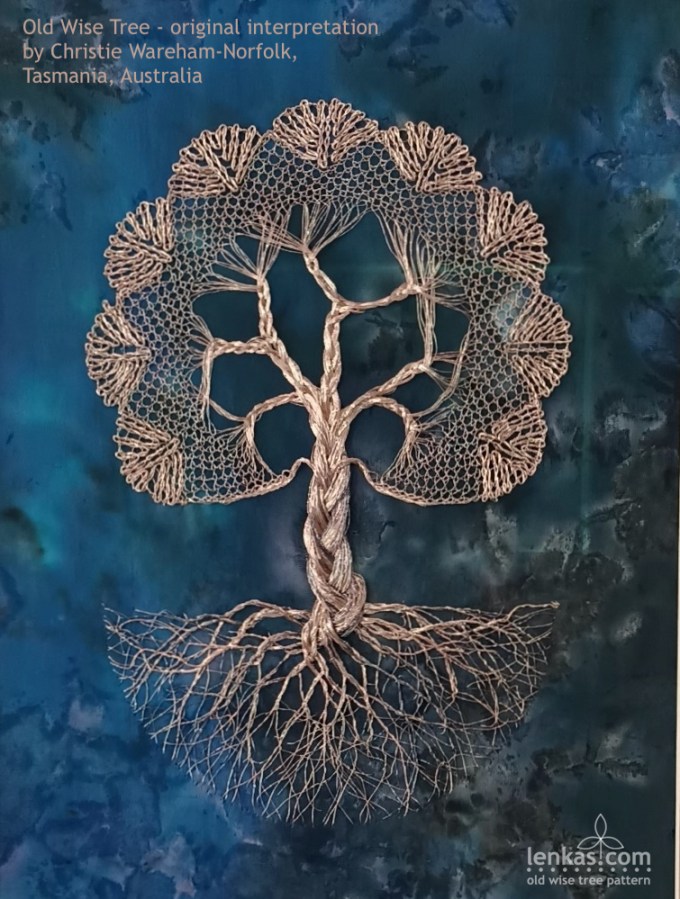
Christie Wareham-Norfolk from Tasmania, Australia, made her Old Wise Tree in wire. With gauge 32 copper in three shades, she achieved a subtle colouring and depth in the Torchon ground. Tightly braided branches and trunk render perfect contrast to the airy crown and intricate roots. Set against the dark variegated background Christie’s Old Wise Tree looks light, ethereal. It seems to be rising up, towards the celestial realm, carrying a message about earthly beauty.
In a well chosen custom frame this work stands out as a unique lace art.
Congratulations, Christie, and thank you for sharing your Old Wise Tree!


***
Three following Old Wise Trees are completely different: strong, uninhibited and brimming with life.
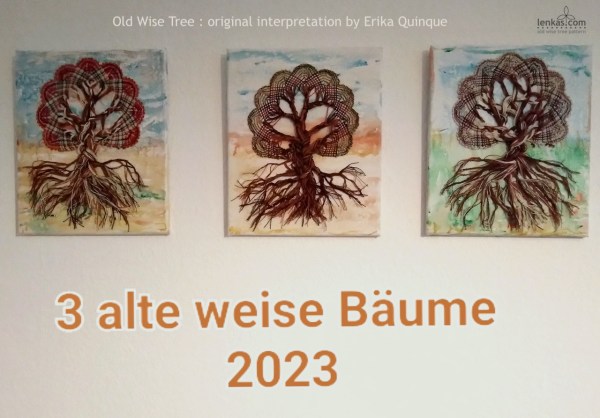

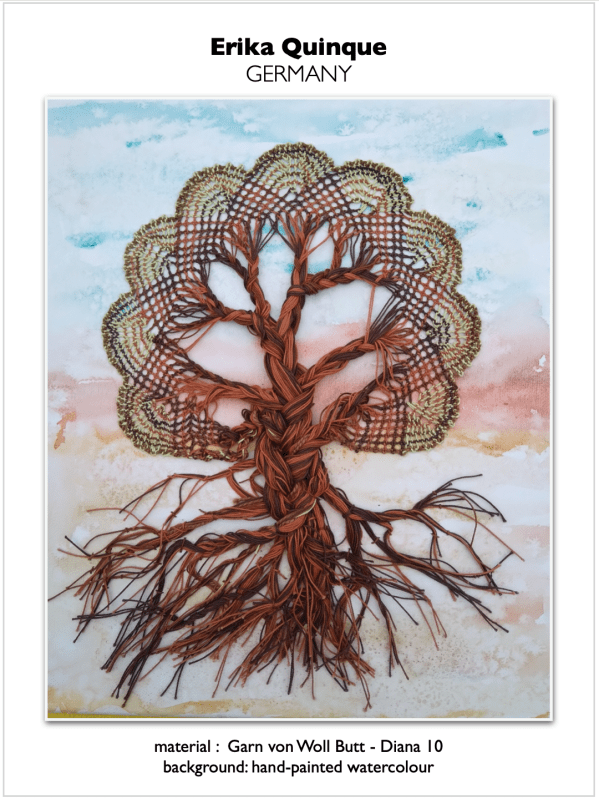

These Old Wise Trees have grown in Germany, a land of enchanted forests which used to be populated by nature spirits – elves, goblins, nymphs – and perhaps still are, and Erika Quinque knows something about it. She is the author of a very original triptych of bold, vivid and mysterious trees.
Erika substituted the recommended thread with a thicker material – Garn von Woll Butt, Diana, size 10. Selection of colours produced striking effects. The shades and values’ dynamic interaction resulted in very interesting patterns, different in each crown. Upon observing the threads in geometrical Torchon ground one realizes how close can bobbin lace be to a woven fabric. In the tree centres the colours seem to change, and show more contrast between light and dark. The sheer volume of the material produces mighty branches, trunks and vigorous root balls that are able to stand firm and hold the ground. Adding to the spontaneity of the works is the openness of hand-painted backgrounds. Erika mentioned that she did not have any previous experience with watercolour painting, and just tried to give her trees original back drop. It worked very well for each tree, and the triptych overall. What an attestation to fearless creativity and animate spirits of the trees!
Well done, Erika! Thank you for contributing your set of Old Wise Trees to the Gallery.


It gives me a great pleasure to witness creativity of contemporary lacemakers. In the past, the craft was often confined to traditional patterns which were repeated with limited variations. I always believed that handmade bobbin lace is exceptionally well suited for creative expression, and this simple pattern is a proof beyond doubt. Every lacemaker interpreted the theme in a unique way, and created a very original lace picture.
And they all look amazing side by side in the Old Wise Tree Gallery!
Free Old Wise Tree Pattern and Tutorial was published on this website on January 16th, 2021.
As of November 30, 2023
- the page has been viewed 11041 times
- 2148 visitors downloaded the pricking
- 29 artworks from 6 countries on 3 continents have been submitted to the Old Wise Tree Gallery
A big THANK YOU to all participating lacemakers!
All lacemakers who create their original Old Wise Trees based on the free pattern are welcome to submit their lace art to the Old Wise Tree GALLERY!
Please consider reaching out by sending a photo of your tree with following information to following email:
Your Name + City / Country + Materials used + Pricking size (if different than the original 100%)
+ Optional: Notes (any specific information you would like to add)
**************************************************************************
Disclaimer: By submitting the photo/s and requested information you agree that your work will be displayed in the Old Wise Tree Gallery hosted on this website.
**************************************************************************
Happy lacemaking and old wise tree growing,
Lenka
Four Seasons of Old Wise Trees in UK
Posted on March 10, 2023
Old Wise Trees are flourishing in all seasons!
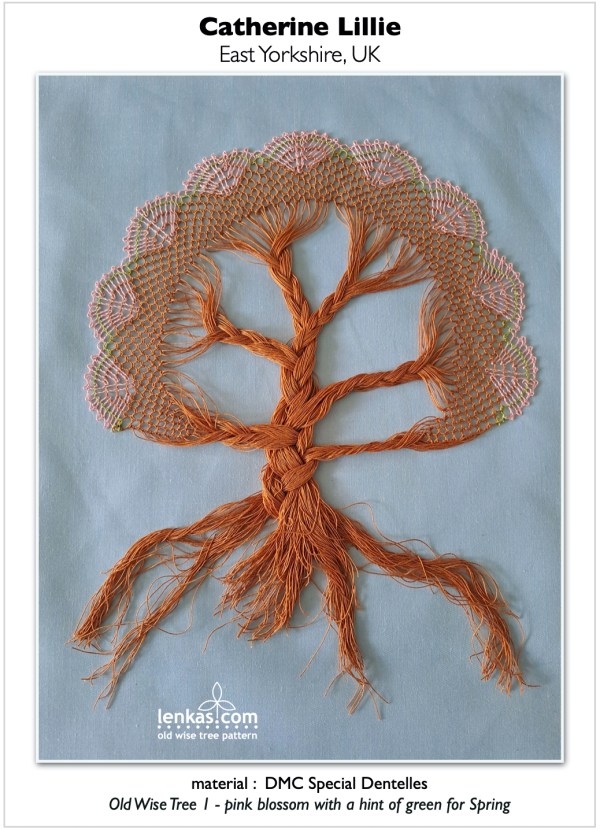
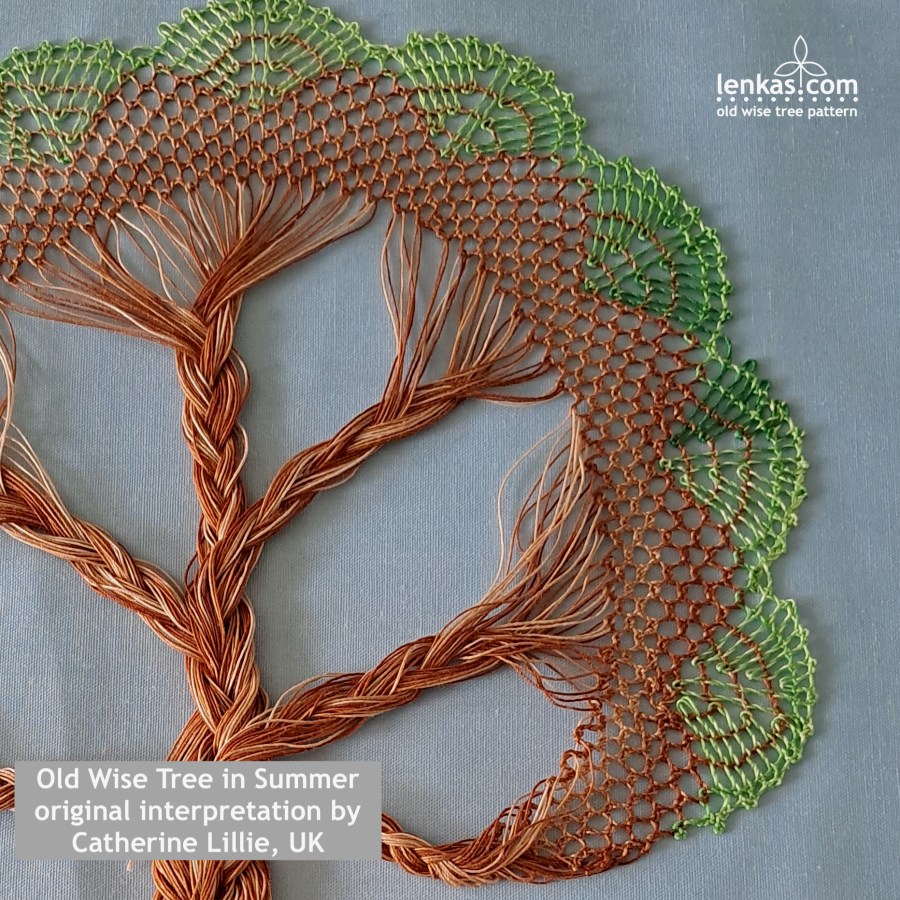
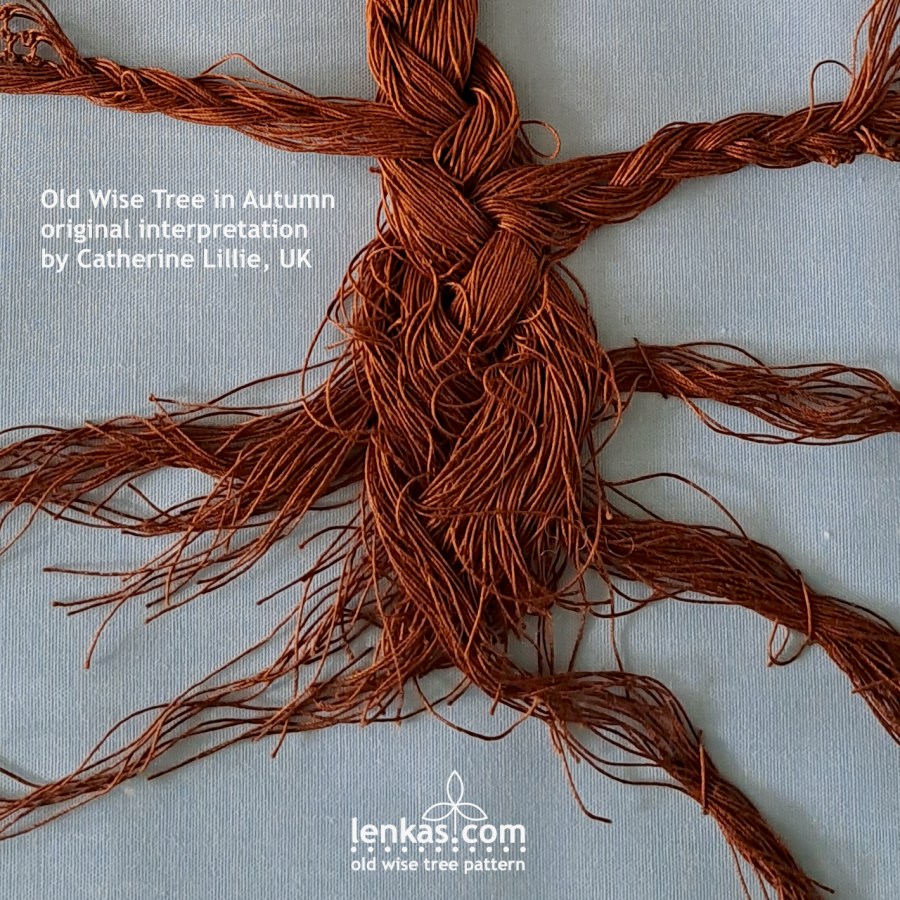
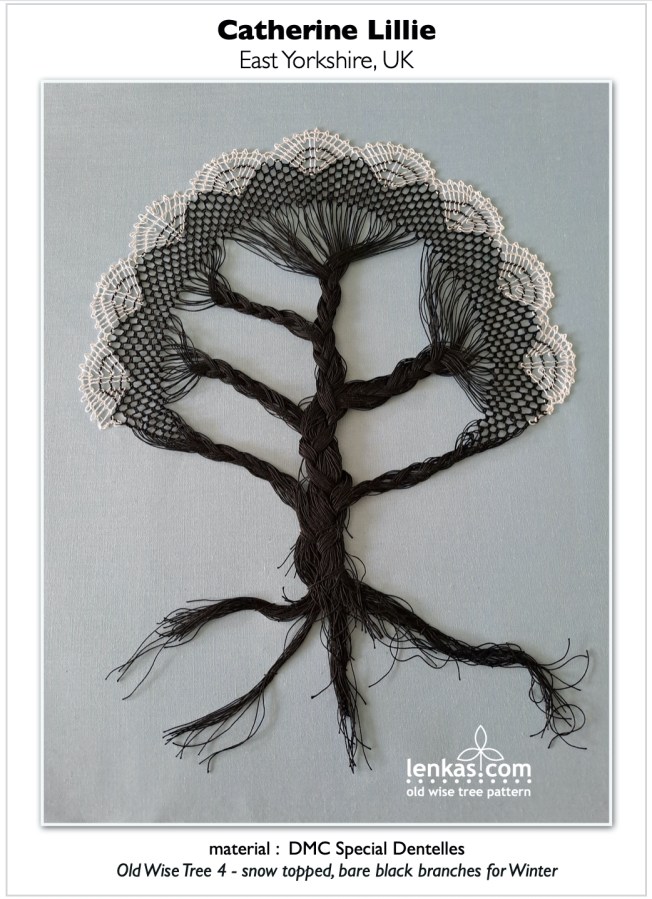
Catherine Lillie from East Yorkshire, UK, interpreted the theme in four variations, representing the four seasons in UK:
– pink blossom with a hint of green for Spring;
– variegated green for Summer;
– autumnal browns and oranges;
– snow topped, bare black branches for Winter;
What a wonderful idea! And great interpretation of the Old Wise Three theme – each tree represents the season not only by well chosen colours, but also by the shape of the crown and architecture of trunk and branches – widely branched fertile mother tree in spring time; relaxed, vigorously growing summer tree; burly, portly tree of autumn; and rugged tree, resilient and strong to withstand the winter weather. So complex, yet so simple – four seasons painted with threads and delicate stitches, with lots of skill, love and dedication.
If you look closely, you can see that Catherine changed the pattern slightly: She substituted plain torchon ground stitch (CT-pin-CT) with Brussels ground (CTCT-pin-CTCT), which produced bolder net with interesting colour shading. It also made transition between the crown and branches a bit more static, showing the firm footside edge, but perhaps due to use of variegated threads, the difference is almost indistinguishable. This reveals and confirms amazing versatility of bobbin lace technique that allows every lacemaker to explore, grow and create original works.
I am happy to see that the Old Wise Tree pattern inspired such ambitious project.
Congratulations, Catherine, well done!


The Free Old Wise Tree Pattern and Tutorial was published on this website on January 16th, 2021.
As of today – March 10th, 2023 –
- the page has been viewed 8327 times
- 1630 visitors downloaded the pricking
- 25 artworks from 5 countries have been submitted to be exhibited in the Old Wise Tree Gallery
A big Thank You to all participating lacemakers!
Maybe there are more lace trees out there? If you created your own, I would like to hear from you.
All lacemakers who create their original Old Wise Trees based on the free pattern are welcome to submit their lace art to the Old Wise Tree GALLERY!
Please consider reaching out by sending a photo of your tree with following information to this email address:
Your Name + City / Country + Materials used + Pricking size (if different than the original 100%)
+ Optional: Notes (any specific information you would like to add)
**************************************************************************
Disclaimer: By submitting the photo/s and requested information you agree that your work will be displayed in the Old Wise Tree Gallery hosted on this website.
**************************************************************************
Happy lacemaking and old wise tree growing,
Lenka
Old Wise Tree in Galicia, Spain
Posted on March 7, 2023
An Old Wise Tree has grown in Spain. It is so nice to see the first interpretation of the theme from a country with such long and rich lacemaking tradition. Over the centuries, Spanish lace has introduced many original designs featuring bold patterns, colours and textures. Fine craft of lace is still very much alive in the country, and highly skilled Spanish lacemakers are still producing amazing lace works.
Thanks to Lucia Combarro Mouriño, the first Spanish Old Wise Tree comes from Galicia.
As part of Green Spain region, Galicia is graced by green forests, lush meadows, and fertile farmland. Lucia’s tree reveals its origins beautifully. Combination of cotton threads in earth and olive tones transforms the simple torchon ground into an intricate pattern, and subtle metallic accent enhances the overall impression of freshness and liveliness. This Old Tree looks not only wise, but also very healthy! Just one look below the surface explains its secret: a spectacular root system, robust and vigorous (and very artistic), supports the growth and supplies ample nourishment to the whole plant. What perfect harmony of nature at work!
Congratulation, Lucia, and thank you for sharing your artwork. It is a wonderful addition to our growing forest of Old Wise Trees.


The Free Old Wise Tree Pattern and Tutorial was published on this website on January 16th, 2021.
As of today – March 6th, 2023 –
- the page has been viewed 8219 times
- 1612 visitors downloaded the pricking
- 21 artworks from 5 countries have been submitted to be exhibited in the Old Wise Tree Gallery
A big Thank You to all participating lacemakers!
Maybe there are more lace trees out there? If you created your own, I would like to hear from you.
All lacemakers who create their original Old Wise Trees based on the free pattern are welcome to submit their lace art to the Old Wise Tree GALLERY!
Please consider reaching out by sending a photo of your tree with following information to this email address:
Your Name + City / Country + Materials used + Pricking size (if different than the original 100%)
+ Optional: Notes (any specific information you would like to add)
**************************************************************************
Disclaimer: By submitting the photo/s and requested information you agree that your work will be displayed in the Old Wise Tree Gallery hosted on this website.
**************************************************************************
Happy lacemaking and old wise tree growing,
Lenka
Old Wise Tree in Virrat, Finland
Posted on January 17, 2023
Another Old Wise Tree has grown! This time in Finland, a country renowned for its stunning nature with forests covering more than seventy-five per cent of the land area. There must be a lot of old wise trees there!
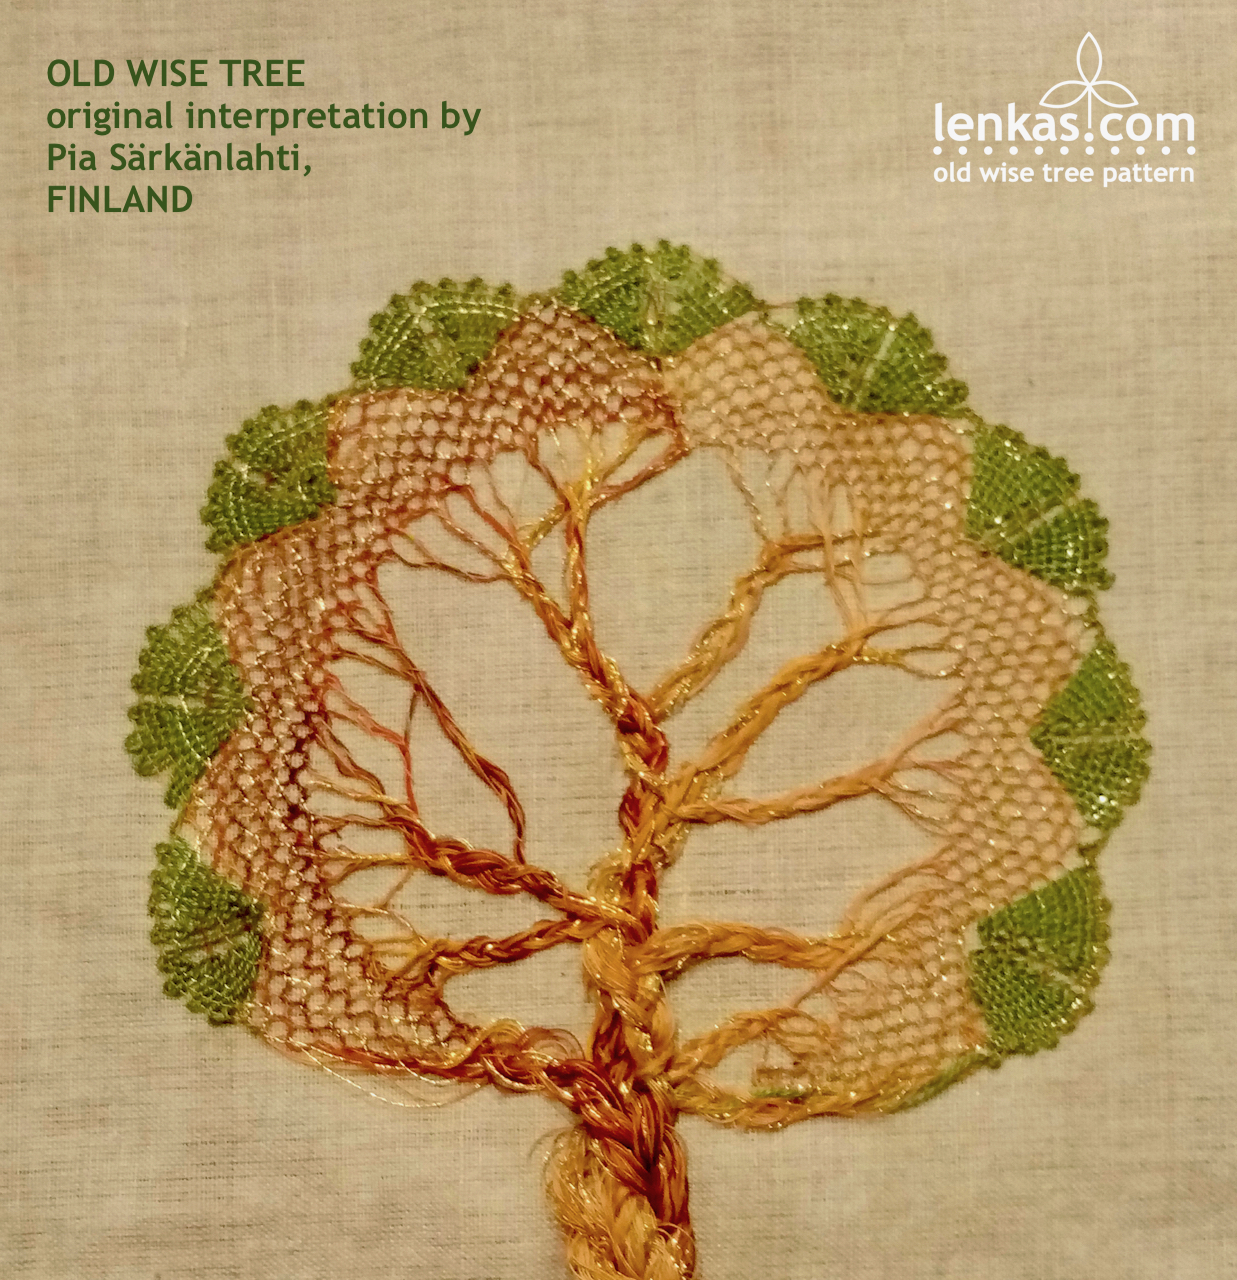
Thanks to Pia Särkänlahti, we get to see one made in lace.
And what a wonderful interpretation ot the Old Wise Tree theme it is! With branches and roots made in two colours, the tree looks like two trees entwined, merged together. Pia adapted the original design to create a unique wedding gift, and her idea worked beautifully: two trees have become one in a loving embrace. The branches met and the connection extended all the way to the roots, joining them in harmony to supply the tree with strength and nourishment for years to come.
A very special wedding gift, indeed, auspicious and symbolic at the same time.
And so true to the lacemaking tradition of creating family heirlooms, by hand and with love, for the most important occasion, in the most delicate of textile techniques.
Congratulation, Pia, and thank you for sharing your artwork!


The Free Old Wise Tree Pattern and Tutorial as published on this website two years ago, on January 16th, 2021. Since then
- the page has been viewed 7666 times
- 1523 visitors downloaded the pricking
- 20 artworks from 4 countries have been submitted to be exhibited in the Old Wise Tree Gallery
A big Thank You to all participating lacemakers!
Maybe there are more lace trees out there? If you created your own, I would like to hear from you.
All lacemakers who create their original Old Wise Trees based on the free pattern are welcome to submit their lace art to the Old Wise Tree GALLERY!
Please consider reaching out by sending a photo of your tree with following information to this email address:
Your Name + City / Country + Materials used + Pricking size (if different than the original 100%)
+ Optional: Notes (any specific information you would like to add)
**************************************************************************
Disclaimer: By submitting the photo/s and requested information you agree that your work will be displayed in the Old Wise Tree Gallery hosted on this website.
**************************************************************************
Happy lacemaking and old wise tree growing,
Lenka
