 Lenka's Way of Lace
Are you looking for free heart patterns for bobbin lace?
Posted on May 17, 2020

Heart design has become very popular among artists lately, and lacemakers are no exception. That’s great to see!
What is a better way to say “Thank you!” or
“I love you” then through a unique lace artwork? Special occasions require special presents, and handmade lace can truly deliver the heartfelt message.
When you dedicate your attention single-mindedly to the task, the positive energy flowing from your heart and mind, through your hands and delicate fingers, is capable of transforming a spool of thread or wire into a very personal artifact. Your spirit will be woven in the lace forever, stored for those who are open to feel it. Even if the person doesn’t know anything about you or handmade bobbin lace, and how long it takes produce a piece of lace (let alone the time needed to master the craft) often they can sense that they are looking at an uncommon work.
That’s why handmade lace artifacts are kept in museums, private collections and family heirlooms.
And that is why the rare lacemaking technique, and the skills that come with it, is now becoming really valuable.

If you have been searching for free heart patters for bobbin lace, on this website you will find a collection of prickings for fibre as well as wire mediums. The patterns were created by Lenka Suchanek of the New School of Lace for three editions lace|heart|art international challenge of handmade bobbin lace in colour. Working instructions and diagrams are included. The patterns can be worked exactly as is shown in the provided samples, or they can be modified and expanded according to your artistic vision.
Links to free downloads:
- Heart 1 (fibre and wire) – pricking + working diagrams
- Heart 2 (fibre and wire) – pricking + working diagrams
- Heart 3 (fibre and wire) – pricking + working instructions
- Heart 3 (fibre) – working instructions
- Heart 3 (wire) – working instructions
(The author would appreciate a credit mention to lenkas.com when you share your lace with recipients or on social media.)
For inspiration on how to work the lace hearts, visit the online exhibitions of hearts from all over the world:
1st lace|heart|art Online Exhibition 2018
2nd lace|heart|art Online Exhibition 2019
3rd lace|heart|art Online Exhibition 2020
Happy ❤️ lacemaking… keep the love and lace alive!
Lenka
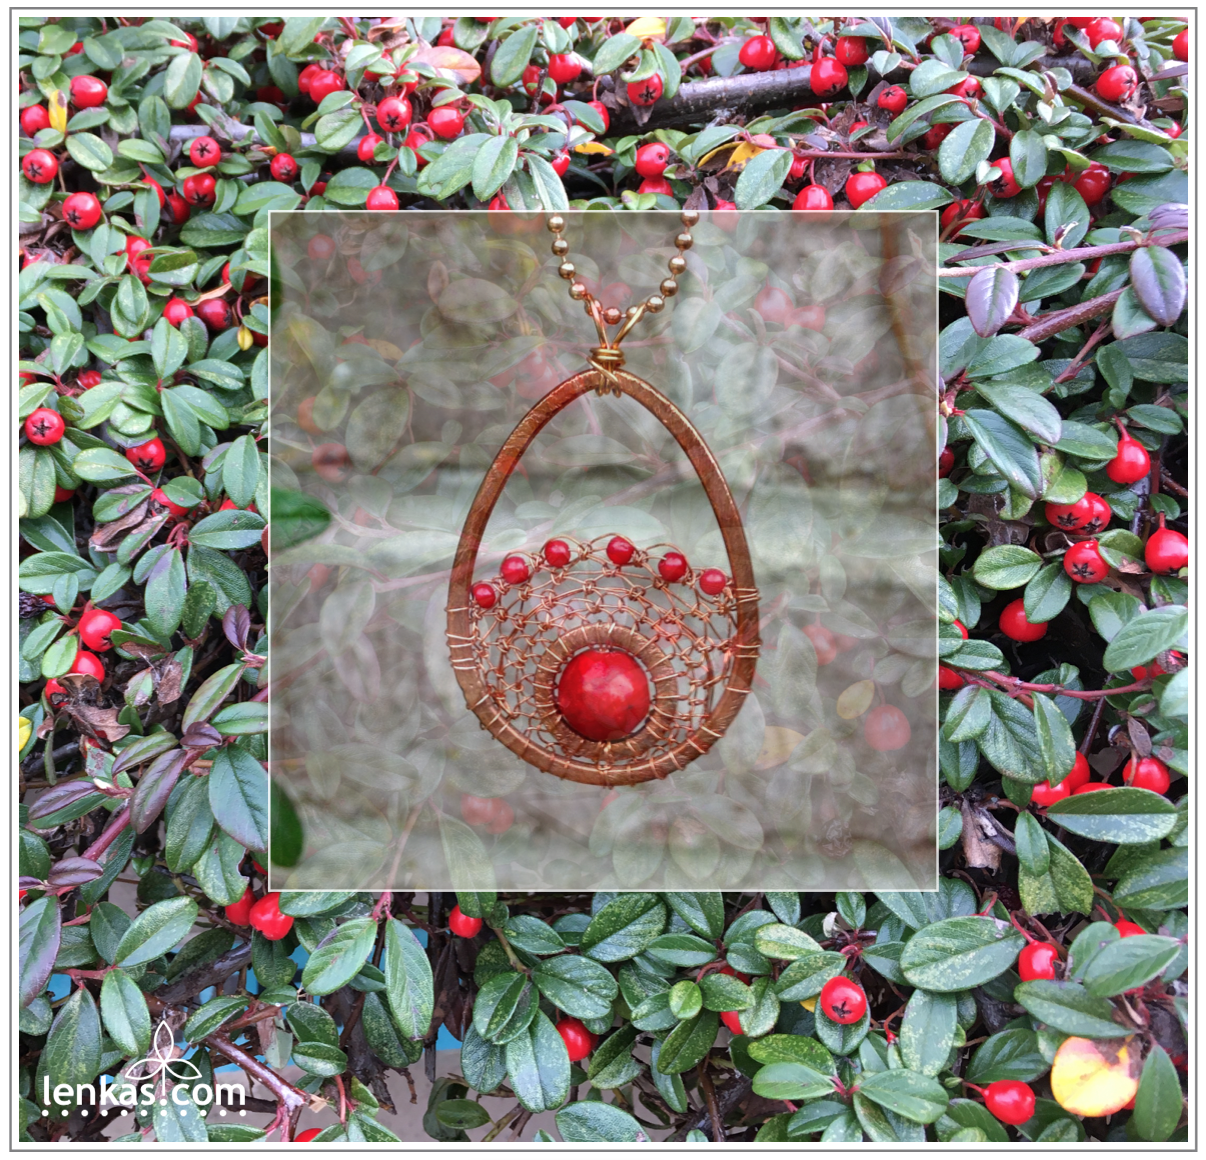
Very Berry Time
Posted on December 1, 2019
 If you read this blog regularly, you might remember one post from March, Offering: Red Berries, in which I wrote about my new lace work and said that “… it became my offering to the season that makes us revere cedar, to the beauty of snow and ice, and to the berries who know how to say ‘fertility’ like none other.”
Half a year later, lo and behold, the trees and shrubs in my neighbourhood are laden with huge amounts of berries. Rowan trees, cotoneasters, barberries, hollies, wild roses, … wherever you look there are clusters of fruits, shining in vivid red and orange colurs. What a beautiful sight, and what a joy to see the overflowing cornucopia of nature!
More and more, I am learning to appreciate the order of the natural cycle, which is governed by never changing purpose to propagate. Observing the unwavering flow of seasons, I sense that nature really doesn’t need us to save her. On the contrary, we would be wise to listen to her wisdom if we wanted to save ourselves. In all its complexity, nature’s way is simple, and therefore timeless.


Happy berry time!
Falling Leaves
Posted on September 25, 2019
“One falling leaf is not just one leaf;
it means the whole autumn”
— Shunryu Suzuki
This quote from Shunryu Suzuki, Sōtō Zen monk and teacher, accompanied the first leaf that I made in wire bobbin lace. The wise words describe an outlook on life where everything is connected in space and time, and people are born with an innate gift to experience this natural harmony in their lives.
Being a lacemaker is of course different than being a Buddhist monk, but there is something in the lacemaking process that calms the mind, deepens concentration and makes space for contemplation. Lace requires discipline to cultivate patience and build skills, and nothing can be rushed. Like nature, lacemaking has its own rhythm, and lacemakers must give up their concepts of time and expectations of achievement if they are to align with the craft tradition.
 Falling Leaf
Fine craft of lace was not much known in Western Canada when I arrived. I tried to present lace as an art form, so I conceived the Falling Leaf as a picture in handmade frame, from which the leaf could be removed and worn as pendant. My skills in wire lace were quite basic at that time. I worked with tools that were far from ideal, and the only copper wires I could find were recycled, often from old magnet coils. But it was exciting time of exploration and new ideas.
 recycled wires
I was fortunate to be represented by Van Dop Gallery in New Westminster at the beginning. My first small works, whimsical wire lace leaves among them, had a place to grow, mature and eventually go their separate ways. I do not know where the individual leaves ended up, but one set of four leaves representing seasons was commissioned by Four Seasons Hotels, and perhaps is still in their collection.
With my growing skills and new bobbins specially designed for wire lacework, I was able to pursue more complex lace patterns. I also learned basic jewellery making techniques along the way, which lead to using precious metals and expanding the wearable lace portfolio.
Raindrops Collection was based on point ground lace, designed on enlarged scale, with open honeycomb pattern and prominent gimps. Lace weave made from silver wire could be shaped into light, airy leaf pins and pendants, and matching necklaces and bracelets.
 Raindrops in fine silver with clear quartz crystals. Photo: Kenji Nagai
Raindrops Collection in oxidized silver with clear quartz beads was selected for the exhibition of finalists in the Powerhouse Museum’s second International Lace for Fashion Award in 2001.
The set was later acquired by the MAAS for their prestigious jewellery collection.
The Raindrops are currently on display at the Powerhouse Museum in Sydney, Australia.
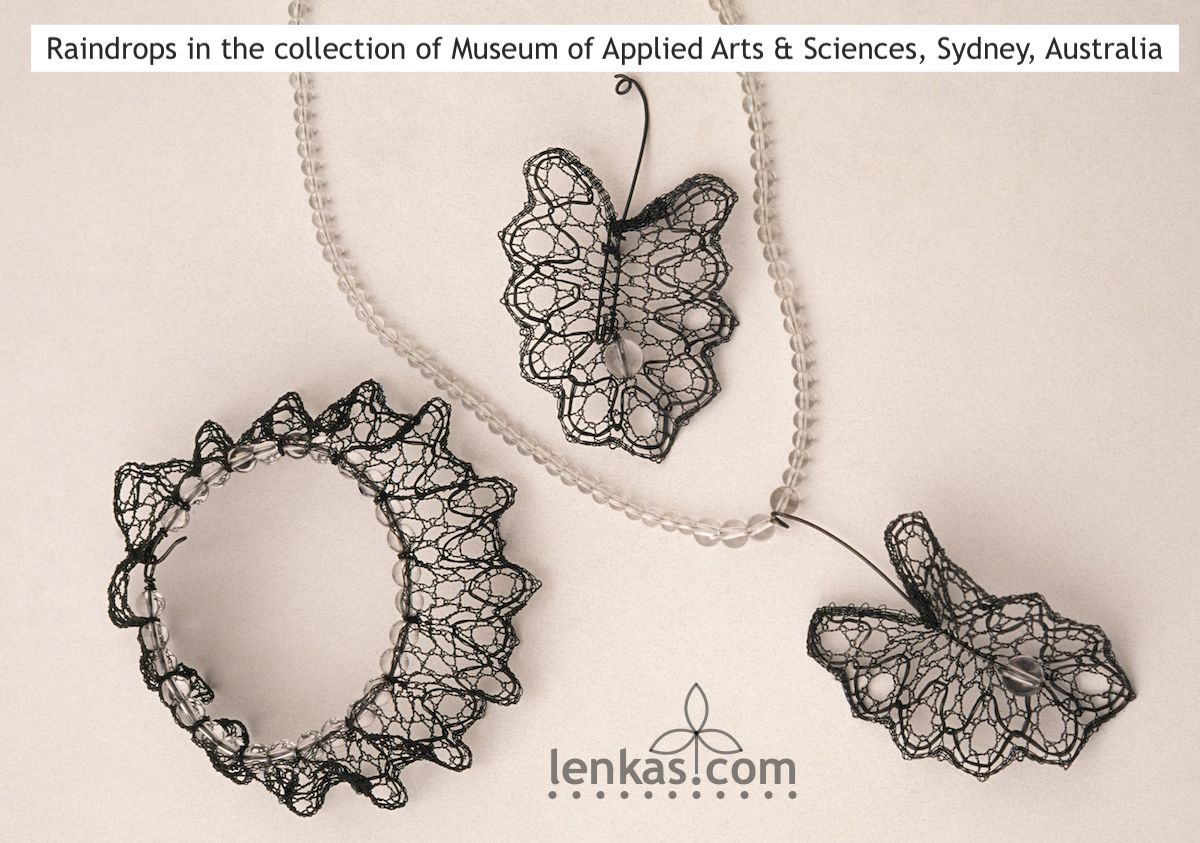 Handmade bobbin lace in fine silver wire, oxidized, with quartz crystals. Photo: Kenji Nagai
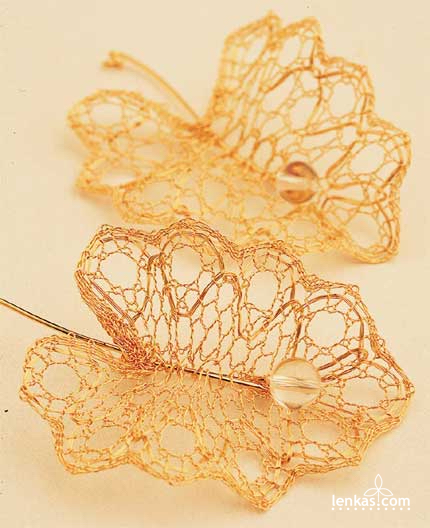 Raindrop pin and pendant in gold plated silver with clear crystal bead. Photo: Kenji Nagai
Another lace leaf appeared in an original wall piece “Sleeping in the Garden”, commissioned by Christine and David Springett.
The leaf pendant with berries was removable and wearable.
 Sleeping in the Garden with removable, wearable pendant
Meanwhile, my Silver Pin Studio in Vancouver started to offer wire lace instructions for interested lacemakers, and leaf motifs became staple designs for beginners and intermediate students.
 workshop projects
This tradition was later carried on to the New School of Lace in Ocean Park.
Working with improved bobbins, much better selection of wire colours, and many creative lacemakers eager to learn and work with colours, it was possible, and necessary, to design new leaf patterns.
 enamelled copper wires in autumn colours
One of the designs, prepared for beginners, was chosen to be published in the New School of Lace Pattern & Tutorial Series. Complete instruction with pricking, working diagrams and detailed step-by-step photos is available for download in my online shop. The Half stitch Leaf is a simple pattern, which is easy to learn, yet looks quite complex when made in multiple colours. With imagination and practice, the new lacemakers can create their first lace pendants right away.
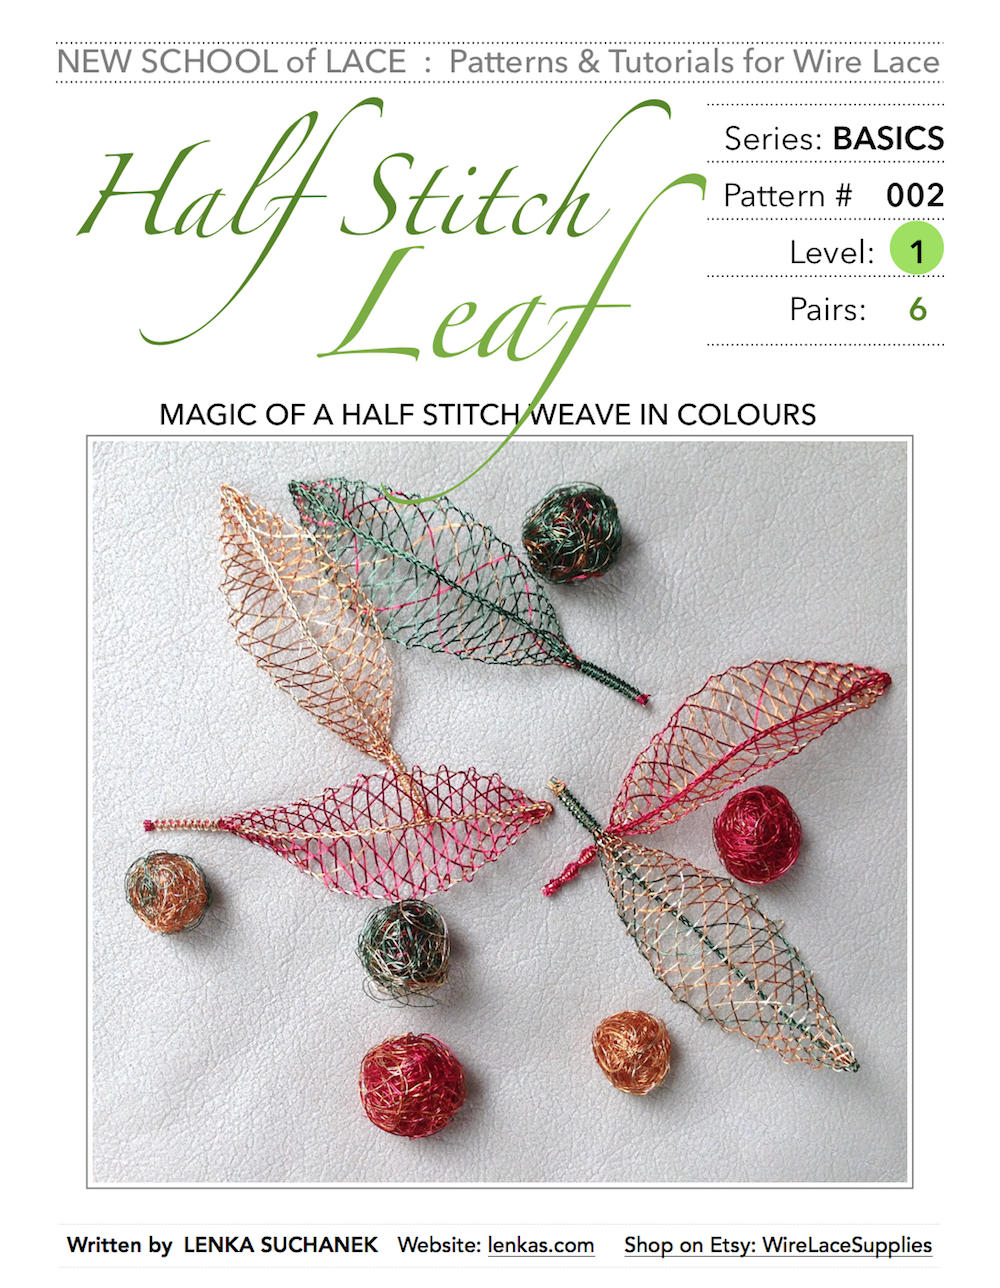 Half Stitch Leaf Pattern and Tutorial
The leaves have grown in number, shapes and colours in the following years.
One of them, the copper beech leaf design, introduced metal smithing techniques for working with raw copper wire, and opened an experimental approach to lace colouring.
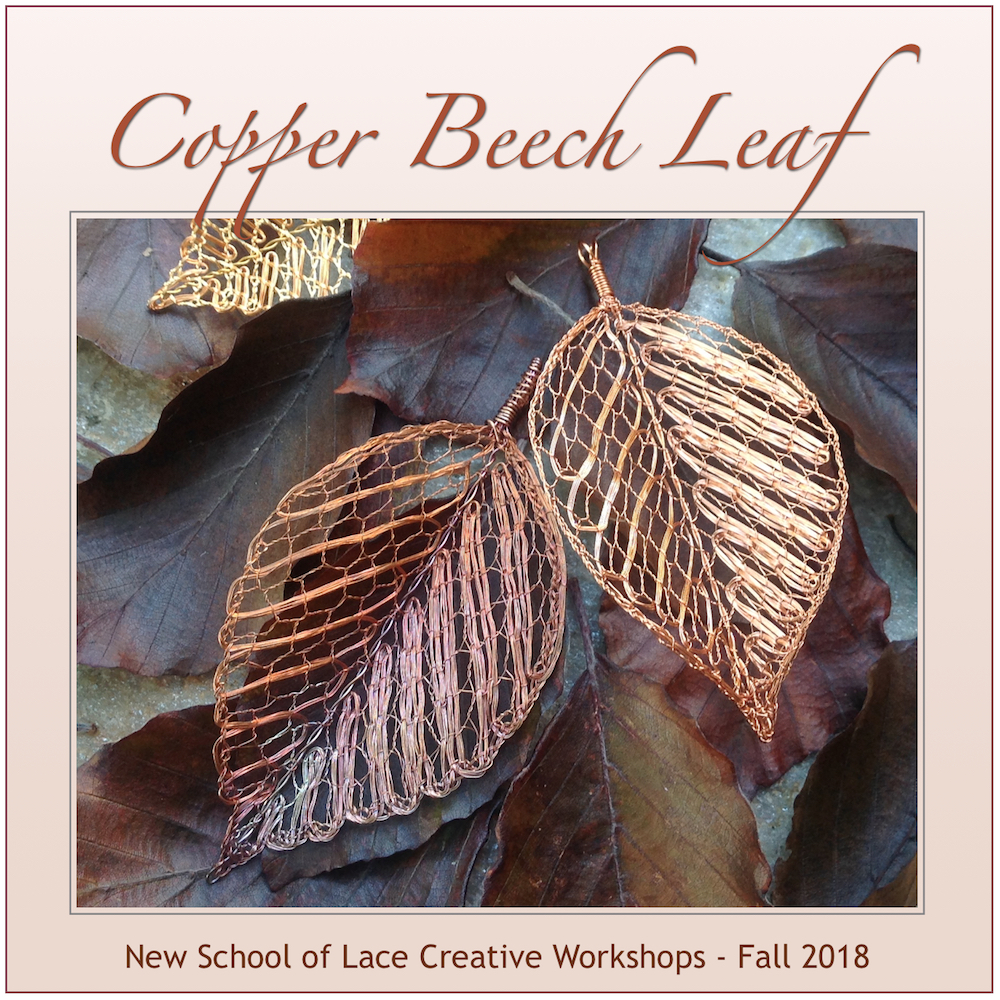 Copper Beech Leaf Pendant workshop
The same pattern was used for research of wire/fibre combinations in lace, which lead to yet another possibility in wearable lace art. The new Copper Beech Collection is now available for sale at the Silk Weaving Studio on Granville Island, in Vancouver, BC.
 Copper Beech Leaf Collection
The Canadian herbarium of lace leaves would be incomplete without a native sugar maple leaf. Prototype is ready, and if all goes well, it might become a pattern for one of the future workshops.
 Sugar Maple leaf in enamelled copper
After twenty years, I still find a lot of joy in making lace leaves. They are small and do not take too much time to finish. With use of rich palette of wire colours, each leaf is different, and truly original.
I like to make them for my friends and family, and send them all over the world.
 Large leaf pendant
And I love to wear them, too, and wear them often. When I lost some over the years, I imagined that they joined their brothers and sisters in the nature. One leaf was by chance discovered in the following spring in a pile of compost in my garden. It was a little bit dirty, but otherwise survived well, its coloured enamel coating intact and shiny.
That’s why, when I say that wire lace is tough and will last forever, I mean it!
Fall season 2019 is upon us, and the trees are slowly starting to change their colours. I look forward to pinning one of my old, worn prickings to the lacemaking pillow, rediscovering the pattern and creating a few more magical leaves.
Lacemaking time is precious for me, and I savour every moment.
I enjoy paying a visit to the meditative space where my mind is set free, like a leaf released on a fresh, crisp autumn day. In slowness and quietness of hand work, Suzuki Roshi’s quote comes back. Applied to lace, it makes perfect sense :
One cross and twist are not just stitches; they mean the whole lace.
 Hunter’s Moon
Happy lacemaking!
Happy Easter, Happy Lace!
Posted on April 18, 2019
If you feel the spring energy surging and looking to manifest through you, here are some ideas for projects in wire lace! We have quite a collection of spring patterns in the New School of Lace design book… in bobbin lace as well as needle lace:


Some of them are available exclusively from Wire Lace Supplies shop on Etsy, the others were workshop projects that are still waiting to be published in the Pattern&Tutorial format.
Get inspired, have fun and express your creative self in wire lace!
Spring is here !
Posted on March 20, 2019

And a new Spring Garden Pattern & Tutorial is coming soon…
NEW: Pattern & Tutorial #12 – Snowflake
Posted on November 28, 2018

Available exclusively in my Wire Lace Supplies shop on Etsy.
Pattern #12: SNOWFLAKE is an ornament for winter festivities. It can be used as a decoration on a Christmas tree or windows, added to season’s greeting cards, or made as a gift for someone special. When fitted with a bail or attached to a bangle frame, the Snowflake can be worn as a pendant, especially when made in fine silver wire.
Required Wire Bobbin Lace Skills :
Plaits and Windmills (PT 001), Half Stitch (PT 002), Leaf Tallies and Sewings (PT 003)
Skill level: 1
Pairs: 4
This pattern looks great when made in Non-Tarnish Silver (0.2mm) or Ivory colour. But it can be done in many other colours: in gold it will look like a star, in red, purple or yellow, it will blossom as a flower. Imagination in wire lace has no boundaries!
lace | heart | art – time to start!
Posted on December 18, 2017
Time flies and it is less than 2 months to the lace|heart|art deadline. Download the free pattern, gather threads and wires in colours you love, and have a go!
 If you need any help with your entry, do not hesitate to contact us by posting a comment here, or by e-mail at lace.heart.art@gmail.com
Happy lacemaking,
the lace|heart|art team
New artworks added
Posted on November 14, 2017
Offering: West Coast Mandala Lace Sculpture
Reframed; Lost Art I & II Wall Art
Offering: Moon Reflection Wall Art


Offering: Moon Reflection
Posted on November 14, 2017

Handmade Bobbin Lace Wall Art
Material
steel wire, milky marble cabochons, glass seed beads, silk background
Techniques
handmade bobbin lace, beading
Size
75 x 27 cm
Making handmade lace art
Posted on November 12, 2017
(How much time does it take?)
Handmade lace art form is not very common in Canada. Whenever I exhibit or demonstrate lacemaking for public, many visitors comment that they have never seen anything like it before. And then comes a standard question: “How much time did it take to make this piece?”
I never know what to say, because I do not keep track of hours when I create. To answer, I usually estimate the number of hours, days, weeks or months that I spent on the project, with a postscript “…and thirty years of experience…”
Lacemaking is an old craft, that preceded invention of an electric power transmission by some 400 years, so there is a lot of manual labour involved in each step of the process. I thought it might be a good idea to explain here what is involved in making lace art, so I can refer any future inquirers to this post.
For this purpose, I chose to document a simpler project, a wall art piece “Offering: Moon Reflection”, as not to overwhelm the readers. Each step of the process is described below, followed by and approximate time count.
Step 1/ Finding a frame
Starting with a frame is simpler for me than creating the lace and then trying to find the right frame for it. I search for empty frames that invoke lace picture, or imagine the lace and then look for the right frame. When I saw this frame, I liked it, but did not buy. As I kept thinking about it, an image of a reflecting moon became clearer and clearer. Eventually, I went back for the frame. It would sit in my studio for a half a year until I had time to make the “Offering”.
(3 hours)
 Step 2/ Making a sketch
Drawing the image on paper is quick. Shown here is the small sketch with notes and some calculations of the future lace pattern.
(30 minutes)
 Step 3/ Choosing a pattern
Having a basic idea about shape and texture of the lace, I look for a pattern which fulfills the visual as well as structural demands of the piece. In this case, I needed rather simple two-dimensional lace in one colour. I envisioned only one pattern, but with a special requirement that it can be graded without losing continuity. To create an image of a water surface, I chose not to use a traditional lace pattern, but rather look for new, unique design with somewhat wavy effect. Perusing Veronika Irvine’s TesseLace, algorithmically designed lace tessellations, available as an Inkscape Bobbin Lace Application (courtesy of Veronika Irvine, tesselace.com), I selected a pattern number 4x4_217 and drafted a set of ten scaled grids. Using a computer program to create these grids is an enormous help to a lace designer, as it requires only a fragment of time that would be otherwise needed if the patterns were all drafted by hand.
(3 hrs)
 4/ Making lace samples
To make sure that the pattern will work, it is the best to make a sample. I used bobbins that were already wound (leftovers from a previous project) and made several swatches. The TesseLace grid is just an outline, showing the paths of the threads in lace. There is an unlimited number of stitch combinations that can be applied to that grid. I tried several options, from which the final design was chosen. This part of work is quite experimental, because even a slight adjustment of stitches can dramatically change the look of lace. Here the designer must rely on experience and also practice restraint, in order to avoid lengthy excursions into the amazing lace wonderland. There many ways to interpret one grid, and I had to decide for just one of them.
(6 hrs)
5/ Making pattern corrections
Comparing the samples revealed that the pattern in small size was right, but the enlarged size was too open, so I went back to the drafting program and used different parameters for scaling the grid. It took some fiddling to finalize grids for all ten segments of lace. My printer was not working smoothly that day, so this step took longer than it should.
(3 hours)
 6/ Preparing working templates (prickings)
In this standard procedure, the printed pattern is attached to a card stock, and covered with a clear plastic sheet. This working template, called a pricking, is then perforated with a pin vise at all cross points of the design. At each hole, a pin will be inserted to support wires during the lacemaking process. Therefore the final look of the finished lace largely depends on the template precision. Knowing that this pricking will be used only once (because this piece will be a one-of-a-kind original, made only once) I used a backing of a lighter card stock, which is easier and therefore faster to perforate.
(3 hours)
 7/ Winding the bobbins
Using just one size and type of wire in this project (stainless steel 0.2mm), the process of winding was straightforward. Because the lace was designed in ten strips, which will be connected together to cover the final width, only 18 pairs (36 pieces) of medium bobbins for wire lace were needed. I used my old mechanical bobbin winder to fill all bobbins with 2-ply of steel wire.
(2 hours)
8/ Making lace
The slowest, most laborious, and most time consuming, and also the most enjoyable part or the work is making the lace. Stitches are created one at the time, by twisting and crossing the threads in an exact sequence. At certain points, pins are placed in the pre-pricked holes. The pins hold the stitches and facilitate tensioning of the wires. Steel wire is willful and a requires a firm tension to create an even weave. This makes working with steel slower than with other wires.
 Work started at the first, narrowest pattern, and each consecutive segment was attached to the previous part by a special sewing technique.With this technique no additional assembly is required at the end.
(30 hrs – 3 hrs per segment x 10)
9/ Finishing lace
According to the design, all wire ends will be hidden under the frame, and therefore no special finishing was required. All ends were simply clipped off with wire cutters. Lace was checked for mistakes. Small errors were corrected, using a nudge tool and pliers. There was one big mistake caused by a wrong alignment of the prickings.. As soon as I spotted it it was sticking out from the pattern as a big irregularity. After much deliberation, I decided to leave the error in, as opposed to redoing the whole segment. The decision was rather atypical and defied my perfectionist tendencies, but as this lace represents ocean waves, which are fluid, free, and irregular, it seemed right to just leave it and let it be. Interestingly, as soon as I made this decision, the mistake was no longer so obvious.
(30 minutes)
10/ Preparing background
I chose a black silk fabric for the background, because it was as smooth and soft as a night sky. It always takes an extra bit of skill and time to stretch silk properly, but I feel it is worth the effort. Two milky marble cabochons, representing the moon and his reflection, were attached to the background.
(2 hours)
 11/ Mounting lace
This lace pattern had (as many bobbin lace patterns do) more twists than crosses, which, combined with willfulness of the stainless steel wire, caused the lace to curl. Therefore the finished lace had to be flattened before mounting. Then it was attached to a support frame. This extra inside frame will lift the lace slightly above the background surface, and give it a deeper perspective. It will also create a sufficient clearance for the lower cabochon.
(30 minutes)
12/ Beading
 Lace stretched on the support frame was ready for beading. I used seven kinds of beads to create an image of shimmering moonlight reflection in the water. For ease of working, I had the lace frame attached to a stretching board, but because of that I lost track of the background. When I checked, it did not look right. There were too many beads. I removed many rows and started all over. The second beading attempt was more successful and only a few small final touches were needed before it was finished.
(8 hours)
12/ Mat was measured and cut (30 minutes)
 13/ Framing
The whole piece was put together in a frame, hanging wire attached, back finished and signed.
(30 minutes)
14/ Photo documentation
The finished piece was photographed for documentation.
(30 minutes)
15/ Archiving
All drafts, prickings and working notes were compiled and archived for a future reference.
(1 hr)
Finished piece:
Title: Offering – Moon Reflection
Material:
steel wire, milky marble cabochons, glass seed beads, silk background
Techniques: handmade bobbin lace, beading
Size: 75 x 27 cm
Approximate total time: 64 hours (… and 30+ years of experience )
Copyright©2017 Lenka Suchanek. All rights reserved.
