 Lenka's Way of Lace
Free Trial Pattern for Wire Lace
Posted on June 2, 2020
Give wire lace a try in this easy excercise!

Handmade bobbin lace keeps evolving, and many contemporary lacemakers and lace artist use non-traditional materials, such as metal. In the last twenty years wire lace has gained considerable popularity, and more and more lacemakers are attracted to it.
Lacemakers who work with fibre are often curious about working with wire: How difficult is it? Can anybody do it? Are the special tolls really necessary?
Based on my experience of making lace with metal for more than 30 years and teaching wire lace techniques to others for almost as long, my answer is always affirmative: “Yes, you can do it!” and “Yes, it is better to have the right tools and materials for the best results”.
In the simple manual “Wire Lacework – Lenka’s Introduction to Bobbin Lace in Wire” written with an aim of helping lacemakers with the transition from fibre to wire lace, I explained the basic differences between tools and materials. A series of basic patterns for wire lace followed, each dedicated to a particular technique in full detail. These publications are available for purchase in my Wire Lace Supplies shop on Etsy, and many lacemakers have downloaded them already. Special bobbins for wire lace, together with colourful wires, are popular as well, and I am happy to supply them to lacemakers around the world to help make the wire lacework accessible to all.
But what about those who are not sure if they will like the medium? Or can’t justify investing in a new set of bobbins yet? For those of you, the new Trial Pattern for Wire Lace Newbies is here to help.
You can try making wire lace with the tools you already have and test the new medium in this simple trial pattern.
You will need:
- 6 pairs or regular lacemaking bobbins that you use for fibre lace
- copper wire
- old scissors for cutting wire
- lacemaking pillow (any style)
- pins
- materials for preparing the pricking (same as for fibre lace)
Let’s start from the beginning, with the most important points first:
1) Attitude
Approach this project as a playful excercise, and not as a serious assignment (rather like a first date, as opposed to a wedding day). Do not set any expectations and keep your mind open to the new experience. Wire is different than thread and it needs different handling. The best way to discover its qualities is to go slowly and pay close attention wire’s behaviour. Allow the wire to show you the way and follow gently. You know the stitches, and wire knows its own preferences. When you work together, you will make a fine team.
2) Wire
Make sure that you have the right wire. This is absolutely essential. Unsuitable material can turn you off wire lace forever, and that would be a real shame. I recommend copper wire in sizes 0.2mm – 0.25mm (in American Wire Gauges #30-32). Good quality copper wire should be soft and pliable to accommodate the stitches. Stay away from brass and aluminum and from wires with unknown content. While it is possible to work with those wires (later, when you have more experience), your first wire lace should be attempted with the most compatible wire, and that is a pure copper wire.
You can make a simple test of the wire pliability: cut a piece of wire and tie a basic bow with it. If you are able to work with the wire easily, and the knot can be tied almost as tightly as with a thread, the wire is suitable for lacework. If the wire feels stiff and the knot doesn’t close, the wire is not acceptable, because it has too much resistance to conform to the stitches.
Red bow – unknown content, coated – too thick and rigid – not suitable for wire lace
Purple bow – pure copper 0.2mm (AWG 32) – perfect for wire lace If your wire is not up to the standard, do yourself a favour and postpone the wire lace trial until you have the right material.
3) Lacemaking pillow
Any pillow will work for this pattern. I used a student pillow, that has been serving to beginners in my studio (and many of my own projects in between) for the last 5 years (and is still good to use!)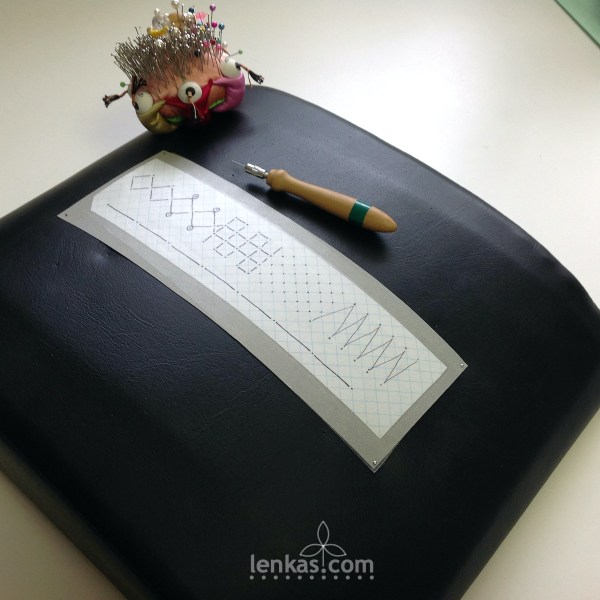 4) Pins
Generic dressmakers pins are better than fine lacemaking pins. In the sample, extra long dressmakers pins were used, and extra thick pins for picots.
5) Bobbins
Use the bobbins you would utilize for making lace with linen #40/2, which are generally bigger, thicker and heavier than those for fine lace. I used traditional Belgian Torchon bobbins that I recommend for students who are learning fibre lace basics.
It is important that the bobbins are not empty, but wound with thread. Leftovers from the past project are ideal. The threads will help to anchor wire, so it won’t be slipping and unwinding from the end.
PREPARATION:
Bobbin winding
Prepare 6 pairs:
0.9 meter (3ft) per bobbin [1.8m (6ft) total wire length for one pair, divided equally between 2 bobbins]
Match the fibre and wire end and tie them together with a simple knot. 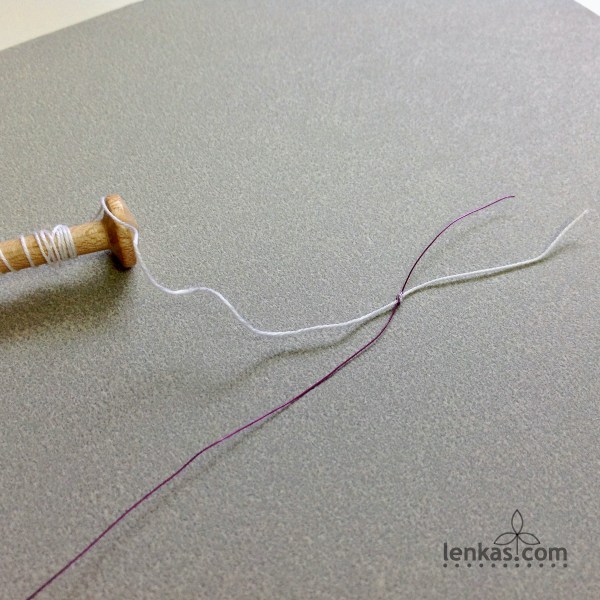 Start winding the wire at the lower part of the neck, wrapping several turns over the ends. This should bury the knot in the layers of fibre underneath, and hide the sharp wire end.
 Work slowly and watch the wire. Keep it open and free at all times to prevent kinks or snags. Observe your good habits from fibre lace and add wire by the means of turning the bobbin (as opposed to wrapping the wire around bobbin). Layer the wire rows over the thread, not too tightly, but not too loosely either. Secure the wire with a half hitch. This one loop is enough to hold the wire on the bobbin and is easy to release.
 Pricking
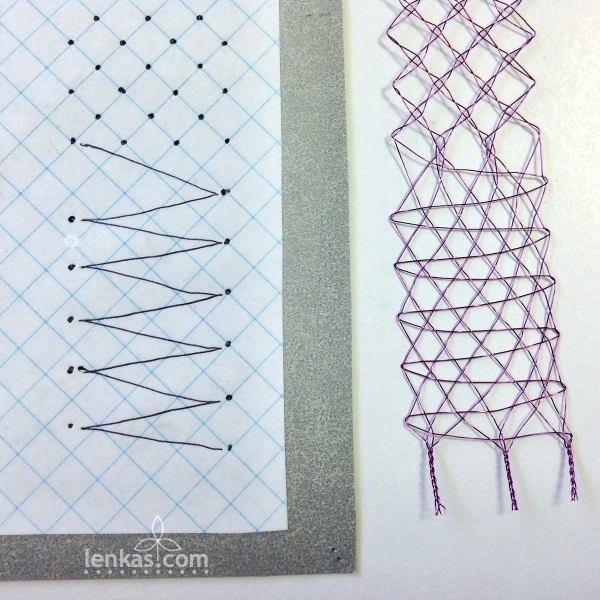
Using a squared paper: imperial 1/4 inch (metric 6x6mm or 5x5mm), draft the pattern as in the picture.  Alternatively, print the pricking from the Free Trial Pattern for Wire Lace Newbies pdf file
Make sure that your printer is set to 100% to print the correct size (size check is included next to the pricking).
 Prepare the pricking as you would for traditional fibre lace. If your pillow is on softer side, use a bit heavier card stock for backing. It will help anchor the pins to withstand firm tensioning.
WORKING INSTRUCTIONS:
Plaits
Hang 2 pairs on the vertical line’s top pin.
Keep the “leashes” short – wire length from the pin to bobbin’s head should not be more than one length of the bobbin. Work simple plait: *start with linen stitch (cloth stitch) C-T-C and tension. Continue braiding T-C-tension, T-C-tension, … until the pinhole is reached. Pin between the pairs.** Repeat from * to **
. Work slowly and concentrate on tensioning both pairs well after each Cross. Feel the wire and learn how much to pull in order to tension the plait well. Continue working until the braid is nice and even. Compared to fibre lace, the plait made from wire should be textured and three-dimensional.
 Unpin the plait and move it to the pillow side. Use another 2 pairs and repeat the plait work.
 Windmill Crossings and Picots
Pin both plaits above the pricking so they are ready to start working at the top of the main pattern. At the first pin, 4 pairs start with windmill crossing. With each pair working as one bobbin make C-T-pin-C, tension.
 After the windmill, two left pairs start with a linen stitch (C-T-C), and continue to plait (T-C-tension, T-C-t,…) towards left pinhole, pin between the pairs. Start the next plait towards the centre pin. When done, work with two right pairs in the same way (plait, pin, plait).
 . Make windmill crossing in the centre. Repeat.
In the 3rd diamond, add picot on the footside. Simple wrapped picot is easy: twist outside pair 3 times (tension after each twist: T-tension, T-tension, T-tension), wrap the twisted pair around the picot pin (clockwise movement on left footside, counterclockwise on right footside). Tension the picot well and start the outgoing plait with C-T-C.


When 4 diamonds are finished, take a short break: If you reached this point without encountering a major frustration, congratulations! That is a promising start. Reflect on your experience and let the new skills sink in.
If you feel that you could do better with more practice, unpin your lace, move it up and repeat 2 or 3 diamonds. When you are ready, proceed to the next part – plaited square grid.
Before you start, have a look at your bobbins – some wires might be short, some longer. Depending on your tensioning technique, sometimes wire gets released when the bobbin is pulled, and other times the pull actually tightens and locks the hitch. That is the nature of the half hitch, and the only remedy is to patiently adjust the lengths of the leashes by undoing the hitch and releasing wire if it is short, or re-winding if it is too long. When your bobbins are all adjusted to the same length, it’s time to proceed to the next segment of the pattern.
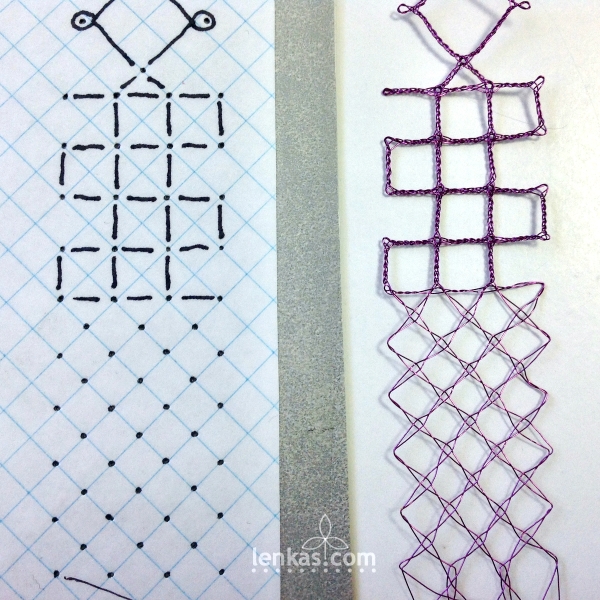
Plaited Square Grid
On the left side of the pricking, add 2 remaining pairs. Make a plait towards the next pin, work windmill crossing, plait, windmill crossing, plait, pin between pairs at the right edge pin. Continue working the grid. The intervals between the pins are identical, so each plait is the same length. It is helpful here to count number of plait stitches and repeat them in each segment to achieve uniformity of the braid. In the sample, I worked C-T-C to start the plait and then repeated T-C-tension 4 times (altogether 6 Crosses between the pins). In the last row of squares, I tensioned more and was able to squeeze one more T-C, to the total of 7 Crosses between the pins. See what you can do. Bear in mind that tensioning depends on the material. Every wire is slightly different, some are softer and therefore easier to tension, some are harder, and no matter how well you tension, minute gaps in the braid remain. That is fine, as long as the plait is nice and even.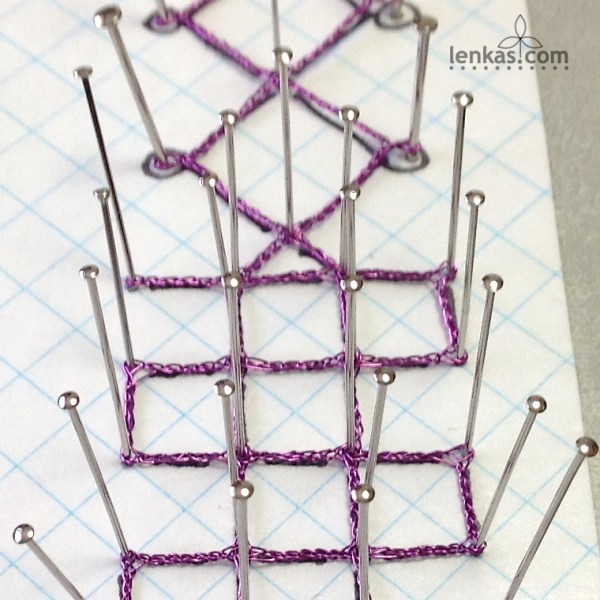 Before the last grid row (from left to right) leave the left plait pair behind, and finish the row with only the right pair: Twist the pair 3 times, work 3 pair windmill crossing, 3xT, 3-pair windmill crossing, pin under the pair at the edge pin hole. This distributes the pairs for the next segment: Torchon Ground.
 Torchon Ground
Torchon ground is easy to work and tension.The ground is done the same way as in fibre by following diagonal lines: C-T-pin-C-T-tension. Make sure to tension after each stitch. Once the wire is formed, it is hard to change its shape. Pulling on the diagonal pair at the end of the row, routinely used in fibre lace, is not very effective in wire medium.  Because wire keeps its shape so well, it does not require continual support of pins. It is therefore possible to start reusing pins from the top rows now.
 Half Stitch
The last part of this trial pattern is a half stitch weave. First row starts on the left, worker makes half stitch C-T with each passive pair. Tension the worker well at the end of the row. Pin, add one Twist to worker, tension. If the single worker line sags instead of being straight, undo the extra twist and re-tension every passive pair (starting from the beginning of the row, all the way to the last passive pair). Then re-tension the worker, add 1 extra twist to it (to the total of two twists). Continue with half stitch weave.
After the last row, plait the neighbouring pairs to create 3 tails. Cut off bobbins.
Unpin gently and admire your first wire lace 🙂
Results
A) If you enjoyed this excercise and are happy with the results, it means that you have a natural talent for wire lace. With what you learned already, you can start exploring other designs – more complex plaited lace or Torchon ground patterns. At the beginning, avoid patterns with cloth stitch. While easy to make in fibre, cloth stitch requires more experience in wire lace, and therefore it is better left for later.
B) If you had fun doing this excercise, but are not wholly satisfied with the outcome, try to work the pattern again and concentrate on the points which need improvement. Since you already know the stitches, it will be easier to pay more attention to the technique, and the outcome will be more competent.
C) If you did not have fun at all and are not thrilled with your first wire lace sample, it might mean that wire lace is not for you, and that is OK, too. You tried and now you know. There are many laces to choose from and lacemakers have to select wisely to which projects they will dedicate their time and effort. You can share your experience with your lace friends and tell them about the Trial Pattern for Newbies, so they can make their own wire lace sampler.
I hope that this Trial Pattern for Wire Lace Newbies encourages more lacemakers to give wire lace a try!
If you have any questions regarding this project or wire lace in general, feel free to ask using the LEAVE A REPLY box below.
Additional Information
To learn more about techniques used in this tutorial, the Flower Earrings Pattern and Tutorial (Basics #001) offers more information about plaits and windmills. Half Stitch Leaf Pattern and Tutorial (Basics #002) is dedicated to mastering half stitch weave, and also explains how to mix colours with doubled wires.
Lenka’s Wire Lace Bobbins
The more wire lace you make, the more you will understand why dedicated wire lace bobbins are beneficial. They are designed to anchor the wire ends securely, and to hold and release wire gently and quickly. Having thicker necks, the bobbins prevent excessive curling (and therefore hardening) of the material, which results in happier wire and consecutively, a happier lacemaker. Medium bobbins for wire lace are extremely easy to use, and they are suitable for many styles of wire lace and many sizes of projects. On top of it, they work equally well for metallic threads. In my humble opinion, they would enhance every lacemaker’s toolbox 🙂
Lenka’s Medium Bobbins for Wire Lace are available exclusively in my Wire Lace Supply online store, currently hosted on Etsy.

Medium bobbins for wire lace are extremely easy to use, and they are suitable for many styles of wire lace and many sizes of projects. On top of it, they work equally well for metallic threads.
In my humble opinion, they would enhance every lacemaker’s toolbox 🙂


Happy lacemaking,
Lenka
